Displays & controls, Front panel, 1 input selector dial – Pioneer VSA-AX10 User Manual
Page 32: 2standby/on button and power on _ /off — button, 3 standby indicator, 4 remote sensor, 7 input indicators, 8 listening mode selector dial (see p.51, step 6), 9 master volume dial, 10 acoustic cal. button (see p.58)
32
En
Displays & Controls
Front Panel
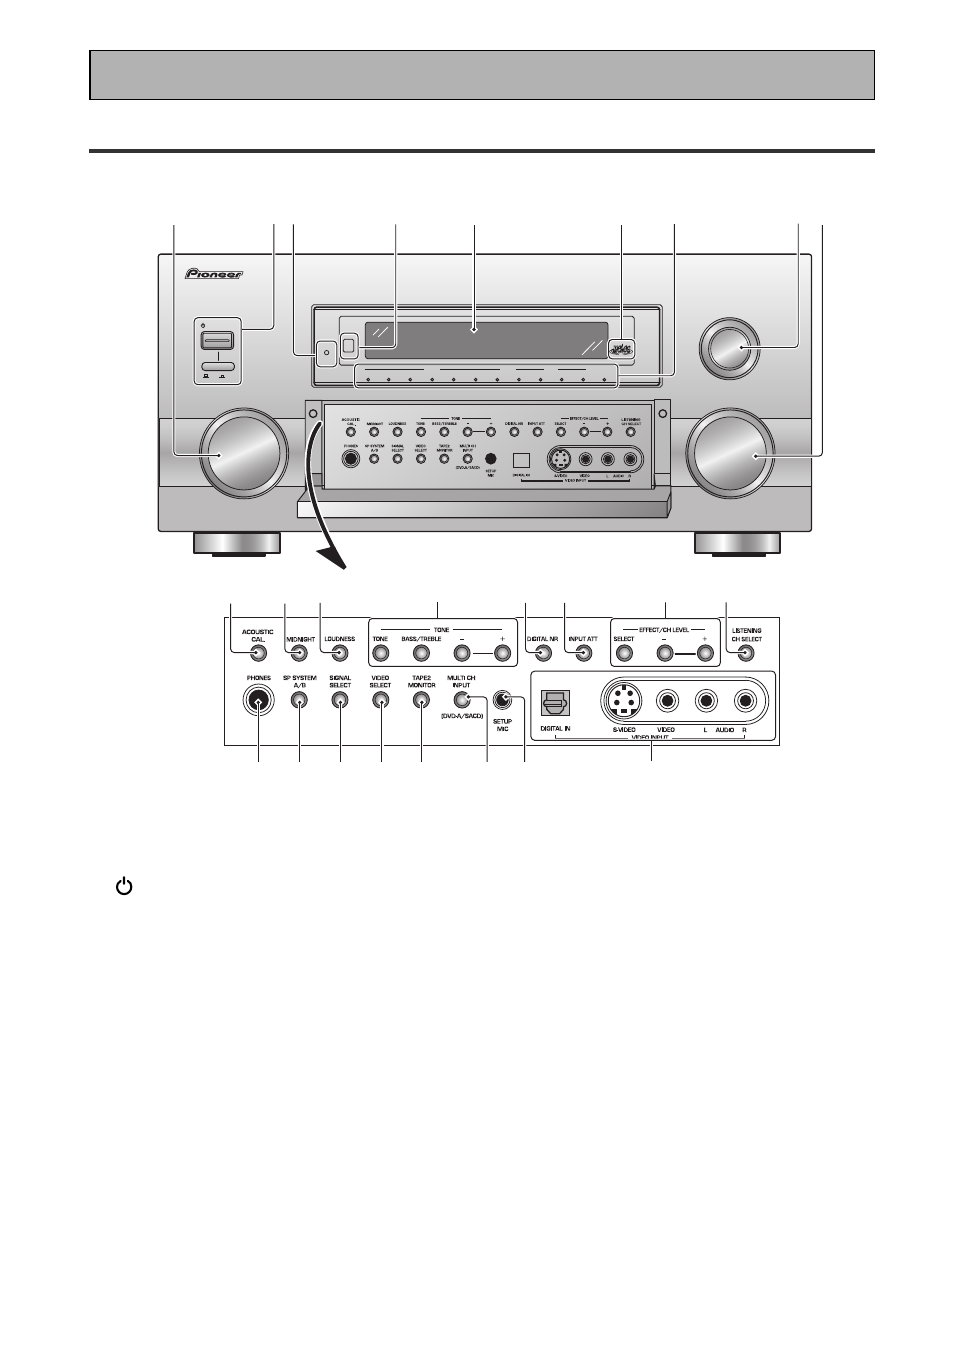
All the controls on the front panel are explained and/or referenced here. To open the front panel push
gently on the lower third of the panel.
1 INPUT SELECTOR dial
Turn to select a source component. The input
indicators show the current component.
2
STANDBY/ON button and power ON
_/OFF — button
Press to switch the amplifier ON or into
STANDBY mode. You can't operate the amplifi-
er when the mechanical power button is in the
OFF (
—) position.
3 STANDBY indicator
Lights when the amplifier is in STANDBY
mode. (Please note that this amplifier
consumes a small amount of power [0.65 W] in
the standby mode.)
4 Remote sensor
Receives the signals from the remote control.
5 Display (see p.39)
6 MCACC indicator (see p.58)
Lights when the ACOUSTIC CAL EQ is on.
(After the Auto Surround Sound Setup has
been completed the ACOUSTIC CAL EQ is set
on and this display will light.)
7 INPUT indicators
Shows which source component is selected.
The MULTI CH INPUT indicator lights when a
component connected to MULTI CH INPUT is
selected. When an unassigned i.LINK-equipped
component is selected, no INPUT indicator will
light.
8 LISTENING MODE SELECTOR dial (see
p.51, step 6)
Turn and push to select a listening mode.
9 MASTER VOLUME dial
Adjusts the overall amplifier volume.
10 ACOUSTIC CAL. button (see p.58)
Use to switch on and off the Acoustic Calibra-
tion EQ.
STANDBY/ON
OFF
ON
STANDBY
DVD/LD
TV/DVD
SAT
VIDEO
VIDEO
AUDIO
VCR1/DVR
VCR2
VCR3
CD
TUNER
PHONO
CD-R/
TAPE1/MD
MULTI CH
INPUT
INPUT SELECTOR
LISTENING MODE SELECTOR
PUSH ENTER
MASTER VOLUME
VSA-AX10
AUDIO VIDEO MULTI-CHANNEL AMPLIFIER
0
- =
+
%
^
&
*
(
_
)
~
#
!
@
$
1
2 3
5
4
7
6
8 9