Remote control (in case of sc-lx85), 01 before you start, Using avnavigator – Pioneer SC-LX75 User Manual
Page 7: Deleting the avnavigator
En
7
01
Before you start
Using AVNavigator
1 Click [AVNavigator] on the desktop to
launch AVNavigator.
AVNavigator is launched and Wiring Navi
starts up. The language selection screen
appears. Follow the instructions on the screen
to make the connections and automatic
settings.
Wiring Navi only starts up automatically the
first time AVNavigator is launched.
2 Select and use the desired function.
AVNavigator includes the following functions:
! Wiring Navi – Guides you through
connections and initial settings in dialog
fashion. High precision initial settings can be
made easily.
! Interactive Manual – Automatically displays
the pages explaining the functions that have
been operated on the receiver. It is also
possible to operate the receiver from the
Interactive Manual.
! Glossary – Displays glossary pages.
! MCACC Appli – Displays Advanced
MCACC measurement results vividly on the
computer.
There are special operating instructions
for MCACC Application. These instructions
are included in the AVNavigator
Interactive Manual’s menus. Refer to them
when using MCACC Application.
! Software Update – Allows various types of
software to be updated.
! Settings – Used to make various
AVNavigator settings.
! Detection – Used to detect the receiver.
Note
To use the AVNavigator of another model, first
uninstall (delete) this receiver’s AVNavigator,
then install the AVNavigator of the other model.
Deleting the AVNavigator
You can use the following method to uninstall
(delete) the AVNavigator from your PC.
% Delete from the Control Panel of the
PC.
From the Start menu, click “Program”
d “PIONEER CORPORATION” d
“AVNavigator(SC-LX85 or SC-LX75)”
d
“Uninstall”.
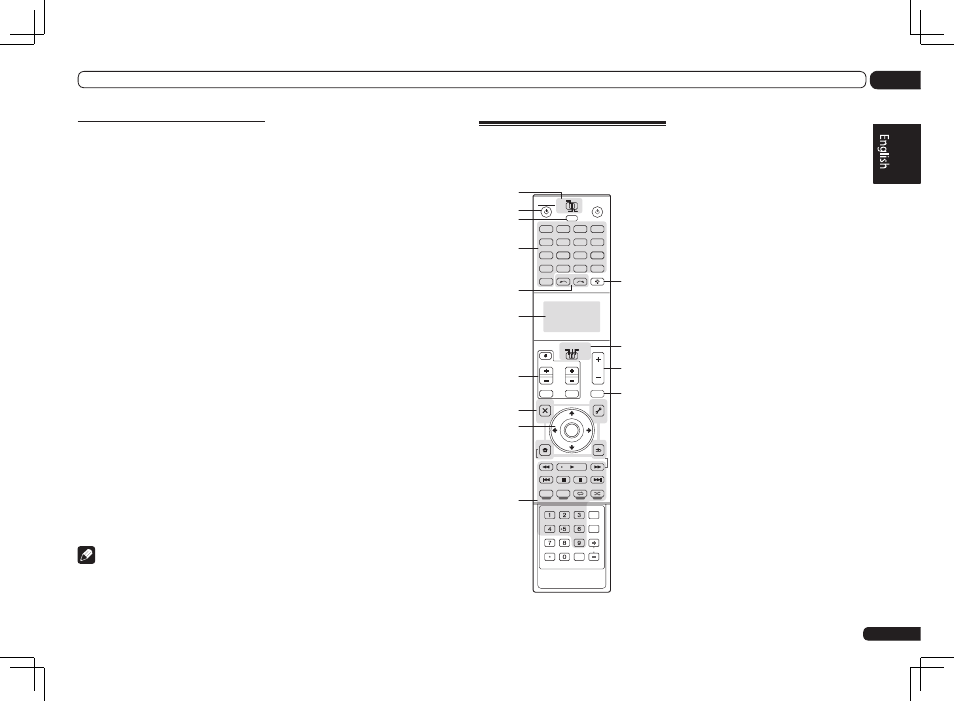
Remote control
(In case of SC-LX85)
This section explains how to operate the remote
control for the receiver.
DVD
RECEIVER
SOURCE
MAIN
MULTI
OPERATION
AUDIO
PARAMETER
TOP MENU
BAND
iPod CTRL
PTY SEARCH
CATEGORY
LIST
TOOLS
HOME
MENU
STATUS
THX
PQLS
MPX
MEMORY
PHASE CTRL
CH LEVEL
T.EDIT
GUIDE
VIDEO
PARAMETER
ZONE2
SOURCE
TV
RECEIVER
3
iPod
USB
OPTION
MULTI CH
ADAPTER
NET RADIO
INPUT SELECT
LIGHT
CD
PHONO
AUX
INPUT
MUTE
TUNE
TUNE
PRESET
PRESET
MUTE
PGM
MENU
VOL
VOL
TV CONTROL
CH
VIDEO
CD-R
STEREO
SIGNAL SEL SLEEP
AUDIO
INFO
DIMMER
A.ATT
CLR
SBch
MCACC
HDMI OUT
D.ACCESS
ENTER
CLASS
DISP
CH
AUTO/ALC/
DIRECT
STANDARD ADV SURR
IN
TUNER
HMG
BD
TV
HDMI
DVR
BDR
1
2
ENTER
RETURN
1
2
3
4
7
8
9
10
5
6
11
12
13
14
The remote has been conveniently color-coded
according to component control using the follow-
ing system:
! White – Receiver control, TV control
! Blue – Other controls (See the Operating
Instructions in CD-ROM for detail.)
1 MULTI-ZONE operation selector switch
Switch to perform operations in the main zone,
ZONE 2 and ZONE 3.
2 u RECEIVER
This switches between standby and on for this
receiver.
3 MULTI OPERATION
Use this button to perform multi operations.
4 Input function buttons
Press to select control of other components.
There are no AUX and CD-R inputs on this
receiver, so the AUX and CD-R buttons cannot
be used.
5 INPUT SELECT
Use INPUT SELECT
c/ d to select the input
function (page 28).
6 Character display
This display shows information when trans-
mitting control signals. The remote screen’s
display differs when operating the receiver by
sending infrared signals from the remote con-
trol and when operating it by RF two-way com-
munications. For details, see Remote control
display on page 8.
7 TV CONTROL buttons
These buttons are dedicated to control the TV
assigned to the TV operation selector switch.
8 Receiver setting buttons
Set the remote control operation selector
switch to RECEIVER first to access:
! AUDIO PARAMETER – Use to access the
Audio options.
! VIDEO PARAMETER – Use to access the
Video options.
! HOME MENU – Use to access the Home
Menu.
! RETURN – Press to confirm and exit the
current menu screen.