Single), 02 connecting your equipment, About hdmi – Pioneer SC-LX75 User Manual
Page 19: Connecting your tv and playback components, Connecting using hdmi
En
19
02
Connecting your equipment
About HDMI
The HDMI connection transfers uncompressed
digital video, as well as almost every kind of
digital audio.
This receiver incorporates High-Definition
Multimedia Interface (HDMI
®
) technology.
This receiver supports the functions described
below through HDMI connections.
! Digital transfer of uncompressed video
(contents protected by HDCP (1080p/24,
1080p/60, etc.))
! 3D signal transfer
! Deep Color signal transfer
! x.v.Color signal transfer
! ARC (Audio Return Channel)
! Input of multi-channel linear PCM digital
audio signals (192 kHz or less) for up to 8
channels
! Input of the following digital audio formats:
— Dolby Digital, Dolby Digital Plus, DTS, High
bitrate audio (Dolby TrueHD, DTS-HD Master
Audio, DTS-HD High Resolution Audio),
DVD-Audio, CD, SACD (DSD signal), Video
CD, Super VCD
! Synchronized operation with components
using the Control with HDMI function (see
Control with HDMI function on Operating
Instructions in CD-ROM)
Note
! An HDMI connection can only be made
with DVI-equipped components compatible
with both DVI and High Bandwidth Digital
Content Protection (HDCP). If you choose to
connect to a DVI connector, you will need a
separate adaptor (DVI
dHDMI) to do so. A DVI
connection, however, does not support audio
signals. Consult your local audio dealer for
more information.
! If you connect a component that
is not compatible with HDCP, an
HDCP ERROR message is displayed on the
front panel display. Some components that
are compatible with HDCP still cause this
message to be displayed, but so long as there
is no problem with displaying video this is not
a malfunction.
! Depending on the component you have
connected, using a DVI connection may result
in unreliable signal transfers.
! This receiver supports SACD, Dolby Digital
Plus, Dolby TrueHD and DTS-HD Master
Audio. To take advantage of these formats,
however, make sure that the component
connected to this receiver also supports the
corresponding format.
! Use a High Speed HDMI
®
cable. If an HDMI
cable other than a High Speed HDMI
®
cable is
used, it may not work properly.
! When an HDMI cable with a built-in equalizer
is connected, it may not operate properly.
! Signal transfer is only possible when
connected to a compatible component.
! HDMI format digital audio transmissions
require a longer time to be recognized. Due to
this, interruption in the audio may occur when
switching between audio formats or beginning
playback.
! Turning on/off the device connected to this
unit’s HDMI OUT terminal during playback,
or disconnecting/connecting the HDMI
cable during playback, may cause noise or
interrupted audio.
HDMI, the HDMI logo, and High-Definition
Multimedia Interface are trademarks or regis-
tered trademarks of HDMI Licensing LLC in the
United States and other countries.
“x.v.Color” and
are trade-
marks of Sony Corporation.
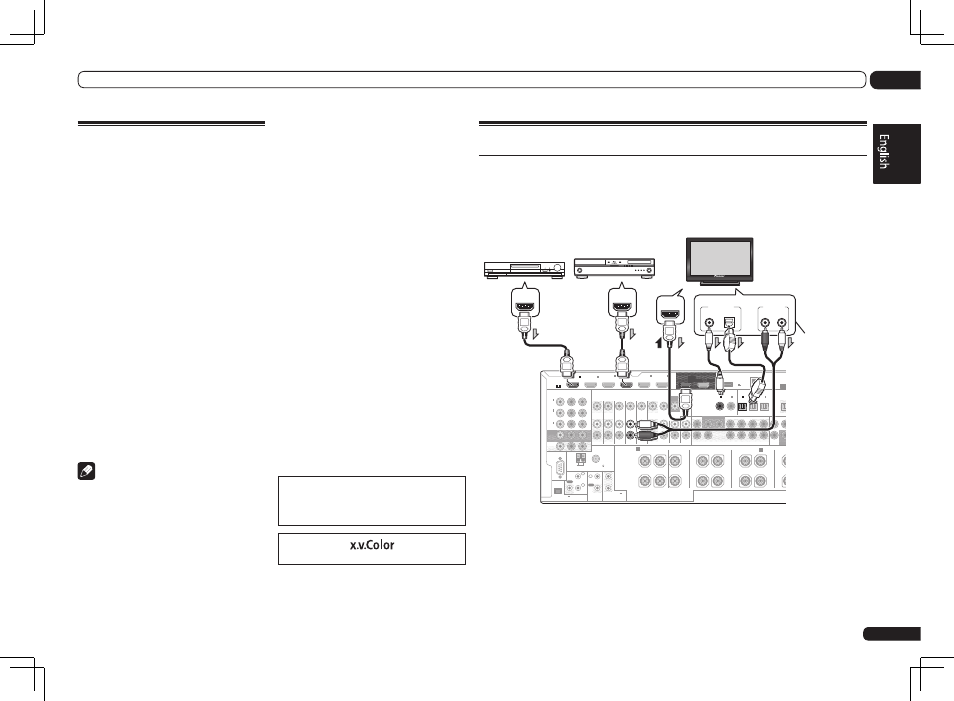
Connecting your TV and playback components
Connecting using HDMI
If you have an HDMI or DVI (with HDCP) equipped component (Blu-ray Disc player (BD), etc.), you
can connect it to this receiver using a commercially available HDMI cable.
If the TV and playback components support the Control with HDMI feature, the convenient Control
with HDMI functions can be used (see Control with HDMI function on Operating Instructions in
CD-ROM).
RS-232C
ZONE 2
IN
IN
IN
IN
DVR/BDR
OUT
OUT
ZONE 3
OUT
TV/SAT
VIDEO
IN
PHONO
GND
SIGNAL
CD IN
DVD
OUT 1
(CONTROL)
OUT 2
PRE OUT
SUBWOOFER
1
2
COMPONENT VIDEO
Y
P
B
P
R
ASSIGNABLE
MONITOR
OUT
ZONE2
OUT
(DVD)
IN
1
(DVR/
BDR)
IN
2
(VIDEO)
IN
3
FRONT
CENTER
SURROUND SURR BACK F HEIGHT
F WIDE
CENT
FRONT
(
CD)
(
DVD)
COAXIAL
ASSIGNABLE
IN
1
IN
2
(
DVR/BDR)
(
TV/SAT)
OPTICAL
ASSIGNABLE
IN
1
IN
2
IN
3
OU
(
VIDEO)
(OUTPU
0.1 A
ADAPTE
CU-RF100
DC OUTPUT
for WIRELESS LAN
(10/100)
LAN
(OUTPUT
5 V
0.6 A MAX)
FRONT
CENTER
R
L
R
L
R
L
R
(Single)
SPEAKERS
FRONT WIDE /
B
FRONT HEIGHT
A
FM UNBAL 75
AM LOOP
ANTENNA
(OUTPUT 5 V
150 mA MAX)
CONTROL
IR
OUT
IN
OUT
IN 1
IN 2
2
1
12 V TRIGGER
(OUTPUT 12 V
TOTAL 150 mA MAX)
VIDEO
AUDIO
MONITOR
OUT
HDMI
BD IN
(VIDEO)
IN
1
IN
2
IN
4
(DVD)
IN
5
(DVR/BDR)
IN
6
ASSIGNABLE
1 6
SUBWO
DIGITAL OUT
COAXIAL
OPTICAL
ANALOG
R
L
AUDIO OUT
HDMI IN
HDMI OUT
HDMI OUT
HDMI/DVI-compatible
Blu-ray Disc player
Other HDMI/DVI-
equipped component
HDMI/DVI-compatible
monitor
Select one
This connection
is required in
order to listen to
the sound of the
TV over the
receiver.
(ARC)
! When connecting to an HDMI/DVI-compatible monitor using the HDMI OUT 2 terminal, switch
the HDMI output setting to HDMI OUT 2 or HDMI OUT ALL. See Switching the HDMI output on
Operating Instructions in CD-ROM.
! For input components, connections other than HDMI connections are also possible (see
Connecting your DVD player with no HDMI output on page 20).
! If you want to listen to the sound of the TV over the receiver, connect the receiver and TV with audio
cables.
— When the TV and receiver are connected by HDMI connections, if the TV supports the HDMI ARC
(Audio Return Channel) function, the sound of the TV is input to the receiver via the HDMI OUT
terminal, so there is no need to connect an audio cable. In this case, set TV Audio at HDMI Setup
to via HDMI (see HDMI Setup on Operating Instructions in CD-ROM).