Pioneer DDJ-SX User Manual
Page 14
14
En
r
CENSOR button
Press:
The track is played in the reverse direction while the [CENSOR] but-
ton is pressed, and normal playback resumes when the button is
released.
! Even during playback in the reverse direction, normal playback
continues in the background. When the button is released, play-
back resumes from the point reached in the background.
[SHIFT] + press:
The track is played in the reverse direction. When the [SHIFT] and
[CENSOR] buttons are pressed again, reverse playback is canceled
and normal playback resumes.
s
PANEL SELECT button
Press:
The panel display switches in the order below each time the button
is pressed.
Panel display off
l [REC] panel l [FX] panel l [SP-6] panel l
Panel display off ...
[SHIFT] + press:
The panel display switches in the order below each time the button
is pressed.
Panel display off
l [SP-6] panel l [FX] panel l [REC] panel l
Panel display off ...
! When Serato-Video is installed and enabled at the [SETUP]
menu, a key for switching to the [VIDEO] panel is displayed on
the Serato DJ software screen. To display the [VIDEO] panel, use
the mouse to click this key for switching to the [VIDEO] panel.
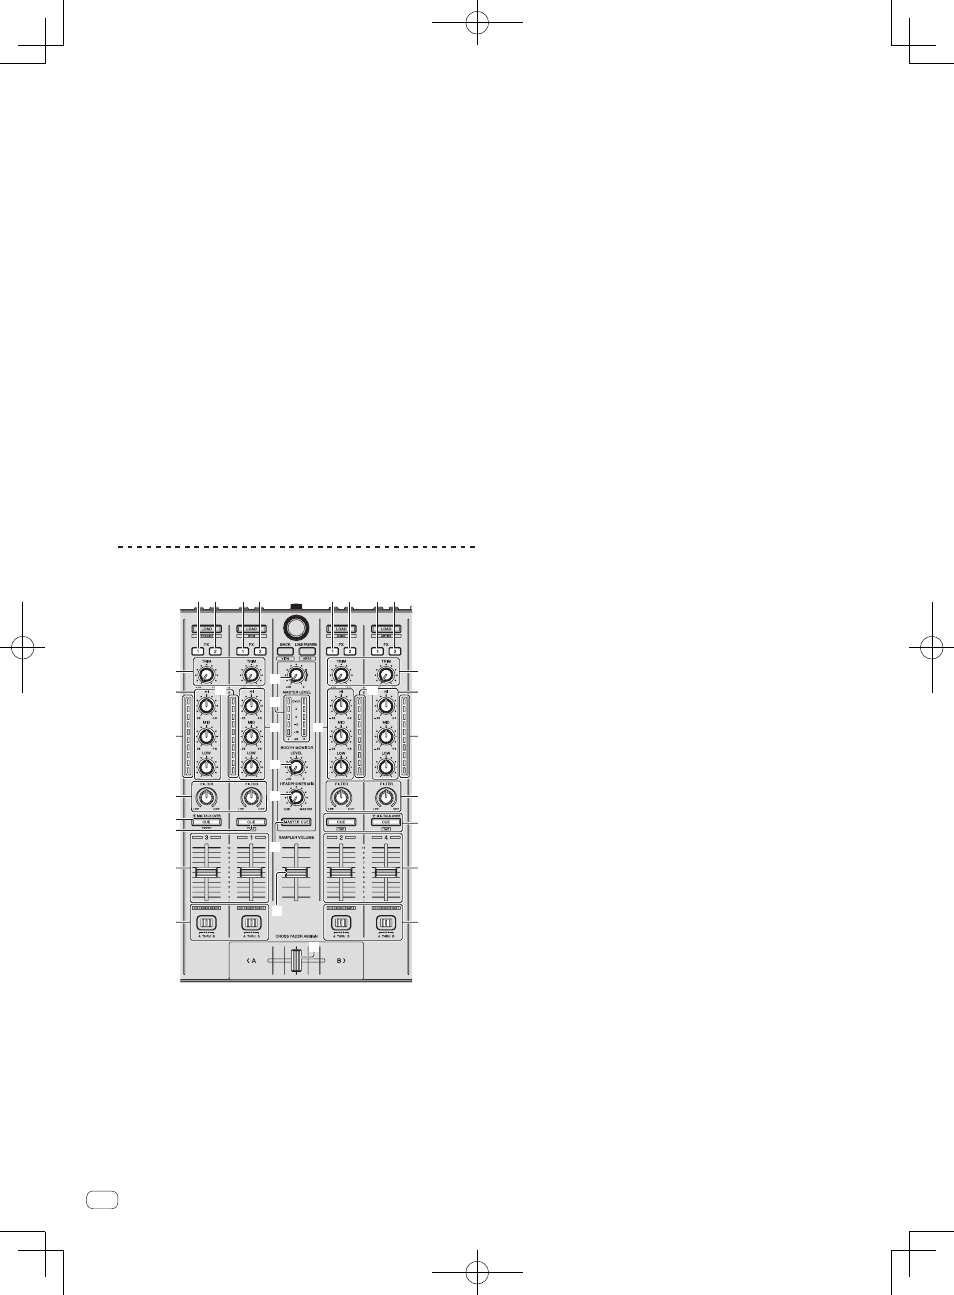
Mixer section
c
d
4
4
e
g
f
h
b
1 2
1 2
1 2
1 2
5
3
9
7
4
6
a
5
5
5
3
8
7
4
6
9
8
1
FX 1 assign button
Turns effect unit FX1 on and off for the respective channel.
2
FX 2 assign button
Turns effect unit FX2 on and off for the respective channel.
3
TRIM control
Adjusts the individual channel output gain.
4
EQ (HI, MID, LOW) controls
Boosts or cuts frequencies for the different channels.
5
Channel Level Indicator
Displays the sound level of the respective channels before passing
through the channel faders.
6
FILTER control
Applies the filter effect for the respective channel.
The original sound is output when the control is at the center
position.
Turn counterclockwise: Gradually decreases the low-pass filter’s
cutoff frequency.
Turn clockwise: Gradually increases the high-pass filter’s cutoff
frequency.
7
Headphones CUE/MIC TALK OVER button
Press:
The sound of channels for which the headphones [CUE] button is
pressed is output to the headphones.
! When the headphones [CUE] button is pressed again, monitoring
is canceled.
When the [INPUT SELECT] switch for channel 3 or 4 is set to [MIC1]
or [MIC2], the talkover function can be turned on or off.
When the talkover function is on, the headphones [CUE/
MIC TALK OVER] button flashes. When a sound of over -15 dB is
input to the microphone, the sound other than that of the micro-
phone is attenuated by approximately 20 dB.
! The talkover function for both the microphone connected to the
[MIC1] terminal and the microphone connected to the [MIC2]
terminal can be turned on and off by pressing the headphones
[CUE/MIC TALK OVER] button for either channel 3 or channel 4.
[SHIFT] + press:
The track’s tempo can be set by tapping the button. (Tap function)
! When the Tap function is used, the display of the deck section on
the computer’s screen switches to the [Beatgrid Editer] display.
Click [Edit Grid] on the computer’s screen.
8
Headphones CUE button
Press:
The sound of channels for which the headphones [CUE] button is
pressed is output to the headphones.
! When the headphones [CUE] button is pressed again, monitoring
is canceled.
[SHIFT] + press:
The track’s tempo can be set by tapping the button. (Tap function)
! When the Tap function is used, the display of the deck section on
the computer’s screen switches to the [Beatgrid Editer] display.
Click [Edit Grid] on the computer’s screen.
9
Channel fader
Move:
Adjusts the level of audio signals output in each channel.
[SHIFT] + move:
Use the channel fader start function.
For details on the channel fader start function, see Using the channel
fader start function on page 25.
a
Crossfader Assign Switch
Assigns the channel output to the crossfader.
[A]: Assigns to [A] (left) of the crossfader.
[B]: Assigns to [B] (right) of the crossfader.
[THRU]: Selects this when you do not want to use the crossfader.
(The signals do not pass through the crossfader.)
b
Crossfader
Outputs the sound assigned with the crossfader assign switch.
c
MASTER LEVEL control
Adjusts the master sound level output.
d
Master level indicator
Displays the master output’s audio level.
e
Booth monitor level control
Adjusts the level of audio signals output from the [BOOTH] terminal.