3 the audio menu, 4 the osd menu, 3 connecting to vp-438 via rs-232 – Kramer Electronics VP-438 User Manual
Page 17: Connecting to vp-438 via rs-232
14
VP-438 - Controlling the VP-438
6.2.3
The AUDIO Menu
The following table defines the AUDIO menu.
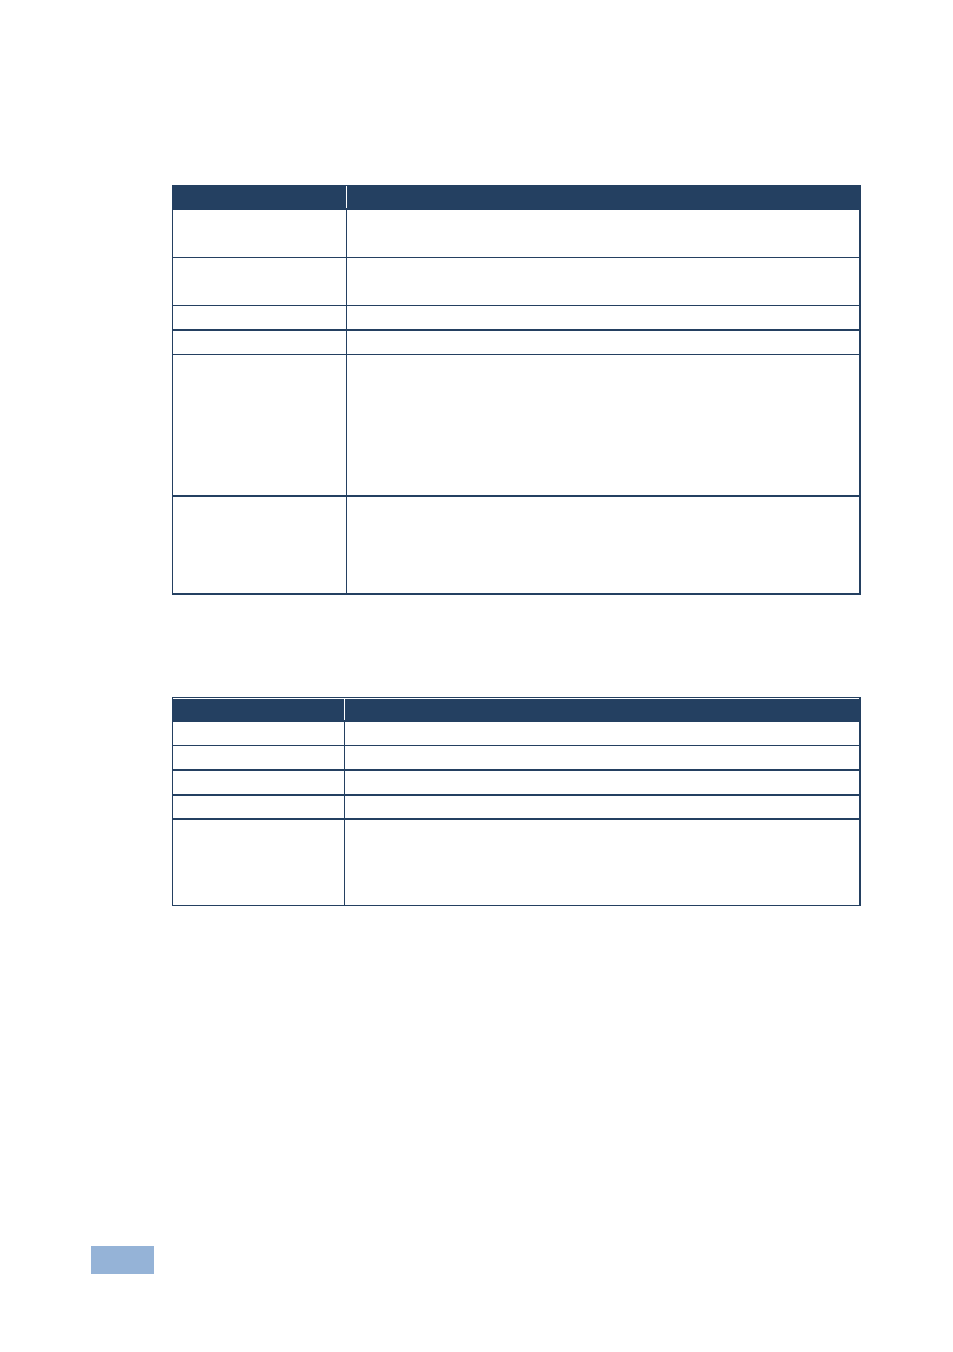
Parameter
Function
OUTPUT VOLUME
Set the output volume (from 0 to 100)
Not applicable for embedded HDMI audio inputs
INPUT VOLUME
Set the input volume (from 0 to 100)
Not applicable for embedded HDMI audio inputs
DELAY
Select the audio delay time: OFF, 40ms, 110ms and 150ms
SOUND
Select the sound options: ON, MUTE
MUTE FOLLOWS
Select the action that will be followed by mute: INDEPENDENT,
FREEZE, BLANK, FREEZE/BLANK
INDEPENDENT means that the audio muting is independent of the
FREEZE and BLANK functions
FREEZE/BLANK means that when you FREEZE or BLANK the video, then
the audio will be muted (the MUTE function follows the FREEZE and the
BLANK functions)
HDMI AUDIO IN
Enabled only when one
of the HDMI inputs is
selected
Select AUTOMATIC (In this case, the embedded audio on the HDMI
input is selected for an HDMI signal, or the analog audio input is
selected if the input is not HDMI (for example, for a DVI input signal),
EMBEDDED (In this case, the embedded audio in the HDMI signal is
selected) or ANALOG (In this case, the analog audio input is selected)
6.2.4
The OSD Menu
The following table defines the OSD menu.
Parameter
Function
H POSITION
Set the horizontal position of the OSD (from 0 to 100)
V POSITION
Set the vertical position of the OSD (from 0 to 100)
TIMER
Set the timeout period in seconds (from 5 to 100)
BACKGROUND
Set the OSD background between 0 (solid black) and 8 (transparent)
DISPLAY
Select the information shown on the screen during operation:
ON - the information is shown permanently
OFF - the information is not shown
INFO - the information is shown for a few seconds
6.3
Connecting to VP-438 via RS-232
You can connect to the VP-438 via an RS-232 connection using, for example, a
PC. Note that a null-modem adapter/connection is not required.
To connect to the VP-438 via RS-232, connect the RS-232 9-pin D-sub rear panel
port on the VP-438 unit via a 9-wire straight cable (only pin 2 to pin 2, pin 3 to pin
3, and pin 5 to pin 5 need to be connected) to the RS-232 9-pin
D-sub port on your PC.