Brocks Performance ShortMeg Full System 14'' Muffler Yamaha FZ-09 User Manual
Page 2
Document ID 996525
Page 2 of 3
Step 3:
Remove the OEM Exhaust
System:
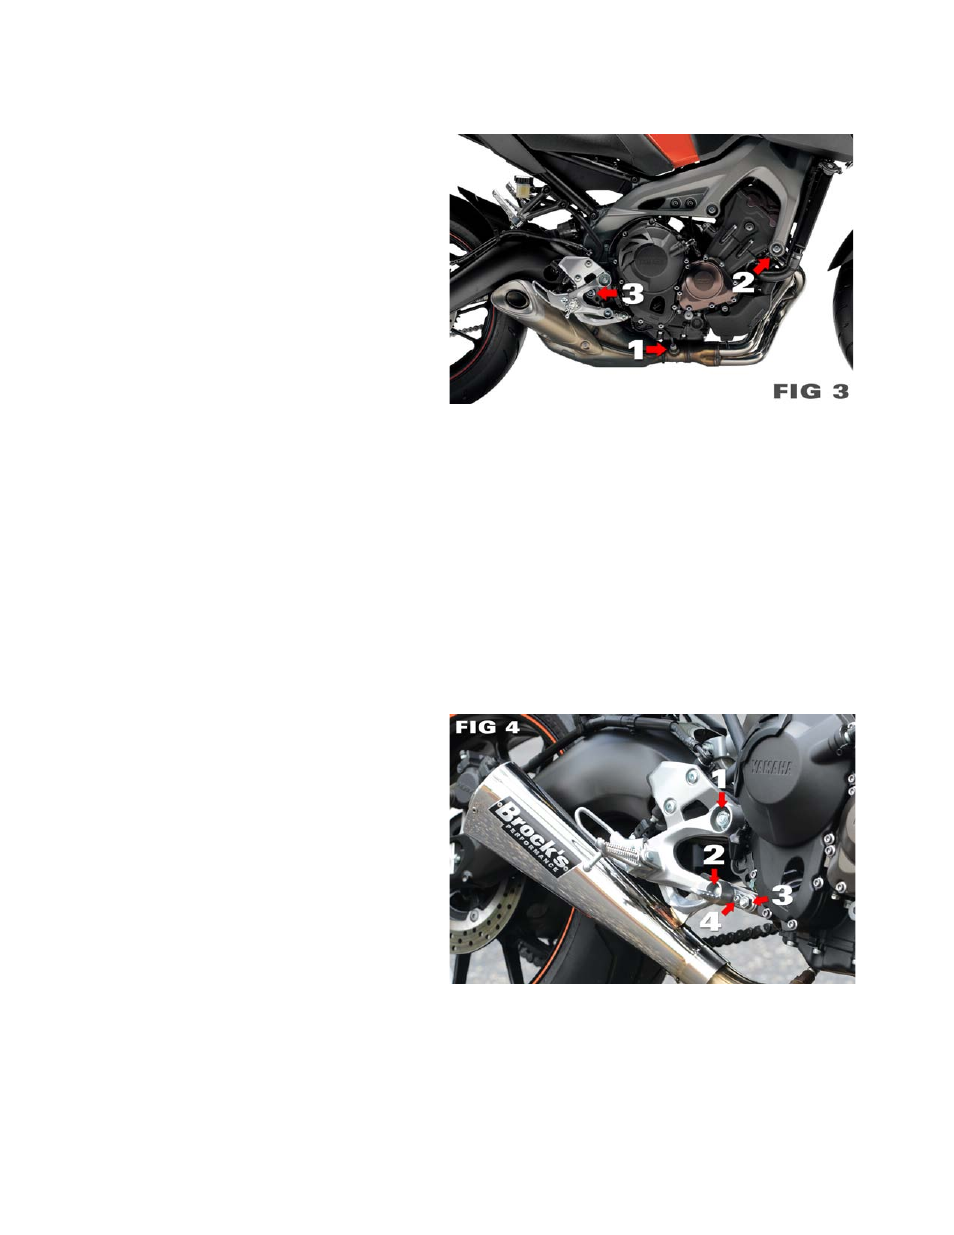
Start by removing the O2 sensor from
the OEM head pipe (Location 1) shown in (Figure
3). Next you will loosen the nuts on all three head
pipes (Location 2) shown in (Figure 3), but do not
completely remove. The muffler/catalytic
converter has two bolts holding it in place.
Remove the two bolts (one on each side)
(Location 3) shown in (Figure 3) and then finish
removing the head pipe nuts. You can now
remove the complete OEM exhaust assembly.
Step 4: Install the Head Pipe
Mounting Flanges:
Install the three head
pipe mounting flanges, reusing the OEM nuts and gaskets. Do not completely tighten the nuts. Leaving them
finger tight will allow easier adjustment when the head pipe is fitted. The nuts will be fully tightened after the
head pipe is installed.
Step 5: Install the Head Pipe and Mid-Pipe Assembly:
Install the head pipes onto the three
head pipe mounting flanges. With the head pipe assembly now installed onto the mounting flanges, tighten the
mounting flange nuts enough to keep the flanges from moving. Remove the head pipe assembly and torque the
flange nuts. Do not over tighten. Max recommended torque is 10 ft-lb.
Prior to final installation of the head pipes, apply a very thin layer of Permatex™ Ultra Copper® to the inside of
each head pipe, no further than 1/2” into the pipe. This will ensure a high temperature seal is created. Be careful
to avoid contact with the radiator while installing the head pipes. Install head pipes onto flanges as far as they
will go, then connect the springs to spring tabs on the head pipes using the supplied spring puller. You can now
connect the mid-pipe onto the head pipes using the supplied springs to secure it in place. ‘Wiggling’ the entire
assembly with the springs installed will pull the pipes into their final location. Reinstall the O2 sensor.
Step 6: Install the Muffler Mounting
Bracket:
To install the muffler mounting
bracket you will need to unbolt the rear brake side
rear set. It is held on with a nut (Location 1) and
bolt (Location 2) shown in (Figure 4). Once you
have those removed, pull the rear set back and
also remove the spacer that the rear set attaches
to. This is held on with a nut (Location 3) and a
hex head screw (Location 4) shown in (Figure 4).
You will then put the muffler-mounting bracket
between the spacer and the frame lining up the 3
bolt holes, then reinstall the spacer. Finally put the
larger supplied spacer between the top rear set
bolt hole at (Location 1) and the frame, then
reinstall rear set.
Step 7: Install Muffler:
Install the muffler onto the mid-pipe. Adjust as necessary to ensure that the
mounting bracket aligns with the muffler-mounting tab. Insert the supplied bolt/washer through the muffler tab
and mounting bracket with the washer on the front side and hand tighten the nut on the backside. Install the
spring holding the muffler to the collector. ‘Wiggle’ the system to insure fitment and then tighten the bolt holding
the muffler to the mounting bracket. Torque the muffler-mount bolt to 34 N-m or (25 ft-lb).