Martin Universal Design 92-20411 Avanti II Easel Assembly User Manual
Page 2
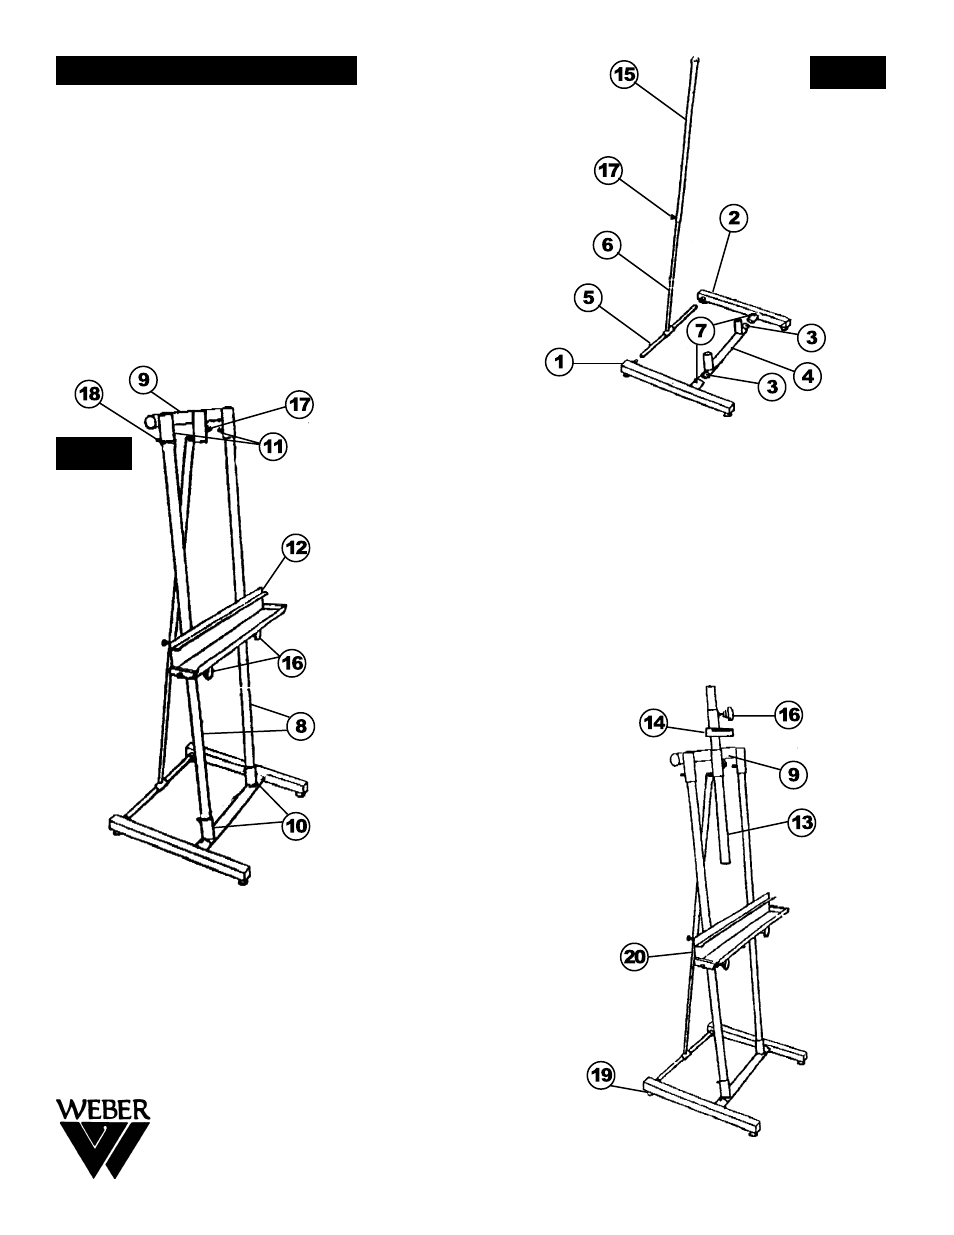
FIGURE A.
Thread part #3 Joiner into part #4 Lower front support.
Put part #5 Lower back joiner into part #6 Lower tilt support
bar and then place part #15 Upper tilt support over the tube
of part #6 Lower tilt support bar.
Screw part #17 Small knob into part #15 Upper tilt support.
Insert part #1 Left Leg into end of #5 Lower back joiner and
into part #3 Joiner. Repeat with right side. Insert part #2
Right leg into end of #5 Lower back joiner and into part #3
Joiner.
Secure part #1 and #2 to part #4 Lower front support using
two #7 Allen screws. Tighten with Allen wrench.
4444 Lawton Avenue, Detroit MI 48208 USA Tel:(313)895-0700 • Fax:(313)895-0709
E-mail: [email protected] • Visit us at: www.MartinUniversalDesign.com
Assembly Instructions
FIG A
FIGURE B.
Insert part # 8 Tray support arms into part #4 Lower front
support. Secure with #10 Allen screws into part #4 lower
front support. Tighten by using Allen wrench.
Proceed by sliding part #12 Tray down over parts #8.
Secure by screwing #16 Large knobs into part #12.
Then slide #9 Top support over the top of #8 and attach #15
Upper tilt support to #9 Top support with #18 Allen screw
with nut. Then screw #11 Allen screws into #9 Top support
to hold in place.
FIG B
FIGURE C.
Insert #13 Top center tube through part #14 Top Canvas
holder and then tighten with #16 Large knob.
Then slide #13 and #14 assembled piece down into #9
Top support. To raise or lower, loosen knob and adjust to
preferred height. Re-tighten knob to secure.
NOTE: DO NOT tighten knobs more than necessary.
Your easel is now ready for use. Enjoy!
pg 2