Other operations, Precautions, Troubleshooting – Sony ZS-BT1 User Manual
Page 2: Messages, Basic operations
ZS-BT1US.3-099-777-21(1)
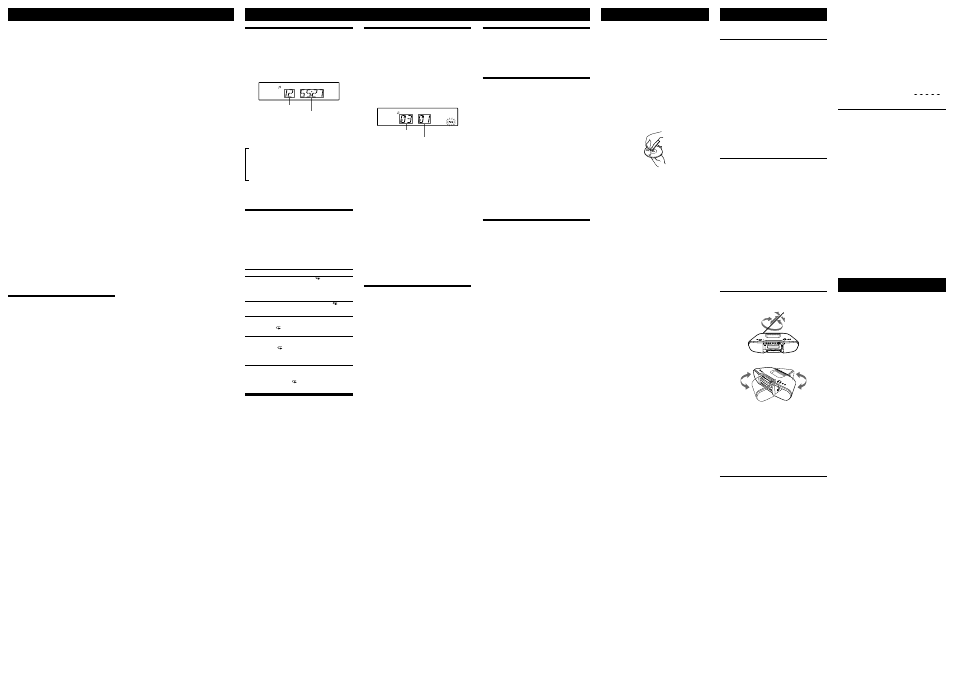
Using the display
You can check information about the CD using the
display.
To check the total track number and
playing time of the CD
Press to stop the CD playback.
Total track number
Total playing time
To check the remaining time
Press DISPLAY on the unit while playing a CD. The
display changes as follows:
The current track number and playing time
The current track number and the remaining
time of the current track*
The number of tracks left and the time
remaining on the CD
* For a track whose number is more than 20, the remaining time
appears as “− − : − −” in the display.
Playing tracks repeatedly
(Repeat Play)
You can play tracks repeatedly in normal, Shuffle or
Program play modes.
1
Press CD .
“CD” appears in the display.
2
Proceed as follows.
To repeat
Do this
A single track 1 Press REPEAT until “ 1” appears.
2 Press or ( or on
the remote) to select the track that you want
to repeat.
3 Press .
All tracks on
the CD
1 Press REPEAT repeatedly until “ ”
appears.
2 Press .
Tracks in
random order
1 Press MODE repeatedly until “SHUF”
appears, and then press REPEAT to show “
”
2 Press .
Programed
tracks
1 Press MODE repeatedly until “PGM”
appears, and then press REPEAT to show
“ ”
2 Program tracks (see step 3 of “Creating your
own program”).
3 Press .
To cancel Repeat Play
Press REPEAT until “ ” disappears from the display.
Playing tracks in random order
(Shuffle
Play)
You can play tracks in random order.
1
Press CD .
“CD” appears in the display.
2
Press MODE repeatedly until “SHUF” appears in
the display.
3
Press to start Shuffle Play.
To cancel Shuffle Play
Stop playing first. Then press MODE repeatedly until
“SHUF” disappears from the display.
Tip
During Shuffle Play, you cannot select the previous track by pressing
( on the remote) .
Other Operations
Creating your own program
(Program
Play)
You can arrange the playing order of up to 20 tracks on
a CD.
1
Press CD .
“CD” appears in the display.
2
Press MODE repeatedly until “PGM” flashes in the
display.
3
Press
or
( or on the
remote) then press ENTER for the tracks you
want to program in the order you want.
Programed track number
Playing order
4
Press to start Program Play.
To cancel Program Play
Stop playing first. Then press MODE repeatedly until
“PGM” disappears from the display.
To delete the last track of the program
Press CLEAR on the remote while the unit is stopped.
To check the order of tracks before play
Press ENTER .
Every time you press the button, the track number
appears in the programed order.
To change the current program
Press once if the CD is stopped and twice if the
CD is playing. The current program will be erased.
Then create a new program following the programing
procedure.
Tips
If you try to program 21 tracks or more, “FULL” will appear in the
display.
You can play the same program again, since the program is saved
until you open the CD tray or turn off the power of the unit.
Presetting radio stations
You can store radio stations into the unit’s memory. You
can preset up to 30 radio stations, 20 for FM and 10 for
AM in any order.
1
Press RADIO BAND
AUTO PRESET on the unit
(RADIO
BAND on the remote) repeatedly to
select the band.
2
Hold down RADIO BAND
AUTO PRESET on the
unit for 2 seconds until “AUTO” flashes in the display.
3
Press ENTER while “AUTO” flashes in the display.
The stations are stored in memory from the lower
frequencies to the higher ones.
If a station cannot be preset automatically
You need to preset a station with a weak signal manually.
1
Press RADIO BAND
AUTO PRESET on the unit
(RADIO
BAND on the remote) repeatedly to
select the band.
2
Tune in a station you want.
3
Hold down ENTER on the unit repeatedly for
2 seconds until the preset number flashes in the
display.
4
Press PRESET + or – on the unit repeatedly until
the preset number you want for the station flashes
in the display.
5
Press ENTER on the unit.
The new station replaces the old one.
Tip
The preset radio stations remain in memory even if you unplug the
AC power cord or remove the batteries.
Playing preset radio stations
1
Press RADIO BAND
AUTO PRESET on the unit
(RADIO
BAND on the remote) to select the band.
2
Press PRESET + or – on the unit (PRESET + or –
on the remote) to tune in the stored station.
Falling asleep to music
1
Play the music source you want.
2
Press SLEEP on the unit to display “SLEEP”.
3
Press SLEEP on the unit to select the minutes
until the unit goes off automatically.
Each time you press the button, the indication changes
as follows:
“AUTO*” “60MIN” “30MIN” “20MIN”
“10MIN” “OFF”.
* When you select “AUTO”, the CD stops playing in 90 minutes at
most and the unit goes off automatically. When you are listening
to the radio, the radio goes off in 90 minutes.
If 4 seconds have passed after you pressed SLEEP ,
the minutes in the display are entered.
When the preset time has passed, the unit goes off
automatically.
To cancel the sleep function
Press POWER to turn off the power.
Tip
The display’s backlight goes off while sleeping time is active.
Connecting optional component
You can enjoy the sound from a PC, TV, VCR, portable
digital music player, etc. through the speakers of this unit.
Be sure to turn off the power of each component before
making any connections.
For details, refer to the instruction manual of the
component to be connected.
1
Connect the AUDIO IN jack on the unit to the
line output jack of the portable digital music player
or other components using an audio connecting
cable* (not supplied).
* For a PC: use a cable which fills the connector of your PC.
For a TV or VCR: use a cable with a stereo-mini plug on one
end and two phono plugs on the other end.
For a portable digital music player: use a cable with a stereo-
mini plug on both ends.
2
Turn the unit and the connected component on.
3
Press AUDIO IN and start playing sound on the
connected component.
The sound from the connected component is output
from the speakers.
Precautions
Discs that this unit CAN play
Audio CD
CD-R/CD-RW (CD-DA*)
* CD-DA is the abbreviation for Compact Disc Digital Audio. It is a
recording standard used for Audio CDs.
Discs that this unit CANNOT play
CD-R/CD-RW other than those recorded in music CD
format
CD-R/CD-RW of poor recording quality, CD-R/CD-RW
that has scratches or are dirty, or CD-R/CD-RW recorded
with an incompatible recording device
CD-R/CD-RW which is finalized incorrectly
Notes on discs
Before playing, clean the CD with a cleaning cloth.
Wipe the CD from the center out. If there is a scratch,
dirt or fingerprints on the CD, it may cause tracking
error.
Do not use solvents such as benzine, thinner,
commercially available cleaners or anti-static spray
intended for vinyl LPs.
Do not expose the CD to direct sunlight or heat sources
such as hot air ducts, nor leave it in a car parked in
direct sunlight as there can be a considerable rise in
temperature inside the car.
Do not stick paper or sticker on the CD, nor scratch the
surface of the CD.
After playing, store the CD in its case.
On safety
As the laser beam used in the CD player section is
harmful to the eyes, do not attempt to disassemble the
casing. Refer servicing to qualified personnel only.
Should any solid object or liquid fall into the unit,
unplug the unit, and have it checked by qualified
personnel before operating it any further.
Discs with non-standard shapes (e.g., heart, square,
star) cannot be played on this unit. Attempting to do so
may damage the unit. Do not use such discs.
On power sources
For AC operation, use the supplied AC power cord; do
not use any other type.
The unit is not disconnected from the AC power source
(mains) as long as it is connected to the wall outlet,
even if the unit itself has been turned off.
Unplug the unit from the wall outlet when it is not used
for an extended period of time.
When the batteries are not to be used, remove them to
avoid damage that can be caused by battery leakage or
corrosion.
The nameplate indicating operating voltage, power
consumption, etc. is located at the bottom.
On placement
Do not leave the unit in a location near heat sources,
in a place subject to direct sunlight, excessive dust or
mechanical shock or in a car subject to the direct rays
of the sun.
Do not place the unit on an inclined or unstable place.
Do not place anything within 10 mm of the side of the
cabinet. The ventilation holes must be unobstructed for
the unit to operate properly and prolong the life of its
components.
Since a strong magnet is used for the speakers, keep
personal credit cards using magnetic coding or spring-
wound watches away from the unit to prevent possible
damage from the magnet.
On operation
If the unit is brought directly from a cold to a warm
location, or is placed in a very damp room, moisture
may condense on the lens inside the CD player section.
Should this occur, the unit will not operate properly. In
this case, remove the CD and wait about an hour for the
moisture to evaporate.
Cleaning the cabinet
Clean the cabinet, panel and controls with a soft cloth
slightly moistened with a mild detergent solution. Do
not use any type of abrasive pad, scouring powder, or
solvent, such as alcohol or benzine.
If you have any questions or problems concerning your
unit, please consult your nearest Sony dealer.
Troubleshooting
General
The power is not on.
Connect the AC power cord to the wall outlet securely.
Make sure the batteries are inserted correctly.
Replace all the batteries with new ones if they are weak.
You cannot turn on the unit with the remote when you
operate the unit on batteries.
There is no audio.
Make sure the function you want to use appears in the
display window.
Unplug the headphones when listening through
speakers.
Noise is heard.
Someone is using a portable telephone or other
equipment that emits radio waves near the unit.
Move the portable telephone, etc., away from the
unit.
CD player
The CD does not play or “NO DISC” is displayed
even when a CD is in place.
Place the CD with the label surface up.
Clean the CD.
Take out the CD and leave the CD tray open for about
an hour to dry moisture condensation.
The CD-R/CD-RW is blank.
There is a problem with the quality of the CD-R/
CD-RW, recording device or application software.
Replace all the batteries with new ones if they are weak.
The sound drops out.
Reduce the volume.
Clean the CD, or replace it if the CD is badly damaged.
Place the unit in a location free from vibration.
Clean the lens with a commercially available blower.
The sound may drop out or noise may be heard when
using poor quality CD-R/CD-RW or if there is a
problem with the recording device or application
software.
Radio
Reception is poor.
Reorient the antenna to improve FM reception.
Reorient the unit itself to improve AM reception.
The audio is weak or has poor quality.
Replace all the batteries with new ones if they are weak.
Move the unit away from the TV.
If you are using the remote while listening to AM radio,
noise may be heard.
The picture of your TV becomes unstable.
If you are listening to an FM program near the TV with
an indoor antenna, move the unit away from the TV.
Bluetooth device
Pairing cannot be done.
Move the Bluetooth device closer to the unit.
Pairing may not be possible if other Bluetooth devices
are present around the unit. In this case, turn off the
other Bluetooth devices.
Connection is not possible.
The Bluetooth device you attempted to connect does
not support the A2DP and AVRCP profiles, and cannot
be connected with the unit.
Enable the Bluetooth function of the Bluetooth device.
The pairing registration information has been erased.
Perform the pairing operation again.
While connected to a Bluetooth device, this unit cannot
be detected and a connection cannot be established
from another Bluetooth device.
The sound skips or fluctuates, or the
connection is lost.
The unit and the Bluetooth device are too far apart.
If there are obstacles between the unit and your
Bluetooth device, remove or avoid the obstacles.
If there is equipment that generates electromagnetic
radiation, such as a wireless LAN, other Bluetooth
device, or a microwave oven nearby, move them away.
The sound of your Bluetooth device cannot be
heard on this unit.
Turn up the volume on your Bluetooth device first, and
then adjust the volume using VOLUME + or – .
Severe hum or noise
If there are obstacles between the unit and your
Bluetooth device, remove or avoid the obstacles.
If there is equipment that generates electromagnetic
radiation, such as a wireless LAN, other Bluetooth
device, or a microwave oven nearby, move them away.
Turn down the volume of the connected Bluetooth
device.
The sound from the Bluetooth headphones is
distorted.
Turn down the volume of the unit using VOLUME
– . If your headphones have a volume control,
also adjust the volume using the headphone’s volume
control.
Press SOUND repeatedly to select “
”.
Remote
The remote does not function.
Replace all the batteries in the remote with new ones if
they are weak.
Make sure that you are pointing the remote at the
remote sensor on the unit.
Remove any obstacles in the path of the remote and the
unit.
Make sure the remote sensor is not exposed to strong
light such as direct sunlight or fluorescent lamp light.
Move closer to the unit when using the remote.
To reset the unit to factory settings
If the unit still does not operate properly, reset the unit to
factory settings.
Use buttons on the unit to reset the unit to its factory
default settings.
1
Remove all the batteries from the unit.
2
Disconnect and reconnect the power cord, and then
turn on the unit.
3
Press , ENTER and POWER on the unit at
the same time.
All user-configured settings, such as preset radio
stations, are deleted.
After trying the remedies, if the problem persists, please
consult your nearest Sony dealer.
Messages
Bluetooth device
LINKED: Bluetooth communication was established.
UNLINKED: Communication with a Bluetooth
device was cut off for some reason, or Bluetooth
communication was ended.
NO DEVICE: A pairable Bluetooth device was not found,
or connection was not possible.
NOT USED: The unit is not connected with a Bluetooth
device using AVRCP.
PIN: The unit is asking for the passcode. For details, see
“Using the Bluetooth function” on the front page.
PLEASE WAIT: The unit is readying for usage of a
Bluetooth device.
Playing music on this unit
You can operate this unit from Bluetooth headphones
by connecting the unit and Bluetooth headphones using
AVRCP.
1
Select a function other than the Bluetooth function.
2
Establish a connection with the Bluetooth
headphones.
Press and hold BLUETOOTH OPR on the unit for
about 2 seconds until the BLUETOOTH indicator
lights up, then release the button.
If more than one Bluetooth device that has been
connected in the past is present around the unit, the
unit attempts to connect with up to 3 most recently
connected devices. (Connection is attempted with up
to 3 devices in order from the most recently connected
device, and the attempts end when a connection is
established.)
Once the connection is established, the unit display
changes as follows:
“LINKED” Name of the Bluetooth device
3
Start playback of the music for the function selected
in step 1.
Depending on the type of Bluetooth headphones, you
can operate this unit (playback, volume control, etc.)
using the headphone’s controls.
For details about the operations of the Bluetooth
headphones, refer to the operation manual supplied
with your Bluetooth headphones.
4
Press VOLUME + or – to adjust the volume.
To cancel the connection with Bluetooth
headphones
Press and hold BLUETOOTH OPR on the unit for
about 2 seconds until the BLUETOOTH indicator
turns off.
Notes
If you cannot connect with paired Bluetooth headphones,
perform the pairing operation between the unit and the Bluetooth
headphones again.
When the unit is changed to a function other than the Bluetooth
function and BLUETOOTH OPR on the unit is pressed while
connected to a Bluetooth device, it may take some time until a
connection is made with the Bluetooth headphones.
This unit stores separate volume settings for when listening through
the speakers or (headphones) jack on the unit, or when
listening through Bluetooth headphones.
Bluetooth wireless technology
Bluetooth wireless technology is a short-range wireless
technology linking digital devices, such as personal
computers and digital still cameras. Using the Bluetooth
wireless technology, you can operate the units involved
within a range of about 10 meters.
The Bluetooth wireless technology is commonly
used between two devices, but a single device can be
connected to multiple devices.
*
You do not need wires to get connected as you do with
a USB connection, and you do not need to place the
devices face to face as you do with wireless infrared
technology. You can use the technology with one
Bluetooth device in your bag or pocket.
Bluetooth wireless technology is a global standard
supported by thousands of companies. These companies
produce products that meet the global standard.
* This unit cannot be connected to multiple devices.
Supported Bluetooth version and profiles
Profile refers to a standard set of capabilities for various
Bluetooth product capabilities. This unit supports the
following Bluetooth version and profiles.
Supported Bluetooth version:
Bluetooth Standard version 2.0
Supported Bluetooth profiles:
A2DP (Advanced Audio Distribution Profile)
AVRCP (Audio Video Remote Control Profile)
Effective communication range
Bluetooth devices should be used within approximately
10 meters (unobstructed distance) of each other. The
effective communication range may become shorter
under the following conditions.
When a person, metal object, wall or other
obstruction is between the devices with a Bluetooth
connection
Locations where a wireless LAN is installed
Around microwave ovens that are in use
Locations where other electromagnetic waves occur
Effects of other devices
Bluetooth devices and wireless LAN (IEEE 802.11b/g)
use the same frequency band (2.4 GHz). When using
your Bluetooth device near a device with wireless LAN
capability, electromagnetic interference may occur.
This could result in lower data transfer rates, noise, or
inability to connect. If this happens, try the following
remedies:
Try connecting this unit and Bluetooth mobile phone
or Bluetooth device when you are at least 10 meters
away from the wireless LAN equipment.
Turn off the power to the wireless LAN equipment
when using your Bluetooth device within 10 meters.
The radio waves broadcast by this unit may interfere
with the operation of some medical devices. Since this
interference may result in malfunction, always turn off
the power on this unit, Bluetooth mobile phone and
Bluetooth device in the following locations:
In hospitals, on trains, in airplanes, at gas stations,
and any place where flammable gasses may be
present
Near automatic doors or fire alarms
Notes
This unit supports security functions that comply with the Bluetooth
specification as a means of ensuring security during communication
using Bluetooth technology. However, this security may be
insufficient depending on the setting contents and other factors, so
always be careful when performing communication using Bluetooth
technology.
Sony cannot be held liable in any way for damages or other loss
resulting from information leaks during communication using
Bluetooth technology.
Bluetooth communication is not necessarily guaranteed with all
Bluetooth devices that have the same profile as this unit.
Bluetooth devices connected with this unit must comply with the
Bluetooth specification prescribed by the Bluetooth SIG, Inc., and
must be certified to comply. However, even when a device complies
with the Bluetooth specification, there may be cases where the
characteristics or specifications of the Bluetooth device make it
impossible to connect, or may result in different control methods,
display or operation.
Noise may occur or the audio may cut off depending on the
Bluetooth device connected with this unit, the communications
environment, or surrounding conditions.
Playable Bluetooth devices
You can check the websites below for the Bluetooth
compatible devices.
Basic Operations