Sony CMT-BX20I User Manual
Micro hi-fi component system, Warning, Hooking up the system securely
CMT-BX20i.GB.3-293-641-11(1)
WARNING
To reduce the risk of fire or electric shock,
do not expose this apparatus to rain or
moisture.
To reduce the risk of fire, do not cover the ventilation
opening of the apparatus with newspapers, tablecloths,
curtains, etc.
Do not place the naked flame sources such as lighted
candles on the apparatus
.
To reduce the risk of fire or electric shock, do not expose
this apparatus to dripping or splashing, and do not place
objects filled with liquids, such as vases, on the apparatus.
Do not install the appliance in a confined space, such as a
bookcase or built-in cabinet.
As the main plug is used to disconnect the unit from the
mains, connect the unit to an easily accessible AC outlet.
Should you notice an abnormality in the unit, disconnect
the main plug from the AC outlet immediately.
Do not expose batteries or apparatus with battery-installed
to excessive heat such as sunshine, fire or the like.
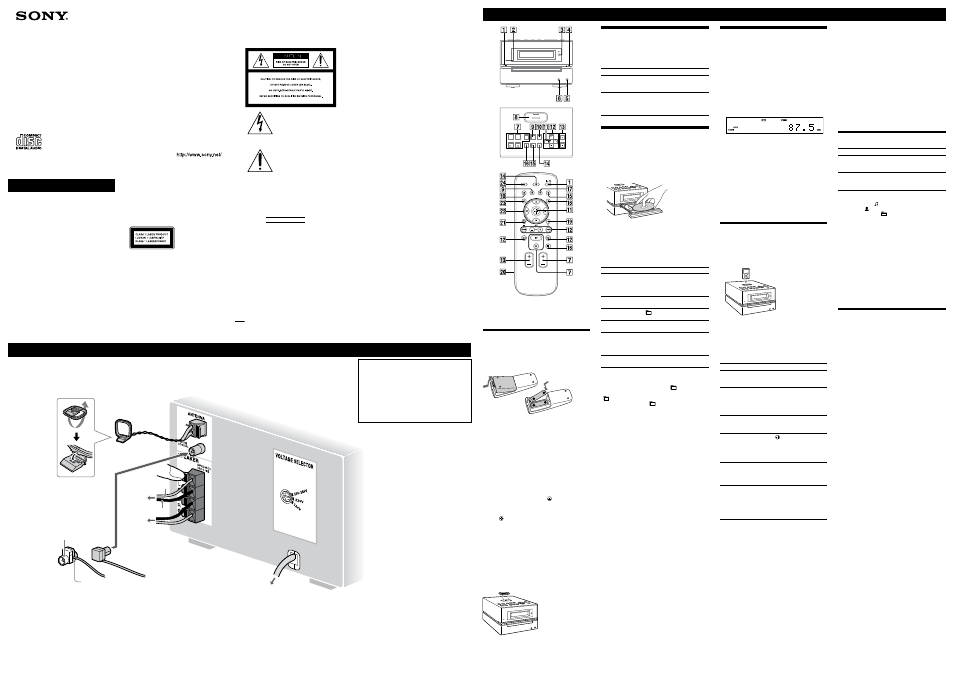
Hooking up the system securely
CAUTION
The use of optical instruments with this product will
increase eye hazard.
Except for customers in the U.S.A.
and Canada
This appliance is classified
as a CLASS 1 LASER
product. This marking
is located on the rear
exterior.
Except for the U.S.A., Canadian,
Australian and New Zealand
models
The nameplate is located on the bottom exterior.
Notice for the customers in the
U.S.A.
CAUTION
The following CAUTION marking is located on the rear
exterior.
This symbol is intended to alert the
user to the presence of uninsulated
“dangerous voltage” within the
product’s enclosure that may be of
sufficient magnitude to constitute a risk
of electric shock to persons.
This symbol is intended to alert the
user to the presence of important
operating and maintenance (servicing)
instructions in the literature
accompanying the appliance.
Owner’s Record
The model and serial numbers are located on the rear of
the unit. Record these numbers in the space provided
below. Refer to them whenever you call upon your Sony
dealer regarding this product.
Model No.
Serial No.
Note to CATV system installer:
This reminder is provided to call the CATV system
installer’s attention to Article 820-40 of the NEC
that provides guidelines for proper grounding and,
in particular, specifies that the cable ground shall be
connected to the grounding system of the building, as
close to the point of cable entry as practical.
The following FCC statement
applies only to the version of this
model manufactured for sale in
the U.S.A. Other versions may
not comply with FCC technical
regulations.
NOTE:
This equipment has been tested and found to comply
with the limits for a Class B digital device, pursuant
to Part 15 of the FCC Rules. These limits are designed
to provide reasonable protection against harmful
interference in a residential installation. This equipment
generates, uses and can radiate radio frequency energy
and, if not installed and used in accordance with the
instructions, may cause harmful interference to radio
communications. However, there is no guarantee that
interference will not occur in a particular installation. If
this equipment does cause harmful interference to radio
or television reception, which can be determined by
turning the equipment off and on, the user is encouraged
to try to correct the interference by one or more of the
following measures:
Reorient or relocate the receiving antenna.
Increase the separation between the equipment and
receiver.
Connect the equipment into an outlet on a circuit
different from that to which the receiver is connected.
Consult the dealer or an experienced radio/TV
technician for help.
CAUTION
You are cautioned that any changes or modifications
not expressly approved in this manual could void your
authority to operate this equipment.
Basic Operations
This manual mainly explains operations using the
remote, but the same operations can also be performed
using the buttons on the unit having the same or similar
names.
Before using the system
To use the remote
Slide and remove the battery compartment lid , and
insert the two supplied R6 (size AA) batteries, side
first, matching the polarities shown below.
Notes on using the remote
With normal use, the batteries should last for about six months.
Do not mix an old battery with a new one or mix different types of
batteries.
If you do not use the remote for a long period of time, remove the
batteries to avoid damage from battery leakage and corrosion.
To set the clock
Use buttons on the remote to set the clock.
1
Turn on the system.
Press (power) .
2
Select the clock set mode.
Press TIMER MENU . If the current mode appears
on the display, press / repeatedly to select
“CLOCK SET?” and then press (enter) .
3
Set the time.
Press / repeatedly to set the hour, and then
press (enter) . Use the same procedure to set the
minutes.
The clock settings are lost when you disconnect the
power cord or if a power failure occurs.
To display the clock when the system is off, press
DISPLAY . The clock is displayed for about 8
seconds.
To use the iPod
Insert an iPod Dock Adaptor into the unit’s connector
before use.
For details on the supplied iPod Dock Adaptors, refer to
the instructions supplied with the Dock Adaptors.
Adjusting the sound
To adjust the volume
Press VOLUME +/ (or VOL +/ on the unit) .
To add a sound effect
To
Press
Generate a more dynamic
sound (Dynamic Sound
Generator X-tra)
DSGX on the unit.
Set the sound effect
EQ repeatedly to select
“BASS” or “TREBLE,” and
then press +/ repeatedly
to adjust the level.
Playing a CD/MP3 disc
1
Select the CD function.
Press FUNCTION +/ (or FUNCTION on the unit)
repeatedly.
2
Place a disc.
Press (open/close) on the unit, and place a disc
with the label side up on the disc tray.
To close the disc tray, press (open/close) on the
unit.
Do not force the disc tray closed with your finger, as
this may damage the unit.
3
Start playback.
Press (play) (or CD (play/pause) on the
unit) .
To
Press
Pause playback
(pause) (or CD (play/
pause) on the unit) .
To resume play, press the button
again.
Stop playback
(stop) (or /CANCEL on the
unit) .
Select a folder on an
MP3 disc
+/ (select folder) .
Select a track or file
/ (go back/go forward)
.
Find a point in a
track or file
Hold down / (rewind/
fast forward) during playback,
and release the button at the
desired point.
Select Repeat Play
REPEAT repeatedly until
“REP” or “REP1” appears.
To change the play mode
Press PLAY MODE repeatedly while the player is
stopped. You can select normal play (“
” for all MP3
files in the folder on the disc), shuffle play (“SHUF” or
“
SHUF*”), or program play (“PGM”).
* When playing a CD-DA disc,
(SHUF) Play performs the same
operation as normal (shuffle) play.
Notes on Repeat Play
All tracks or files on a disc are played repeatedly up to five times.
“REP1” indicates that a single track or file is repeated until you stop
it.
Notes on playing MP3 discs
Do not save other types of tracks or files or unnecessary folders on a
disc that has MP3 files.
Folders that have no MP3 files are skipped.
MP3 files are played back in the order that they are recorded onto
the disc.
The system can only play MP3 files that have a file extension of
“.MP3”.
If there are files on the disc that have the “.MP3” file extension,
but that are not MP3 files, the unit may produce noise or may
malfunction.
The maximum number of:
folders is 255 (including the root folder).
MP3 files is 511.
MP3 files and folders that can be contained on a single disc is 512.
folder levels (the tree structure of files) is 8.
Compatibility with all MP3 encoding/writing software, recording
device, and recording media cannot be guaranteed. Incompatible
MP3 discs may produce noise or interrupted audio or may not play
at all.
Notes on playing multisession discs
If the disc begins with a CD-DA (or MP3) session, it is recognized as
a CD-DA (or MP3) disc, and other sessions are not played back.
A disc with a mixed CD format is recognized as a CD-DA (audio)
disc.
Listening to the radio
1
Select “TUNER FM” or “TUNER AM.”
Press FUNCTION +/ (or FUNCTION on the unit)
repeatedly.
2
Select the tuning mode.
Press TUNING MODE repeatedly until “AUTO”
appears.
3
Tune in the desired station.
Press +/ (or TUNE +/ on the unit) . Scanning
stops automatically when a station is tuned in, and
then “TUNED” and “STEREO” (for stereo programs
only) appear.
To stop automatic scanning
Press (stop) (or /CANCEL on the unit) .
To tune in a station with a weak signal
If “TUNED” does not appear and the scanning does not
stop, press TUNING MODE repeatedly until “AUTO”
and “PRESET” disappear, and then press +/ (or TUNE
+/ on the unit) repeatedly to tune in the desired
station.
To reduce static noise on a weak FM stereo
station
Press FM MODE repeatedly until “MONO” appears
to turn off stereo reception.
Playing the iPod
1
Select the iPod function.
Press FUNCTION +/ (or FUNCTION on the unit)
repeatedly.
2
Place the iPod.
3
Start playback.
Press (play) (or iPod (play/pause) on the
unit) .
To control the iPod
You can control your iPod with the following buttons on
the remote or unit.
To
Press
Pause playback
(pause) (or iPod
(play/pause) on the unit) or
(stop) .
Scroll up/down the
iPod menus
/ . You can scroll up or
down the iPod menus much like
the Click Wheel operations of
the iPod or the drag up-or-down
operations of the iPod touch.
Select a track
or chapter of
audiobook/podcast
/ (go back/go forward)
. To fast-forward or fast-
rewind, hold down the button.
Choose the selected
item
/ (enter) (or ENTER on
the unit) . You can choose the
selected item much like the center
button on the iPod or the touch
operation of the iPod touch.
Find a point in a
track or chapter of
audiobook/podcast
/ (fast rewind/fast
forward) during playback, and
release the button at the desired
point.
Return to the
previous menu or
select a menu
/TOOL MENU /
(return) . You can return to the
previous menu or select a menu
much like the Menu button on
the iPod or the touch operation
of the iPod touch.
To use the system as a battery charger
You can use the system as a battery charger for the iPod
when the system is both on and off.
The charging begins when the iPod is placed on the unit’s
connector . The charging status appears in the iPod
display. For details, see the user’s guide of your iPod.
To stop charging the iPod
Remove the iPod. If you stop charging the iPod when
the system is off, press DISPLAY until the clock
disappears in the display.
Antennas
Find a location and an orientation that provide
good reception, and then set up the antenna.
Keep the antennas away from the speaker cords
and the power cord to avoid picking up noise.
FM lead antenna
(Extend it horizontally.)
AM loop antenna
Power
For models with a voltage selector, set VOLTAGE
SELECTOR to the local power line voltage.
Connect the power cord to a wall socket.
If the plug does not fit the wall socket, detach the
supplied plug adaptor (only for models equipped with
an adaptor).
Wall socket
Speakers
Insert only the stripped
portion of the cord.
Right speaker
Speaker cord (Red/)
Speaker cord (Black/)
Left speaker
or
White side for North
American model
When carrying this system
1
Remove a disc to protect the CD mechanism.
2
Press FUNCTION +/ (or FUNCTION on the unit)
repeatedly to select the CD function.
3
Hold down VOL + and DSGX on the unit,
and press on the unit until “STANDBY”
appears.
4
After “LOCK” appears, unplug the power cord.
Brown side for other regions
Notes
When placing or removing the iPod, handle the iPod in the same
angle as that of the iPod connector on the unit and do not twist
or sway the iPod to prevent connector damage.
Do not carry the unit with an iPod set on the connector. Doing so
may cause a malfunction.
When placing or removing the iPod, brace the unit with one hand
and take care not to press the controls of the iPod by mistake.
To remove the iPod Dock Adaptor, pull it up with your fingernail or
a flat object using the slot inside the adaptor.
Before disconnecting the iPod, pause playback.
While playing video, you cannot use / . You can fast
rewind (fast forward) by holding down / .
To change the volume level, use VOLUME +/ (or VOL +/ on the
unit) . The volume level does not change even if adjusted on the
iPod.
This system is designed for iPod only. You cannot connect any other
portable audio players.
To use an iPod, refer to the user’s guide of your iPod.
Sony cannot accept responsibility in the event that data recorded to
iPod is lost or damaged when using an iPod with this unit.
Changing the display
To
Press
Change
information on the
display
1)
DISPLAY repeatedly when the
system is on.
Check the clock
when the system
is off
2)
DISPLAY when the system is
off
3)
. The clock is displayed for 8
seconds.
1)
For example, you can view CD/MP3 disc information, such as;
track or file number during normal play.
track or file name (“ ”) during normal play.
artist name (“ ”) during normal play.
album or folder name (“
”) during normal play.
total playing time while the player is stopped.
2)
The clock is displayed continuously while the iPod is being charged.
To turn off the clock display, press DISPLAY (See “To stop
charging the iPod”).
3)
The STANDBY indicator on the unit lights up when the system is
off.
Notes on the display information
Characters that cannot be displayed appear as “_”.
The following are not displayed:
total playing time for a CD-DA disc depending on the play mode.
total playing time and remaining playing time for an MP3 disc.
The following are not displayed correctly:
folder and file names that do not follow either ISO9660 Level 1,
Level 2 or Joliet in the expansion format.
The following is displayed:
ID3 tag information for MP3 files when ID3 version 1 and version
2 tags are used (up to 62 characters).
Using optional audio components
To connect an optional headphones
Connect headphones to the PHONES jack on the
unit.
To connect an optional component
Connect additional audio component to the AUDIO
IN jack on the unit using an audio analog cord (not
supplied). Turn down the volume on the system, and
then select the AUDIO IN function.
CMT-BX20i
© 2008 Sony Corporation
Printed in China
Operating Instructions
3-293-641-11(1)
Micro HI-FI
Component
System