Input setting menu – Sony SDM-P232 User Manual
Page 15
15
GB
INPUT SETTING menu
You can adjust the following items using the INPUT SETTING
menu.
• Auto Adjust
• Phase
• Pitch
• H Center
• V Center
• Input1 Priority
• Input2 Priority
x
Adjusting Picture Position and Sharpness
(analog RGB signal only)
Automatic picture quality adjustment function
When the monitor receives an input signal, it automatically
adjusts the picture’s position and sharpness (phase/pitch),
and ensures that a clear picture appears on the screen
(page 18).
Note
While the automatic picture quality adjustment function is activated, only
the 1 (power) switch will operate.
If the automatic picture quality adjustment function of this
monitor seems to not completely adjust the picture
By pressing the AUTO button, you can make further automatic
adjustment of the picture quality for the current input signal (page 5).
If you still need to make further adjustments to the picture
quality
You can manually adjust the picture’s sharpness (phase/pitch) and
position (horizontal/vertical position).
If you need to eliminate a shift of the picture occurring when
the input signal has been changed
The shift is caused by the automatic picture quality adjustment function.
You can deactivate this function (See “Auto Adjust” below).
These adjustments are stored in memory and automatically
recalled when the monitor receives a previously input and
registered input signal.
Eliminate a shift of the picture caused by the automatic
picture quality adjustment (Auto Adjust)
1
Press the MENU button.
The main menu appears on the screen.
2
Press the
M
/
m
buttons to select
(INPUT
SETTING) and press the OK button.
The INPUT SETTING menu appears on the screen.
3
Press the
M
/
m
buttons to select “Auto Adjust” and
press the OK button.
The options are displayed on the popup menu.
4
Press the
M
/
m
buttons to select “Off” and press the
OK button.
To resume the automatic picture quality adjustment function
Select “On” in step
4
above.
Adjust the picture’s sharpness manually (Phase/Pitch)
You can adjust the picture’s sharpness as follows. This
adjustment is effective when the computer is connected to the
monitor’s HD15 input connector (analog RGB).
1
Load the Utility Disk.
2
Start the Utility Disk and display the test pattern.
For Windows
Click [Utility]
t [Windows]/[Win Utility.exe].
For Macintosh
Click [Utility]
t [Mac]/[Mac Utility].
3
Press the MENU button.
The main menu appears on the screen.
4
Press the
M
/
m
buttons to select
(INPUT
SETTING) and press the OK button.
The INPUT SETTING menu appears on the screen.
5
Press the
M
/
m
buttons to select “Phase” and press
the OK button.
The “Phase” adjustment menu appears on the screen.
6
Press the
M
/
m
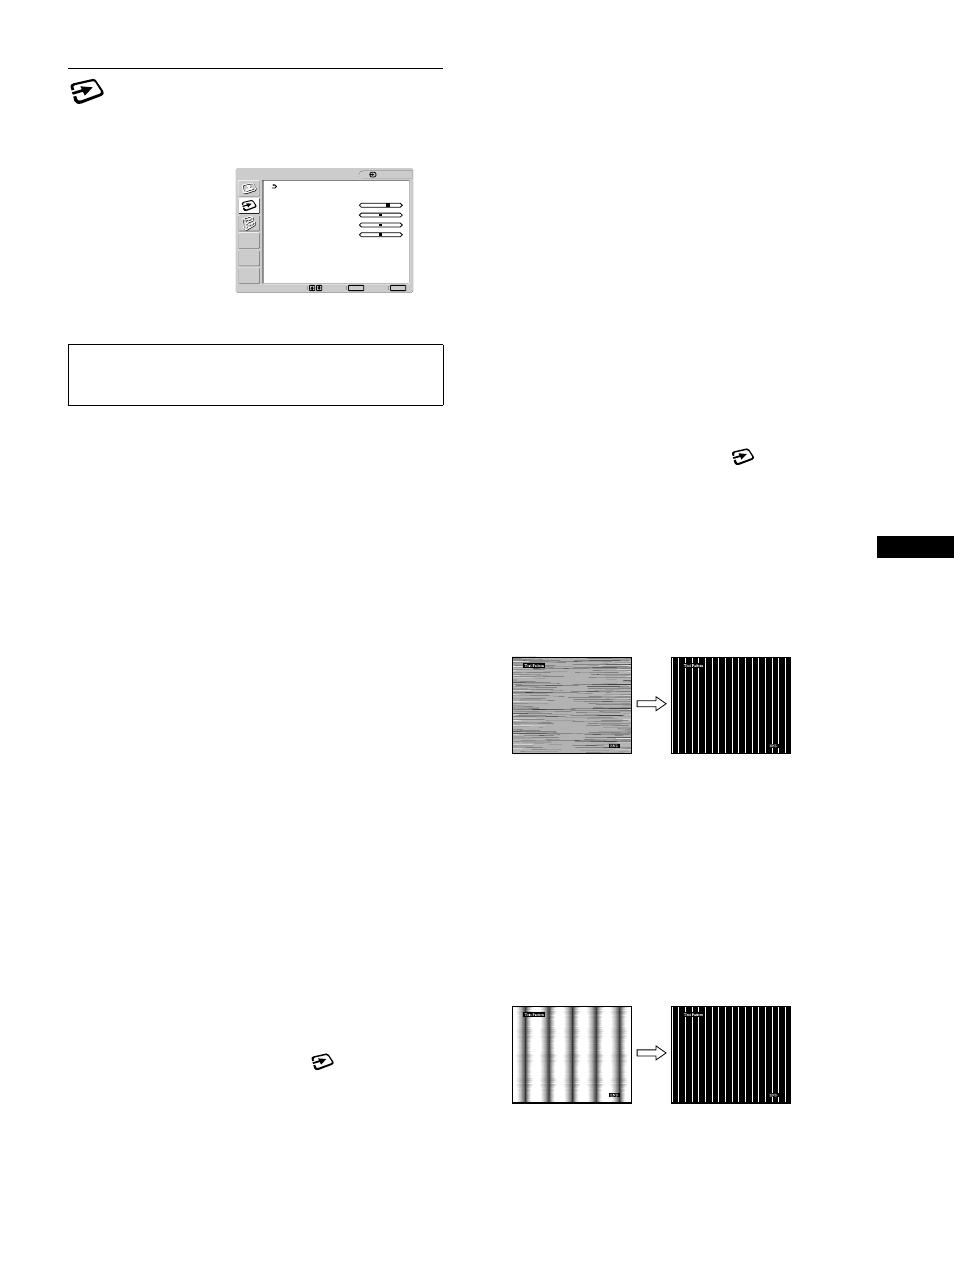
buttons until the horizontal stripes
are at a minimum.
Adjust so that the horizontal stripes are at a minimum.
7
Press the OK button.
The main menu appears on the screen.
If vertical stripes are observed over the entire screen, adjust
the pitch using the following procedures.
8
Press the
M
/
m
buttons to select “Pitch” and press
the OK button.
The “Pitch” adjustment menu appears on the screen.
9
Press the
M
/
m
buttons until the vertical stripes
disappear.
Adjust so that the vertical stripes disappear.
10 Click
[END]
on the screen to turn off the test pattern.
Note
When receiving digital RGB signals from the DVI-D input connector,
adjustment is unnecessary.
Set
Exit
MENU
Select
OK
1: HD15
INPUT SETTING
Auto Adjust :
On
Phase :
20
Pitch :
0
H Center :
50
V Center :
50
Input1 Priority :
DVI-D
Input2 Priority :
DVI-D
1920
×
1200/60 Hz