Sony RDP-NWD300 User Manual
Page 2
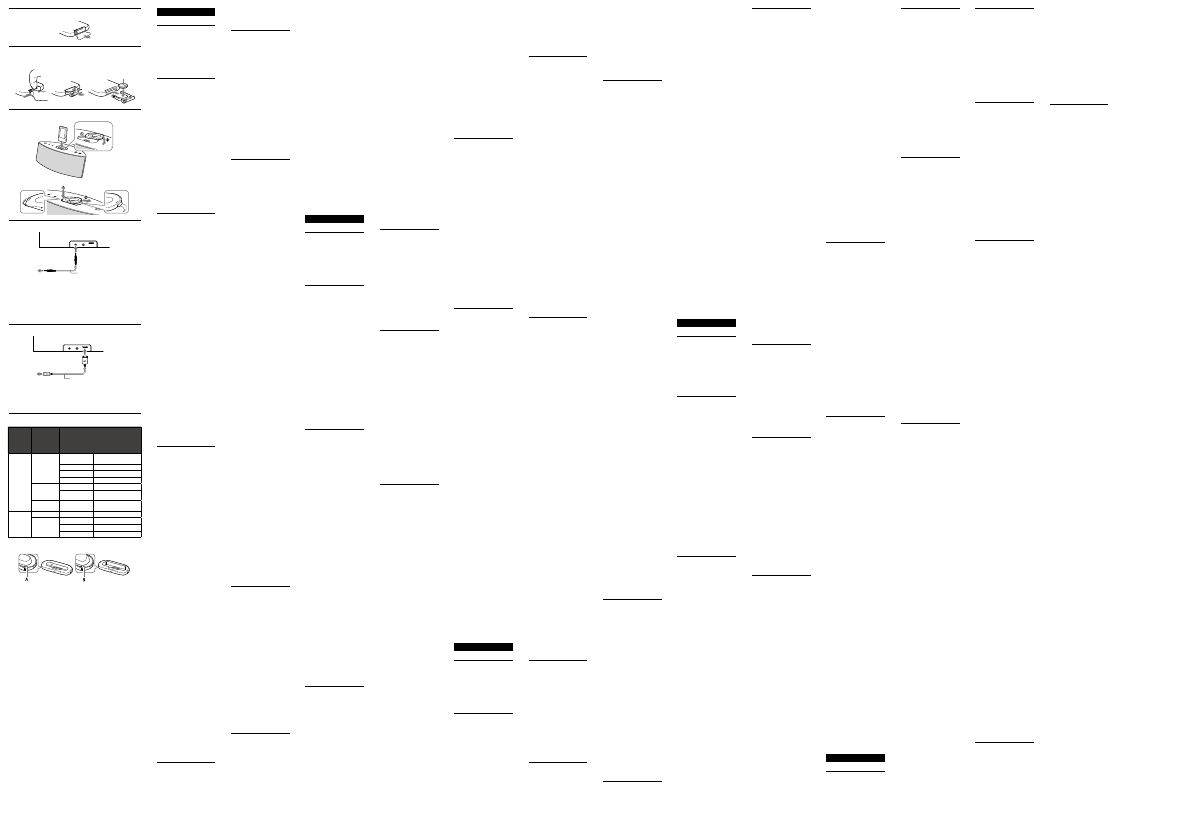
English
Preparing the
remote commander
(See fig. )
Before using the remote commander
for the first time, remove the insulation
film.
The battery is installed in the remote
commander at the factory.
Replacing the
lithium battery
(See fig.)
The working distance of the remote
commander shortens as the battery
becomes exhausted.
Replace the battery with a new one
following the procedure below. It will
last about 6 months normally.
1
Take out the battery case. (See
fig. -1)
2
Replace the lithium battery
CR2025 with a new one, with
the + side facing up. (See fig.
-2)
3
Place the battery case back in
position.
Notes
Keep the lithium battery out of the reach
of children. Should the battery be
swallowed, immediately consult a doctor.
Do not expose the remote sensor to direct
sunlight or strong light of the fluorescent
light to avoid a malfunction of the remote
commander.
Setting the
“WALKMAN”
(See fig. )
1
Install the “WALKMAN”
attachment.
Use the appropriate attachment
supplied either with the
“WALKMAN” or the main unit.
There are two types of attachment
supplied with the main unit. The
attachment shape may differ
depending on the “WALKMAN.”
For details, see ““WALKMAN”
models supported by the main
unit.”
2
Insert the tab on the left side of
the attachment () into left
slot in the hole of the WM-PORT
plug, and then press down into
the main unit (). (See fig. -
1)
3
Set the “WALKMAN” on the
main unit.
Tip
To remove the “WALKMAN” attachment,
press firmly down on the area marked
(
) (), and remove (), as shown in
the illustration. (See fig. -2) If the
attachment is not removed, press firmly
down on the other side area marked
(
).
To use the main unit as a
battery charger
Plug the AC cord into the mains and
set the “WALKMAN” on the main
unit. Battery charging starts
automatically. The charging conditions
appear in the “WALKMAN” display.
For details, refer to the Operation
Guide of your “WALKMAN.”
Note
Playback and recharging can be done at
the same time. Recharging time will be
longer during playback.
Tip
The “WALKMAN” can be charged while
the main unit is in standby mode.
Listening to the
sound
1
Press the / button to turn on
the main unit.
The / indicator lights up.
2
Start playback on the
“WALKMAN.”
When operating the “WALKMAN”
while connecting to the main unit,
brace it with your other hand.
When the LINE INPUT indicator
lights up, press the LINE INPUT
button to turn it off.
3
Adjust the volume.
Press the VOLUME +/– button to
adjust the volume.
4
Press the / button to turn off
the main unit after use.
The / indicator goes off.
Notes
When the “WALKMAN” is turned
on, there may be noise from the
speaker, depending on
your“WALKMAN.” However it is
not a malfunction.
Set the Bluetooth function to off
when using a “WALKMAN” with
built-in Bluetooth function.
Availability of the Dynamic
Normaliser, Equalizer, VPT (Virtual
Phone Technology surround), DSEE
(Digital Sound Enhancement
Engine) or the function of speaker
output optimizer depends on the
“WALKMAN” you are using. Set
these settings to off.
If connecting the main unit to the
device with a built-in radio or tuner,
radio reception may not occur or
sensitivity may be reduced
significantly.
Sound is not output from the
headphone jack of the
“WALKMAN” if it is set to the main
unit.
Turn down the volume when the
main unit is in standby mode to
avoid playing back at full volume
when you use the main unit next
time.
Tips
When a “WALKMAN” is set on the main
unit, you can operate the “WALKMAN” to
start playback and pause, etc., by using the
remote commander. Before operating the
“WALKMAN” using the remote
commander, select the audio data playback
mode such as “Music” or “Podcast” from
the library on the HOME menu of the
“WALKMAN.”
When the main unit enters the standby
mode by pressing the / button, the
volume setting is memorized. However, if
you disconnect the AC power adaptor
from the mains or disconnect the AC
power adaptor plug from the main unit,
the volume will return to the factory
setting.
Connecting external
equipment
(See fig. )
You can connect a portable audio
device to the main unit. Connect the
device to the LINE IN jack using a
suitable connecting cord (not
supplied).
Before connecting the device to the
main unit, lower the volume of the
device to avoid sudden loud sound,
which damage your hearing.
Note
Sound from an audio device connected to
the LINE IN jack cannot be recorded on
the “WALKMAN.”
Listening to
external equipment
1
Press the / button to turn on
the main unit.
The / indicator lights up.
2
Press the LINE INPUT button to
light up the LINE INPUT
indicator.
3
Start playing on the source
device connected.
4
Adjust the volume.
Adjust the volume using the
VOLUME +/– button or the
connected source device.
5
Press the / button to turn off
the main unit after use.
The / indicator goes off.
Note
If connecting the main unit to a device
with a built-in radio or tuner, radio
reception may not occur or sensitivity may
be reduced.
Transferring data
between a
“WALKMAN” and a
computer
(See fig. )
By connecting a USB cable (supplied
with the “WALKMAN”) to a computer,
you can transfer data between a
“WALKMAN” set on the WM-PORT
plug and the computer.
1
Press the / button to turn on
the main unit.
The / indicator lights up.
2
Press the PC MODE button until
the PC MODE indicator lights
up.
The PC MODE indicator remains
lit.
3
Transfer data between the
“WALKMAN” and computer.
For details about transferring data,
refer to the Operation Guide of the
“WALKMAN.”
When transferring data is finished
and you want to start playback,
press the PC MODE button until
the PC MODE indicator turns off.
4
Press the / button to turn off
the main unit after use.
The / indicator goes off.
Notes
Before pressing the PC MODE
button, confirm that the “Creating
Library” message is not displayed in
the display of the “WALKMAN.”
Do not connect or disconnect the
USB cable or AC power adaptor or
press the PC MODE button while
transferring data from your
computer. Your computer may not
recognize the “WALKMAN” or data
transfer may be interrupted.
When detaching the “WALKMAN”
by the operation of the computer,
the PC MODE indicator will not
turn off. Press the PC MODE button
to turn off the PC MODE indicator.
If you switch from the data transfer
to music playback by pressing the
PC MODE button, there may be
noise from the speaker, depending
on your“WALKMAN.” However it is
not a malfunction.
If the “WALKMAN” becomes
detached from the main unit during
data transfer, attach it to the main
unit and start data transfer again.
In the following cases, the PC
MODE indicator will not light up,
even if the PC MODE button is
pressed. (After it flashes several
time, it goes off.)
- When not connecting the USB
cable to the WM-PORT jack
- When the computer connected to
the main unit is turned off
While the PC MODE indicator is lit,
the “WALKMAN” set on the WM-
PORT plug will not playback sound.
If the main unit is connected to the
computer by connecting the USB
cable to the WM-PORT jack, it will
not be able to play back the sound of
the computer. To do that, connect
the computer to the LINE IN jack of
the main unit using the connecting
cord (not supplied).
Even if the video/audio cable is
connected to the WM-PORT jack,
the video and audio signals cannot
be output.
Tips
If the LINE INPUT indicator lights up by
pressing the LINE INPUT button, the
sound from the device connected to the
LINE IN jack can be output during data
transfer from the computer.
Even if the main unit enters the standby
mode by pressing the / button during
data transfer, the data transfer is
continued.
“WALKMAN”
models supported
by the main unit
The main unit supports any
“WALKMAN” device compatible with
WM-PORT (22 pin).
For details on “WALKMAN” models
compatible with the main unit, visit the
following customer support Web site
or refer to the catalog.
Europe:
http://support.sony-europe.com/DNA
For details on “WALKMAN” models
compatible with type A and type B
attachments, see fig. .
When using a “WALKMAN” other
than theses models (fig. ), use the
attachment supplied with the
“WALKMAN.”
Notes
The main unit guarantees only music
playback of “WALKMAN.” Operation of
“WALKMAN” models not listed here is
not guaranteed.
Operation may not always be ensured even
when using supported “WALKMAN”
models.
Some “WALKMAN” models may not be
available for purchase in certain areas.
Troubleshooting
If you have any questions or problems
concerning this system that are not
covered in this manual, please consult your
nearest Sony dealer.
Should any problem persist, consult your
nearest Sony dealer.
There is no sound.
Check the connections.
Press VOLUME + on the main unit. If the
volume is still low, set the “WALKMAN”
on the WM-PORT plug of the main unit
securely.
Remove the protective case of the
“WALKMAN,” and make sure the
“WALKMAN” is securely set.
Make sure the “WALKMAN” is playing
music.
Press the PC MODE button until the PC
MODE indicator turns off.
Press MUTING on the remote commander
to set MUTING to OFF.
If the approaches listed above fail to
resolve the issue, press the RESET button
of the “WALKMAN” to reset it.
The remote commander does
not function on the main unit
or the “WALKMAN.”
Bring the remote commander close to the
remote sensor of the main unit.
Remove any obstacles between the main
unit and the remote commander.
Set the “WALKMAN” on the WM-PORT
plug securely.
Replace the battery.
Locate the main unit away from
fluorescent lights.
Press the LINE INPUT button to turn off
the LINE INPUT indicator.
There is severe hum or noise.
Move the main unit away from the source
of noise.
Connect the main unit to a different mains
spur.
The sound is distorted.
Press the VOLUME – button on the main
unit to reduce the volume.
Set the sound mode of the “WALKMAN”
to “Off” or a flatter setting.
Turn the volume down on the external
equipment connected to the LINE IN jack.
The batteries cannot be
inserted in the remote
commander.
Check the polarity (+/–), and then insert
correctly.
No radio reception is available.
When connecting the main unit to a
“WALKMAN” with a built-in radio or to a
radio via the LINE IN jack, radio reception
may not occur, or sensitivity may be
reduced.
If the / (power/standby) indicator flashes,
or if the main unit turns off automatically by
playing back at full volume, the protection
circuit is operating. In this case, unplug the
AC power adaptor from the mains, and plug
in again. If it still does not operate properly,
consult your nearest Sony dealer.
Français
Préparation de la
télécommande
(Voir figure )
Avant d’utiliser la télécommande pour
la première fois, retirez la feuille
isolante.
La pile de la télécommande est mise en
place en usine.
Remplacement de la
pile au lithium
(Voir figure )
La portée de la télécommande diminue
au fur et à mesure que la pile s’épuise.
Remplacez la pile par une pile neuve
en vous conformant à la procédure ci-
dessous. Sa durée de vie est d’environ
6 mois dans des conditions d’utilisation
normales.
1
Retirez le logement de la pile.
(Voir figure -1)
2
Remplacez la pile au lithium
CR2025 par une neuve, en
orientant le pôle + vers le haut.
(Voir figure -2)
3
Remettez le logement de la pile
en place.
Remarques
Tenez la pile au lithium hors de la portée
des enfants. En cas d’ingestion de la pile,
consultez immédiatement un médecin.
N’exposez pas le capteur de télécommande
à la lumière directe du soleil ou à la
lumière vive d’une lampe fluorescente afin
d’éviter un dysfonctionnement de la
télécommande.
Réglage du
« WALKMAN »
(Voir figure )
1
Installez la fixation pour
« WALKMAN ».
Utilisez la fixation appropriée
fournie avec le « WALKMAN » ou
l’appareil principal.
Il existe deux types de fixations
fournies avec l’appareil principal.
La forme de la fixation peut varier
en fonction du « WALKMAN ».
Pour plus d’informations, reportez-
vous aux « Modèles de
« WALKMAN » compatibles avec
l’appareil principal ».
2
Insérez l’ergot du côté gauche
de la fixation () dans la fente
gauche de l’orifice du
connecteur WM-PORT, puis
enfoncez dans l’appareil
principal (). (Voir figure -1)
3
Placez le « WALKMAN » sur
l’appareil principal.
Conseil
Pour retirer la fixation du « WALKMAN »,
appuyez fermement sur la zone portant
l’indication (
) (), puis retirez-la
(), comme indiqué sur l’illustration de
droite. (Voir figure -2) Si la fixation n’est
pas retirée, appuyez fermement sur la zone
portant l’indication (
) située de l’autre
côté.
Pour utiliser l’appareil
principal comme chargeur de
pile
Branchez le cordon secteur sur la prise
secteur et posez le « WALKMAN » sur
l’appareil principal. La charge de la pile
commence automatiquement. Les
conditions de charge apparaissent sur
l’écran du « WALKMAN ». Pour plus
d’informations, reportez-vous au Mode
d’emploi de votre « WALKMAN ».
Remarque
Il est possible de lire de la musique et de
recharger la pile simultanément. La charge
dure plus longtemps lorsque la lecture est
en cours.
Conseil
Il est possible de recharger le
« WALKMAN » alors que l’appareil
principal est en mode veille.
Ecoute du son
1
Appuyez sur la touche / pour
mettre l’appareil principal sous
tension.
Le témoin / s’allume.
2
Démarrez la lecture sur le
« WALKMAN ».
Lorsque vous utilisez le
« WALKMAN » alors qu’il est
raccordé à l’appareil principal,
soutenez-le de l’autre main.
Lorsque le témoin LINE INPUT
s’allume, appuyez sur la touche
LINE INPUT pour l’éteindre.
3
Réglez le volume.
Appuyez sur la touche VOLUME
+/– pour régler le volume.
4
Une fois l’utilisation terminée,
appuyez sur la touche / pour
mettre l’appareil principal hors
tension.
Le témoin / s’éteint.
Remarques
Lorsque le « WALKMAN » est mis
sous tension, du bruit peut
s’échapper du haut-parleur, selon
votre « WALKMAN ». Il ne s’agit
cependant pas d’un
dysfonctionnement.
Désactivez la fonction Bluetooth lors
de l’utilisation d’un « WALKMAN »
doté de la fonction Bluetooth
intégrée.
Les fonctions Dynamic Normaliser,
Equalizer, VPT (Virtual Phone
Technology surround), DSEE
(Digital Sound Enhancement
Engine) ou la fonction d’optimiseur
de sortie haut-parleur sont
disponibles, selon le « WALKMAN »
que vous utilisez. Désactivez ces
réglages.
Si vous raccordez l’appareil principal
à un périphérique muni d’une radio
ou d’un syntoniseur intégré, la
réception radio peut être inexistante
ou la sensibilité risque d’être réduite
de manière significative.
Le son n’est pas reproduit par la prise
casque du « WALKMAN » si celui-ci
est posé sur l’appareil principal.
Diminuez le volume lorsque
l’appareil principal est en mode veille
afin d’éviter que le volume soit
maximum la prochaine fois que vous
allumez l’appareil principal.
Conseils
Lorsqu’un « WALKMAN » est posé sur
l’appareil principal, vous pouvez utiliser le
« WALKMAN » pour lancer ou suspendre
la lecture, etc. à l’aide de la télécommande.
Avant d’utiliser le « WALKMAN » à l’aide
de la télécommande, sélectionnez le mode
de lecture des données audio, tel que
« Musique » ou « Podcast » dans la
bibliothèque du menu HOME du
« WALKMAN ».
Lorsque l’appareil principal passe en mode
veille suite à un appui de la touche /, le
réglage du volume est mémorisé. Toutefois,
si vous débranchez l’adaptateur secteur du
secteur ou si vous débranchez la fiche de
l’adaptateur secteur de l’appareil principal,
le volume retrouve son réglage d’usine.
Raccordement d’un
périphérique
externe
(Voir figure )
Vous pouvez raccorder un
périphérique audio portatif à l’appareil
principal. Raccordez le périphérique à
la prise LINE IN à l’aide d’un câble de
raccordement adapté (non fourni).
Avant de raccorder le périphérique à
l’appareil principal, baissez le volume
du périphérique afin d’éviter l’émission
d’un son puissant susceptible d’altérer
l’ouïe.
Remarque
Il est impossible d’enregistrer sur le
« WALKMAN » le son provenant d’un
périphérique audio raccordé à la prise
LINE IN.
Ecoute avec un
périphérique
externe
1
Appuyez sur la touche / pour
mettre l’appareil principal sous
tension.
Le témoin / s’allume.
2
Appuyez sur la touche LINE
INPUT pour allumer le témoin
LINE INPUT.
3
Lancez la lecture sur le
périphérique source raccordé.
4
Réglez le volume.
Réglez le volume à l’aide de la
touche VOLUME +/– ou du
périphérique source raccordé.
5
Une fois l’utilisation terminée,
appuyez sur la touche / pour
mettre l’appareil principal hors
tension.
Le témoin / s’éteint.
Remarque
Si vous raccordez l’appareil principal à un
périphérique muni d’une radio ou d’un
syntoniseur intégré, la réception radio peut
être inexistante ou la sensibilité risque
d’être réduite.
Transfert de
données entre un
« WALKMAN » et un
ordinateur
(Voir figure )
Vous pouvez raccorder un câble USB
(fourni avec le « WALKMAN ») à un
ordinateur pour transférer des données
entre un « WALKMAN » posé sur le
connecteur WM-PORT et l’ordinateur.
1
Appuyez sur la touche / pour
mettre l’appareil principal sous
tension.
Le témoin / s’allume.
2
Appuyez sur la touche PC MODE
jusqu’à ce que le témoin PC
MODE s’allume.
Le témoin PC MODE reste allumé.
3
Transférez des données entre le
« WALKMAN » et l’ordinateur.
Pour plus d’informations sur le
transfert de données, reportez-vous
au Mode d’emploi du
« WALKMAN ».
Une fois le transfert de données
terminé, si vous souhaitez
démarrer la lecture, appuyez sur la
touche PC MODE jusqu’à ce que le
témoin PC MODE s’éteigne.
4
Une fois l’utilisation terminée,
appuyez sur la touche / pour
mettre l’appareil principal hors
tension.
Le témoin / s’éteint.
Remarques
Avant d’appuyer sur la touche PC
MODE, vérifiez que le message
« Création de Bibliothèque » ne
s’affiche pas sur l’écran du
« WALKMAN ».
Pendant le transfert de données
depuis l’ordinateur, ne branchez ou
ne débranchez pas le câble USB ou
l’adaptateur secteur. Evitez
également d’appuyer sur la touche
PC MODE. L’ordinateur risquerait
de ne pas reconnaître le
« WALKMAN » ou le transfert de
données pourrait être interrompu.
Lorsque vous débranchez le
« WALKMAN » par l’intermédiaire
de l’ordinateur, le témoin PC MODE
ne s’éteint pas. Appuyez sur la touche
PC MODE pour éteindre le témoin
PC MODE.
Si vous passez du transfert de
données à l’écoute de la musique en
appuyant sur la touche PC MODE,
du bruit peut s’échapper du haut-
parleur, selon votre « WALKMAN ».
Il ne s’agit cependant pas d’un
dysfonctionnement.
Si le « WALKMAN » se déconnecte
de l’appareil principal pendant le
transfert de données, fixez-le à ce
dernier et relancez le transfert de
données.
Dans les cas suivants, le témoin PC
MODE ne s’allume pas, même si
vous appuyez sur la touche PC
MODE. (Il clignote à plusieurs
reprises, puis s’éteint.)
- Si le câble USB n’est pas raccordé à
la prise WM-PORT
- Si l’ordinateur raccordé à l’appareil
principal est hors tension
Lorsque le témoin PC MODE est
allumé, le « WALKMAN » posé sur
le connecteur WM-PORT ne
reproduit pas le son.
Si l’appareil principal est raccordé à
l’ordinateur en connectant le câble
USB à la prise WM-PORT, il ne
pourra pas reproduire le son de
l’ordinateur. Pour cela, raccordez
l’ordinateur à la prise LINE IN de
l’appareil principal à l’aide du cordon
de raccordement (non fourni).
Même si le câble vidéo/audio est
raccordé à la prise WM-PORT, il est
impossible de reproduire les signaux
vidéo et audio.
Conseils
Si le témoin LINE INPUT s’allume lorsque
vous appuyez sur la touche LINE INPUT, il
est possible que le son du périphérique
raccordé à la prise LINE IN soit reproduit
pendant le transfert de données depuis
l’ordinateur.
Même si l’appareil principal passe en mode
veille suite à un appui de la touche /
pendant le transfert de données, ce dernier
ne s’interrompt pas.
Modèles de
« WALKMAN »
compatibles avec
l’appareil principal
L’appareil principal prend en charge les
« WALKMAN » compatibles avec
WM-PORT (22 broches).
Pour plus d’informations sur les
modèles de « WALKMAN »
compatibles avec l’appareil principal,
visitez le site Web d’assistance client
suivant ou reportez-vous au catalogue.
Europe :
http://support.sony-europe.com/DNA
Pour plus d’informations sur les
modèles de « WALKMAN »
compatibles avec les fixations de type
A et B, reportez-vous à la figure .
Si vous utilisez un modèle de
« WALKMAN » différent (figure ),
utilisez la fixation fournie avec le
« WALKMAN ».
Remarques
L’appareil principal garantit seulement la
lecture de la musique du « WALKMAN ».
Le fonctionnement des modèles de
« WALKMAN » non indiqués ici n’est pas
garanti.
Le fonctionnement n’est pas toujours
garanti, même en cas d’utilisation d’un
modèle de « WALKMAN » compatible.
Il est possible que certains modèles de
« WALKMAN » ne soient pas
commercialisés dans certaines régions.
Dépannage
Pour toute question ou tout problème
concernant ce système, dont vous ne
trouveriez pas la réponse dans ce manuel,
consultez votre revendeur Sony le plus
proche.
Si le problème persiste, consultez votre
revendeur Sony le plus proche.
Il n’y a pas de son.
Vérifiez les raccordements.
Appuyez sur la touche VOLUME + de
l’appareil principal. Si le niveau du son
reste bas, installez fermement le
« WALKMAN » sur la prise WM-PORT de
l’appareil principal.
Retirez l’étui protecteur du « WALKMAN »
et assurez-vous que ce dernier est placé
correctement.
Assurez-vous que le « WALKMAN »
reproduit de la musique.
Appuyez sur la touche PC MODE jusqu’à
ce que le témoin PC MODE s’éteigne.
Appuyez sur MUTING sur la
télécommande pour régler MUTING sur
OFF.
Si les solutions répertoriées ci-dessus ne
permettent pas de résoudre le problème,
appuyez sur la touche RESET du
« WALKMAN » pour le réinitialiser.
La télécommande ne
fonctionne pas avec l’appareil
principal ou le « WALKMAN ».
Rapprochez la télécommande du capteur
situé sur l’appareil principal.
Enlevez tout obstacle entre l’appareil
principal et la télécommande.
Installez fermement le « WALKMAN » sur
le connecteur WM-PORT.
Remplacez la pile.
Eloignez l’appareil principal des lampes
fluorescentes.
Appuyez sur la touche LINE INPUT pour
éteindre le témoin LINE INPUT.
Bourdonnement ou parasites
importants.
Eloignez l’appareil principal de la source
des parasites.
Branchez l’appareil principal sur une autre
prise secteur.
Il y a une distorsion du son.
Appuyez sur la touche VOLUME – de
l’appareil principal pour réduire le volume.
Réglez le mode son du « WALKMAN » sur
« Désactivé » ou sur un réglage plus
uniforme.
Diminuez le volume de l’appareil externe
raccordé à la prise LINE IN.
Les piles ne peuvent pas être
insérées dans la
télécommande.
Vérifiez la polarité (+/–) et insérez-les dans
le bon sens.
Aucune réception radio n’est
disponible.
Si vous raccordez l’appareil principal à un
« WALKMAN » doté d’une radio intégrée
ou à une radio via la prise LINE IN, la
réception radio peut être inexistante ou la
sensibilité risque d’être réduite.
Si le témoin / (marche/veille) clignote, ou
si l’appareil principal s’éteint
automatiquement en cas de lecture à plein
volume, le circuit de protection s’est
déclenché. Dans ce cas, débranchez
l’adaptateur secteur du secteur, puis
rebranchez-le. S’il ne fonctionne toujours pas
correctement, consultez votre revendeur
Sony le plus proche.
Deutsch
Vorbereiten der
Fernbedienung
(siehe Abb. )
Bevor Sie die Fernbedienung zum
ersten Mal verwenden, müssen Sie die
Isolierfolie herausziehen.
Die Batterie wurde werkseitig in die
Fernbedienung eingelegt.
Austauschen der
Lithiumbatterie
(siehe Abb. )
Die Reichweite der Fernbedienung
verkürzt sich, wenn die Batterie
schwächer wird.
Tauschen Sie die Batterie wie im
Folgenden erläutert gegen eine neue
aus. In der Regel hält die Batterie etwa
6 Monate.
1
Ziehen Sie das Batteriefach
heraus. (siehe Abb. -1)
2
Tauschen Sie die CR2025-
Lithiumbatterie gegen eine
neue aus und legen Sie sie mit
der Seite + nach oben ein.
(siehe Abb. -2)
3
Schieben Sie das Batteriefach
wieder zurück.
Hinweise
Bewahren Sie die Lithiumbatterie
außerhalb der Reichweite von Kindern auf.
Sollte eine Lithiumbatterie verschluckt
werden, ist umgehend ein Arzt
aufzusuchen.
Schützen Sie den Fernbedienungssensor
vor direktem Sonnenlicht oder starkem
Licht von Leuchtstoffröhren. Andernfalls
kann es zu einer Fehlfunktion der
Fernbedienung kommen.
Einsetzen des
„WALKMAN“
(siehe Abb. )
1
Installieren Sie den
„WALKMAN“-Adapter.
Verwenden Sie den passenden
Adapter, der mit dem
„WALKMAN“ oder dem
Hauptgerät geliefert wurde.
Mit dem Hauptgerät werden zwei
Adaptertypen geliefert. Die Form
des Adapters kann je nach
„WALKMAN“ variieren.
Weitere Informationen dazu finden
Sie unter „Vom Hauptgerät
unterstützte „WALKMAN“-
Modelle“.
2
Setzen Sie die Lasche links am
Adapter () in die linke
Aussparung am WM-PORT-
Stecker ein und drücken Sie den
Adapter in das Hauptgerät ().
(siehe Abb. -1)
3
Setzen Sie den „WALKMAN“ in
das Hauptgerät ein.
Tipp
Drücken Sie zum Abnehmen des
„WALKMAN“-Adapters fest auf die mit
(
) markierte Stelle () und heben Sie
ihn dann heraus (), wie in der
Abbildung dargestellt. (siehe Abb. -2)
Wenn sich der Adapter nicht
herausnehmen lässt, drücken Sie auf der
anderen Seite fest auf die mit (
)
markierte Stelle.
So verwenden Sie das
Hauptgerät als Akkuladegerät
Schließen Sie das Netzkabel an eine
Netzsteckdose an und setzen Sie den
„WALKMAN“ in das Hauptgerät ein.
Der Akkuladevorgang beginnt
automatisch. Der Ladezustand wird im
„WALKMAN“-Display angezeigt.
Einzelheiten dazu finden Sie im
Bedienungshandbuch zu Ihrem
„WALKMAN“.
Hinweis
Sie können gleichzeitig Ton wiedergeben
und das Gerät aufladen. Läuft die
Wiedergabe, dauert das Aufladen länger.
Tipp
Der „WALKMAN“ kann geladen werden,
wenn sich das Hauptgerät im
Bereitschaftsmodus befindet.
Tonwiedergabe
1
Schalten Sie das Hauptgerät
mit der Taste / ein.
Die Anzeige / leuchtet auf.
2
Starten Sie die Wiedergabe am
„WALKMAN“.
Wenn Sie den in das Hauptgerät
eingesetzten „WALKMAN“
bedienen, stützen Sie ihn mit der
anderen Hand ab. Wenn die
Anzeige LINE INPUT leuchtet,
schalten Sie sie mit der Taste LINE
INPUT aus.
3
Stellen Sie die Lautstärke ein.
Stellen Sie mit der Taste VOLUME
+/– die Lautstärke ein.
4
Schalten Sie das Hauptgerät
nach Gebrauch mit der Taste
/ aus.
Die Anzeige / erlischt.
Hinweise
Beim Einschalten des „WALKMAN“
sind je nach „WALKMAN“ über den
Lautsprecher möglicherweise
Störgeräusche zu hören. Dies ist
jedoch keine Fehlfunktion.
Deaktivieren Sie die Bluetooth-
Funktion, wenn Sie einen
„WALKMAN“ mit integrierter
Bluetooth-Funktion verwenden.
Die Verfügbarkeit von Dynamic
Normaliser, Equalizer, VPT (Virtual
Phone Technology surround), DSEE
(Digital Sound Enhancement
Engine) und der Funktion zum
Optimieren der Lautsprecherausgabe
hängt vom verwendeten
„WALKMAN“ ab. Schalten Sie diese
Einstellungen aus.
Wenn Sie das Hauptgerät an ein
Gerät mit eingebautem Radio oder
Tuner anschließen, ist unter
Umständen kein Radioempfang
möglich oder die Empfindlichkeit ist
erheblich reduziert.
Über die Kopfhörerbuchse des
„WALKMAN“ wird kein Ton
ausgegeben, wenn der „WALKMAN“
in das Hauptgerät eingesetzt ist.
Drehen Sie die Lautstärke herunter,
wenn sich das Hauptgerät im
Bereitschaftsmodus befindet. Damit
vermeiden Sie, dass die Wiedergabe
beim nächsten Mal, wenn Sie das
Hauptgerät verwenden, mit voller
Lautstärke startet.
Tipps
Wenn ein „WALKMAN“ in das Hauptgerät
eingesetzt ist, können Sie den
„WALKMAN“ mit der Fernbedienung
bedienen und die Wiedergabe starten, in
die Pause schalten usw. Bevor Sie den
„WALKMAN“ mit der Fernbedienung
bedienen, wählen Sie in der Bibliothek im
Menü HOME des „WALKMAN“ den
Wiedergabemodus für Audiodaten aus,
wie z. B. „Musik“ oder „Podcast“.
Wenn das Hauptgerät mit der Taste / in
den Bereitschaftsmodus geschaltet wird,
wird die Lautstärkeeinstellung gespeichert.
Wenn Sie jedoch das Netzteil vom
Stromnetz trennen oder den Stecker des
Netzteils aus dem Hauptgerät ziehen, wird
die Lautstärke auf die werkseitige
Einstellung zurückgesetzt.
Anschließen
externer Geräte
(siehe Abb. )
Sie können ein tragbares Audiogerät
an das Hauptgerät anschließen.
Schließen Sie das andere Gerät über
ein geeignetes Verbindungskabel (nicht
mitgeliefert) an die Buchse LINE IN
an.
Bevor Sie das andere Gerät an das
Hauptgerät anschließen, verringern Sie
die Lautstärke am anderen Gerät, um
plötzliche laute Geräusche zu
vermeiden, die das Gehör schädigen
können.
Hinweis
Der Ton von einem an die Buchse LINE IN
angeschlossenen Audiogerät kann nicht
auf dem „WALKMAN“ aufgezeichnet
werden.
Wiedergabe des
Tons von externen
Geräten
1
Schalten Sie das Hauptgerät
mit der Taste / ein.
Die Anzeige / leuchtet auf.
2
Drücken Sie die Taste LINE
INPUT, so dass die Anzeige LINE
INPUT aufleuchtet.
3
Starten Sie die Wiedergabe an
der Tonquelle.
4
Stellen Sie die Lautstärke ein.
Stellen Sie die Lautstärke mit den
Tasten VOLUME +/– oder an der
angeschlossenen Tonquelle ein.
5
Schalten Sie das Hauptgerät
nach Gebrauch mit der Taste
/ aus.
Die Anzeige / erlischt.
Hinweis
Wenn Sie das Hauptgerät an ein Gerät mit
eingebautem Radio oder Tuner
anschließen, ist unter Umständen kein
Radioempfang möglich oder die
Empfindlichkeit ist reduziert.
Übertragen von
Daten zwischen
einem „WALKMAN“
und einem
Computer
(siehe Abb. )
Wenn Sie dieses Gerät über ein USB-
Kabel (mit dem „WALKMAN“
mitgeliefert) an einen Computer
anschließen, können Sie Daten
zwischen einem am WM-PORT-
Stecker eingesetzten „WALKMAN“
und dem Computer übertragen.
1
Schalten Sie das Hauptgerät
mit der Taste / ein.
Die Anzeige / leuchtet auf.
2
Drücken Sie die Taste PC MODE,
bis die Anzeige PC MODE
aufleuchtet.
Die Anzeige PC MODE leuchtet
stetig.
3
Übertragen Sie Daten zwischen
dem „WALKMAN“ und dem
Computer.
Einzelheiten zum Übertragen von
Daten finden Sie im
Bedienungshandbuch zu Ihrem
„WALKMAN“.
Wenn die Datenübertragung
abgeschlossen ist und Sie die
Wiedergabe starten wollen,
drücken Sie die Taste PC MODE,
bis die Anzeige PC MODE erlischt.
4
Schalten Sie das Hauptgerät
nach Gebrauch mit der Taste
/ aus.
Die Anzeige / erlischt.
Hinweise
Vergewissern Sie sich vor dem
Drücken der Taste PC MODE, dass
die Meldung „Bibliothek erstellen“
nicht im Display des „WALKMAN“
angezeigt wird.
Während der Datenübertragung
vom Computer dürfen Sie das USB-
Kabel oder Netzteil weder
anschließen noch lösen und auch die
Taste PC MODE nicht drücken.
Andernfalls erkennt der Computer
den „WALKMAN“ möglicherweise
nicht oder die Datenübertragung
wird unterbrochen.
Wenn Sie die Verbindung zum
„WALKMAN“ trennen, indem Sie
am Computer eine entsprechende
Funktion ausführen, erlischt die
Anzeige PC MODE nicht. Schalten
Sie die Anzeige PC MODE mit der
Taste PC MODE aus.
Wenn Sie mit der Taste PC MODE
von der Datenübertragung zur
Musikwiedergabe umschalten, sind
je nach „WALKMAN“ über den
Lautsprecher möglicherweise
Störgeräusche zu hören. Dies ist
jedoch keine Fehlfunktion.
Wenn der „WALKMAN“ während
der Datenübertragung vom
Hauptgerät getrennt wird, setzen Sie
ihn wieder ein und starten Sie die
Datenübertragung erneut.
In den folgenden Fällen leuchtet die
Anzeige PC MODE nicht, auch
wenn Sie die Taste PC MODE
drücken. (Die Anzeige blinkt einige
Male und erlischt dann.)
- Wenn das USB-Kabel nicht an die
WM-PORT-Buchse angeschlossen
ist
- Wenn der mit dem Hauptgerät
verbundene Computer
ausgeschaltet ist
Solange die Anzeige PC MODE
leuchtet, gibt der am WM-PORT-
Stecker eingesetzte „WALKMAN“
keinen Ton wieder.
Wenn Sie das Hauptgerät mit dem
Computer verbinden, indem Sie das
USB-Kabel an die WM-PORT-
Buchse anschließen, kann es den
Ton vom Computer nicht
wiedergeben. Dazu schließen Sie
den Computer über das
Verbindungskabel (nicht
mitgeliefert) an die Buchse LINE IN
am Hauptgerät an.
Auch wenn ein Video-/Audiokabel
an die WM-PORT-Buchse
angeschlossen ist, können keine
Video- und Audiosignale
ausgegeben werden.
Tipps
Wenn durch Drücken der Taste LINE
INPUT die Anzeige LINE INPUT
aufleuchtet, kann der Ton vom an die
Buchse LINE IN angeschlossenen Gerät
während der Datenübertragung vom
Computer ausgegeben werden.
Auch wenn das Hauptgerät während der
Datenübertragung mit der Taste / in
den Bereitschaftsmodus geschaltet wird,
wird die Datenübertragung fortgesetzt.
Vom Hauptgerät
unterstützte
„WALKMAN“-
Modelle
Das Hauptgerät unterstützt alle
„WALKMAN“-Geräte, die mit dem
WM-PORT (22-polig) kompatibel
sind.
Einzelheiten dazu, welche
„WALKMAN“-Modelle mit dem
Hauptgerät kompatibel sind, finden Sie
in der folgenden Kunden-
Supportwebsite oder im Katalog.
Europa:
http://support.sony-europe.com/DNA
Einzelheiten dazu, welche
„WALKMAN“-Modelle mit dem
Adapter des Typs A bzw. B kompatibel
sind, sind in Abb. aufgeführt.
Wenn Sie einen anderen „WALKMAN“
als diese Modelle (Abb. )
verwenden, verwenden Sie den mit
dem „WALKMAN“ gelieferten
Adapter.
Hinweise
Bei dem Hauptgerät kann nur die
Musikwiedergabe über einen
„WALKMAN“ gewährleistet werden. Der
Betrieb von „WALKMAN“-Modellen, die
hier nicht aufgelistet sind, kann nicht
garantiert werden.
Der Betrieb kann auch bei den
unterstützten „WALKMAN“-Modellen
nicht unbedingt garantiert werden.
Bestimmte „WALKMAN“-Modelle sind
möglicherweise nicht in allen Regionen
erhältlich.
Störungsbehebung
Wenn Sie Fragen oder Probleme im
Zusammenhang mit diesem System haben,
die in dieser Anleitung nicht behandelt
werden, wenden Sie sich bitte an den
nächsten Sony-Händler.
Sollte sich ein Problem nicht beheben
lassen, wenden Sie sich an den nächsten
Sony-Händler.
Es ist kein Ton zu hören.
Überprüfen Sie die Verbindungen.
Drücken Sie VOLUME + am Hauptgerät.
Wenn der Ton immer noch sehr leise ist,
setzen Sie den „WALKMAN“ fest auf den
WM-PORT-Stecker des Hauptgeräts.
Nehmen Sie die Schutzhülle vom
„WALKMAN“ ab und überprüfen Sie, ob
der „WALKMAN“ fest eingesetzt ist.
Überprüfen Sie, ob am „WALKMAN“
Musik wiedergegeben wird.
Drücken Sie die Taste PC MODE, bis die
Anzeige PC MODE erlischt.
Drücken Sie MUTING auf der
Fernbedienung, um MUTING auf OFF zu
setzen.
Wenn sich das Problem mit den oben
aufgelisteten Maßnahmen nicht beheben
lässt, drücken Sie die Taste RESET am
„WALKMAN“, um ihn zurückzusetzen.
Das Hauptgerät oder der
„WALKMAN“ lässt sich nicht
mit der Fernbedienung
steuern.
Halten Sie die Fernbedienung näher an
den Fernbedienungssensor des
Hauptgeräts.
Entfernen Sie Hindernisse zwischen dem
Hauptgerät und der Fernbedienung.
Setzen Sie den „WALKMAN“ fest auf den
WM-PORT-Stecker.
Tauschen Sie die Batterie aus.
Stellen Sie das Hauptgerät weiter vom
Licht einer Leuchtstoffröhre entfernt auf.
Drücken Sie die Taste LINE INPUT, so
dass die Anzeige LINE INPUT erlischt.
Starkes Brummen oder
Störgeräusche sind zu hören.
Stellen Sie das Hauptgerät weiter entfernt
von der Quelle der Störungen auf.
Schließen Sie das Hauptgerät an einen
anderen Netzstromkreis an.
Der Ton ist verzerrt.
Reduzieren Sie mit VOLUME – am
Hauptgerät die Lautstärke.
Setzen Sie den Klangmodus des
„WALKMAN“ auf „Aus“ oder verwenden
Sie eine Einstellung mit weniger
Verstärkung.
Verringern Sie die Lautstärke am an die
Buchse LINE IN angeschlossenen externen
Gerät.
Die Batterie lässt sich nicht in
die Fernbedienung einlegen.
Überprüfen Sie die Polarität (+/–) und
setzen Sie sie richtig herum ein.
Kein Radioempfang ist
möglich.
Wenn Sie das Hauptgerät an einen
„WALKMAN“ mit eingebautem Radio
oder über die Buchse LINE IN an ein
Radio anschließen, ist unter Umständen
kein Radioempfang möglich oder die
Empfindlichkeit ist reduziert.
Wenn die Anzeige / (Ein/Bereitschaft)
blinkt oder sich das Hauptgerät bei
Wiedergabe mit voller Lautstärke
automatisch ausschaltet, hat sich die
Schutzschaltung eingeschaltet. Trennen Sie
in diesem Fall das Netzteil vom Stromnetz
und schließen Sie es dann wieder an. Wenn
es danach immer noch nicht richtig
funktioniert, wenden Sie sich an Ihren Sony-
Händler.
Español
Preparación del
mando a distancia
(consulte la
ilustración )
Antes de utilizar el mando a distancia
por primera vez, retire la película
aislante.
La pila viene instalada de fábrica en el
mando a distancia.
Sustitución de la
pila de litio
(consulte la
ilustración )
La distancia de funcionamiento del
mando a distancia se acorta a medida
que se agota la energía de la pila.
Sustituya la pila por una nueva
mediante el procedimiento descrito a
continuación. La pila dura unos seis
meses en condiciones normales.
1
Extraiga el compartimiento de
la pila. (consulte la ilustración
-1)
2
Sustituya la pila de litio CR2025
por una nueva, con el lado +
hacia arriba. (consulte la
ilustración -2)
3
Vuelva a colocar el
compartimiento de la pila en su
posición.
Notas
Mantenga la pila de litio fuera del alcance
de los niños. Si se ingiere una pila de forma
accidental, acuda inmediatamente a un
médico.
No exponga el sensor remote a la luz solar
directa o a luz intensa procedente de un
fluorescente para evitar un fallo de
funcionamiento del mando a distancia.
Ajuste del
“WALKMAN”
(consulte la
ilustración )
1
Instale el accesorio de
“WALKMAN”.
Utilice el accesorio adecuado
suministrado con el “WALKMAN”
o la unidad principal.
Existen dos tipos de accesorios
suministrados con la unidad
principal. La forma del accesorio
puede variar en función del
“WALKMAN”.
Para obtener más información,
consulte los “Modelos de
“WALKMAN” compatibles con la
unidad principal”.
2
Inserte la pestaña del lado
izquierdo del accesorio () en
la ranura izquierda del orificio
de la clavija WM-PORT y, a
continuación, insértelo en la
unidad principal (). (consulte
la ilustración -1)
3
Coloque el “WALKMAN” en la
unidad principal.
Sugerencia
Para retirar el accesorio del “WALKMAN”,
presione firmemente el área con la marca
(
) () y extráigalo (), tal y como
muestra la ilustración. (consulte la
ilustración -2) Si el accesorio no se ha
retirado, presione firmemente la otra área
con la marca (
).
Para utilizar la unidad principal
como un cargador de baterías
Enchufe el cable de ca a una toma de
corriente y coloque el “WALKMAN”
en la unidad principal. La batería
comenzará a cargarse
automáticamente. Las condiciones de
carga aparecen en la pantalla del
“WALKMAN”. Para obtener más
información, consulte la Guía de
funcionamiento del “WALKMAN”.
Nota
La reproducción y la recarga se pueden
realizar al mismo tiempo. El tiempo de
recarga será mayor durante la
reproducción.
Sugerencia
El “WALKMAN” puede cargarse mientras
la unidad principal se encuentra en modo
de espera.
Cómo escuchar el
sonido
1
Pulse el botón / para
encender la unidad principal.
El indicador / se ilumina.
2
Inicie la reproducción en el
“WALKMAN”.
Cuando se utiliza el “WALKMAN”
mientras se realiza la conexión a la
unidad principal, sujételo con la
otra mano. Cuando el indicador
LINE INPUT se ilumine, pulse el
botón LINE INPUT para apagarlo.
3
Ajuste el volumen.
Pulse el botón VOLUME +/– para
ajustar el volumen.
4
Pulse el botón / para apagar
la unidad principal después de
su utilización.
El indicador / se apaga.
Notas
Cuando el “WALKMAN” está
encendido, es posible que se genere
ruido del altavoz, en función del
“WALKMAN”. No obstante, no se
trata de un fallo de funcionamiento.
Desactive la función Bluetooth
cuando utilice un “WALKMAN” con
función Bluetooth integrada.
En función del “WALKMAN” que
está utilizando, dispondrá de
Normalizador dinámico,
ecualizador, VPT (Virtual Phone
Technology surround), sistema
DSEE (Digital Sound Enhancement
Engine) o función de optimizador
de salida del altavoz. Desactive estos
ajustes.
Si conecta la unidad principal al
dispositivo con una radio o un
sintonizador incorporados, es
posible que la recepción de radio no
se produzca o que la sensibilidad se
reduzca de forma significativa.
El sonido no se emite desde la toma
de auriculares del “WALKMAN” si
se ajusta a la unidad principal.
Baje el volumen cuando la unidad
principal se encuentre en el modo de
espera para evitar que la
reproducción se realice a todo
volumen cuando utilice la unidad
principal la próxima vez.
Sugerencias
Al colocar un “WALKMAN” en la unidad
principal, es posible utilizar el
“WALKMAN” para iniciar la reproducción
e introducir una pausa, etc., con el mando
a distancia. Antes de utilizar el
“WALKMAN” mediante el mando a
distancia, seleccione el modo de
reproducción de datos de audio como
“Música” o “Podcast” desde la biblioteca en
el menú HOME del “WALKMAN”.
Cuando la unidad principal entra en el
modo de espera mediante la pulsación del
botón /, se memoriza el ajuste del
volumen. Sin embargo, si desconecta el
adaptador de alimentación de ca de la
toma de corriente o desconecta el enchufe
del adaptador de alimentación de ca de la
unidad principal, el volumen volverá al
ajuste predeterminado de fábrica.
Cómo conectar
equipos externos
(consulte la
ilustración )
Puede conectar un dispositivo de audio
portátil a la unidad principal. Conecte
el dispositivo a la toma LINE IN
mediante un cable de conexión
adecuado (no suministrado).
Antes de conectar el dispositivo a la
unidad principal, baje el volumen del
dispositivo para evitar un sonido fuerte
brusco, que podría dañar sus oídos.
Nota
No es posible grabar en el “WALKMAN”
sonido de un dispositivo de audio
conectado a la toma LINE IN.
Cómo escuchar
equipos externos
1
Pulse el botón / para
encender la unidad principal.
El indicador / se ilumina.
2
Pulse el botón LINE INPUT para
que se ilumine el indicador LINE
INPUT.
3
Inicie la reproducción en el
dispositivo fuente conectado.
4
Ajuste el volumen.
Ajuste el volumen mediante el
botón VOLUME +/– o el
dispositivo fuente conectado.
5
Pulse el botón / para apagar
la unidad principal después de
su utilización.
El indicador / se apaga.
Nota
Si conecta la unidad principal a un
dispositivo con una radio o un
sintonizador incorporados, es posible que
la recepción de radio no se produzca o que
la sensibilidad se reduzca.
Transferencia de
datos entre un
“WALKMAN” y un
ordenador (consulte
la ilustración )
Mediante la conexión de un cable USB
(suministrado con el “WALKMAN”) a
un ordenador, es posible transferir
datos entre un “WALKMAN” colocado
en la clavija WM-PORT y el
ordenador.
1
Pulse el botón / para
encender la unidad principal.
El indicador / se ilumina.
2
Pulse el botón PC MODE hasta
que el indicador PC MODE se
ilumine.
El indicador PC MODE permanece
encendido.
3
Transfiera los datos entre el
“WALKMAN” y el ordenador.
Para obtener más información
acerca de la transferencia de datos,
consulte la Guía de funcionamiento
del “WALKMAN”.
Cuando finalice la transferencia de
datos y desee iniciar la
reproducción, pulse el botón PC
MODE hasta que el indicador PC
MODE se apague.
4
Pulse el botón / para apagar
la unidad principal después de
su utilización.
El indicador / se apaga.
Notas
Antes de pulsar el botón PC MODE,
asegúrese de que el mensaje
“Creando biblioteca” no se muestra
en la pantalla del “WALKMAN”.
No conecte ni desconecte el cable
USB o el adaptador de alimentación
de ca ni pulse el botón PC MODE
durante la transferencia de datos del
ordenador. Es posible que el
ordenador no reconozca el
“WALKMAN” o que la transferencia
de datos se interrumpa.
Al extraer el “WALKMAN”
mediante el ordenador, el indicador
PC MODE no se apagará. Pulse el
botón PC MODE para desactivar el
indicador PC MODE.
Si pulsa el botón PC MODE para
cambiar de la transferencia de datos
a la reproducción de música, es
posible que se genere ruido del
altavoz, en función del
“WALKMAN”. No obstante, no se
trata de un fallo de funcionamiento.
Si el “WALKMAN” se separa de la
unidad principal durante la
transferencia de datos, colóquelo en
la unidad principal e inicie el
proceso de transferencia de datos de
nuevo.
En los casos siguientes, el indicador
PC MODE no se iluminará, incluso
si se pulsa el botón PC MODE. (Se
apagará después de parpadear varias
veces).
- Cuando no conecte el cable USB a
la toma WM-PORT
- Cuando el ordenador conectado a
la unidad principal está apagado
Mientras el indicador PC MODE
esta encendido, el “WALKMAN”
que se encuentra colocado en la
clavija WM-PORT no reproducirá
ningún sonido.
Si la unidad principal está conectada
al ordenador mediante la conexión
del cable USB a la toma WM-PORT,
no se podrá reproducir el sonido del
ordenador. Para ello, conecte el
ordenador a la toma LINE IN de la
unidad principal mediante el cable
de conexión (no suministrado).
Incluso si el cable de audio/vídeo
está conectado a la toma WM-
PORT, las señales de vídeo y audio
no se pueden emitir.
Sugerencias
Si el indicador LINE INPUT se ilumina al
pulsar el botón LINE INPUT, el sonido
procedente del dispositivo conectado a la
toma LINE IN se puede emitir durante la
transferencia de datos desde el ordenador.
Incluso si la unidad principal entra en el
modo de espera mediante la pulsación del
botón / durante la transferencia de
datos, la transferencia de datos continúa.
Modelos de
“WALKMAN”
compatibles con la
unidad principal
La unidad principal admite cualquier
dispositivo “WALKMAN” compatible
con WM-PORT (22 contactos).
Para obtener más información acerca
de los modelos de “WALKMAN”
compatibles con la unidad principal,
visite el siguiente sitio web de
asistencia al cliente o consulte el
catálogo.
Europa:
http://support.sony-europe.com/DNA
Para obtener más información acerca
de los modelos de “WALKMAN”
compatibles con los tipos de accesorios
A y B, consulte la ilustración .
Cuando utilice un “WALKMAN”
diferente de esos modelos (ilustración
), utilice el accesorio suministrado
con el “WALKMAN”.
Notas
Solamente se garantiza la reproducción de
música del “WALKMAN ” en la unidad
principal. No se garantiza el
funcionamiento de modelos de
“WALKMAN” distintos a los indicados.
No se garantiza siempre el funcionamiento
aunque se utilicen modelos de
“WALKMAN” compatibles.
Es posible que algunos modelos de
“WALKMAN” no se comercialicen en
determinadas zonas.
Solución de
problemas
Si tiene cualquier duda o problema
relacionado con este sistema y que no
aparezca en el manual, consulte con su
distribuidor de Sony más próximo.
Si el problema persiste, consulte con el
distribuidor Sony más próximo.
No hay sonido.
Compruebe las conexiones.
Pulse VOLUME + en la unidad principal.
Si el volumen sigue siendo bajo, coloque el
“WALKMAN” en el enchufe WM-PORT
de la unidad firmemente.
Extraiga la funda protectora del
“WALKMAN” y asegúrese de que el
“WALKMAN” está colocado de forma
segura.
Asegúrese de que el “WALKMAN” está
reproduciendo música.
Pulse el botón PC MODE hasta que el
indicador PC MODE se apague.
Pulse MUTING en el mando a distancia
para ajustar MUTING en OFF.
Si las indicaciones anteriores no logran
resolver el problema, pulse el botón RESET
del “WALKMAN” para restablecerlo.
El mando a distancia no
funciona en la unidad principal
o en el “WALKMAN”.
Acerque el mando a distancia al sensor
remote de la unidad principal.
Elimine cualquier obstáculo que exista
entre la unidad principal y el mando a
distancia.
Coloque el “WALKMAN” en la clavija
WM-PORT firmemente.
Cambie la pila.
Coloque la unidad principal en un lugar
alejado de la luz fluorescente.
Pulse el botón LINE INPUT para apagar el
indicador LINE INPUT.
Se oye un ruido o un zumbido
intenso.
Aleje la unidad principal de la fuente del
ruido.
Conecte la unidad principal a una toma de
corriente diferente.
El sonido está distorsionado.
Pulse el botón VOLUME – en la unidad
principal para reducir el volumen.
Ajuste el modo de sonido del
“WALKMAN” en “Desactivado” o en un
ajuste más plano.
Baje el volumen en el equipo externo
conectado a la toma LINE IN.
No es posible insertar las pilas
en el mando a distancia.
Compruebe la polaridad (+/–) y, a
continuación, insértelas correctamente.
La función de recepción de
radio no se encuentra
disponible.
Al conectar la unidad principal a un
“WALKMAN” con radio incorporada o a
una radio a través de la toma LINE IN, es
posible que no se produzca la recepción de
radio o que se reduzca la sensibilidad.
Si el indicador / (encendido/en espera)
parpadea, o si la unidad principal se apaga
automáticamente al reproducir a todo
volumen, el circuito de protección se
encuentra en funcionamiento. En este caso,
desconecte el adaptador de alimentación de
ca de la toma de corriente y vuelva a
conectarlo. Si sigue sin funcionar
correctamente, póngase en contacto con el
distribuidor Sony más cercano.
Nederlands
De
afstandsbediening
voorbereiden
(Zie afb. )
Vooraleer u de afstandsbediening voor
het eerst gebruikt, moet u het plastic
beschermlaagje verwijderen.
De batterij wordt in de fabriek in de
afstandsbediening geplaatst.
De lithiumbatterij
vervangen
(Zie afb.)
De bedieningsafstand van de
afstandsbediening wordt korter
naarmate de batterij leger raakt.
Vervang de batterij door een nieuwe en
volg hierbij de onderstaande
procedure. Een nieuwe batterij kan
normaal ongeveer 6 maanden gebruikt
worden.
1
Verwijder de batterijhouder.
(Zie afb. -1)
2
Vervang de CR2025-
lithiumbatterij door een nieuwe
batterij met de pluspool (+)
naar boven gericht. (Zie afb. -
2)
3
Plaats de batterijhouder terug
op zijn positie.
Opmerkingen
Houd de lithiumbatterij buiten het bereik
van kinderen. Raadpleeg meteen een arts
als de batterij wordt ingeslikt.
Stel de afstandsbedieningssensor niet bloot
aan direct zonlicht of felle verlichting van
een fluorescentielamp om storingen van de
afstandsbediening te vermijden.
De "WALKMAN"
instellen
(Zie afb. )
1
Installeer het hulpstuk voor de
"WALKMAN".
Gebruik het juiste hulpstuk dat bij
de "WALKMAN" of het
hoofdapparaat is geleverd.
Er zijn twee types hulpstukken
geleverd bij het hoofdapparaat.
Afhankelijk van de "WALKMAN"
kan de vorm van het hulpstuk
afwijken.
Zie ""WALKMAN”-modellen die
worden ondersteund door het
hoofdapparaat" voor meer
informatie.
2
Plaats het nokje op de
linkerzijde van het hulpstuk
() in het linkergat van de
opening van de WM-PORT-
stekker en druk het hulpstuk
vervolgens naar beneden in het
hoofdapparaat (). (Zie afb.
-1)
3
Plaats de "WALKMAN" op het
hoofdapparaat.
Tip
Om het hulpstuk van de "WALKMAN" te
verwijderen, drukt u stevig omlaag op het
gemarkeerde deel (
) () en
verwijdert u het stuk () zoals
weergegeven op de afbeelding. (Zie afb.
-2) Als het hulpstuk niet verwijderd
wordt, drukt u stevig omlaag op het andere
gemarkeerde deel (
).
Het hoofdapparaat gebruiken
als batterijlader
Steek de stekker van het netsnoer in
het stopcontact en plaats de
"WALKMAN" op het hoofdapparaat.
Het opladen van de batterij wordt
automatisch gestart. De oplaadstatus
wordt weergegeven op het scherm van
de "WALKMAN". Raadpleeg de
Bedieningshandleiding van de
"WALKMAN" voor meer informatie.
Opmerking
U kunt het apparaat afspelen terwijl het
wordt opgeladen. De laadtijd zal langer
duren tijdens het afspelen.
Tip
De "WALKMAN" kan opgeladen worden
terwijl de stand-bystand geactiveerd is op
het hoofdapparaat.
Het geluid
beluisteren
1
Druk op de /-toets om het
hoofdapparaat in te schakelen.
De /-aanduiding gaat branden.
2
Start het afspelen op de
"WALKMAN".
Als u de "WALKMAN" bedient
terwijl deze in het hoofdapparaat is
geplaatst, moet u deze met uw
andere hand vasthouden. Wanneer
de LINE INPUT-aanduiding
oplicht, drukt u op de LINE
INPUT-toets om deze uit te
schakelen.
3
Pas het volume aan.
Druk op de toets VOLUME +/–
om het volume aan te passen.
4
Druk op de /-toets om het
hoofdapparaat uit te schakelen
na het gebruik.
De /-aanduiding dooft.
Opmerkingen
Wanneer de "WALKMAN"
ingeschakeld wordt, produceert de
luidspreker mogelijk geluid,
afhankelijk van uw "WALKMAN".
Dit duidt niet op een storing.
Schakel de Bluetooth-functie uit
wanneer u een "WALKMAN" met
ingebouwde Bluetooth-functie
gebruikt.
Beschikbaarheid van Dynamic
Normaliser, Equalizer, VPT (Virtual
Phone Technology-surround), DSEE
(Digital Sound Enhancement
Engine) of de functie voor het
optimaliseren van de
luidsprekeruitvoer is afhankelijk van
de "WALKMAN" die u gebruikt.
Schakel deze instellingen uit.
Als u het hoofdapparaat aansluit op
een toestel met een ingebouwde
radio of tuner, is het mogelijk dat u
radio-uitzendingen niet kunt
ontvangen of dat de gevoeligheid
ernstig verminderd.
Er wordt geen geluid uitgevoerd via
de hoofdtelefoonaansluiting van de
"WALKMAN" als deze in het
hoofdapparaat geplaatst is.
Verlaag het volume wanneer de
stand-bystand geactiveerd is op het
hoofdapparaat om te vermijden dat
het volume veel te hoog staat
wanneer u het hoofdapparaat de
volgende keer gebruikt.
Tips
Wanneer er een "WALKMAN" in het
hoofdapparaat geplaatst is, kunt u deze
bedienen (afspelen, pauzeren enz.) met de
afstandsbediening. Voor u de
"WALKMAN" bedient met behulp van de
afstandsbediening, selecteert u een
afspeelmodus voor de audiogegevens zoals
"Music" of "Podcasts" in de bibliotheek in
het menu HOME van de "WALKMAN".
Wanneer de stand-bystand geactiveerd
wordt op het hoofdapparaat door te
drukken op de /-toets, wordt de
volume-instelling onthouden. Als u echter
de netspanningsadapter loskoppelt van het
stopcontact of de stekker van de
netspanningsadapter loskoppelt van het
hoofdapparaat, wordt het volume
teruggezet op de fabrieksinstelling.
Externe apparatuur
aansluiten
(Zie afb. )
U kunt een draagbaar audioapparaat
aansluiten op het hoofdapparaat.
Verbind het audioapparaat met de
LINE IN-aansluiting met behulp van
een geschikte kabel (niet bijgeleverd).
Vooraleer u het audioapparaat aansluit
op het hoofdapparaat, verlaagt u het
volume van het apparaat om plotse
harde geluiden te vermijden (deze
kunnen gehoorschade veroorzaken).
Opmerking
Geluid van een audioapparaat dat
aangesloten is op de LINE IN-aansluiting
kan niet opgenomen worden op de
"WALKMAN".
Externe apparatuur
beluisteren
1
Druk op de /-toets om het
hoofdapparaat in te schakelen.
De /-aanduiding gaat branden.
2
Druk op de LINE INPUT-toets
om de LINE INPUT-aanduiding
te doen branden.
3
Start het afspelen op het
aangesloten bronapparaat.
4
Pas het volume aan.
Pas het volume aan met de toets
VOLUME +/– of via het
aangesloten bronapparaat.
5
Druk op de /-toets om het
hoofdapparaat uit te schakelen
na het gebruik.
De /-aanduiding dooft.
Opmerking
Als u het hoofdapparaat aansluit op een
toestel met een ingebouwde radio of tuner,
is het mogelijk dat u radio-uitzendingen
niet kunt ontvangen of dat de gevoeligheid
vermindert.
Gegevens
overzetten tussen
een "WALKMAN" en
een computer
(Zie afb. )
Door een USB-kabel (geleverd bij de
"WALKMAN") aan te sluiten op een
computer, kunt u gegevens overzetten
tussen een "WALKMAN" die geplaatst
is op de WM-PORT-stekker en een
computer.
1
Druk op de /-toets om het
hoofdapparaat in te schakelen.
De /-aanduiding gaat branden.
2
Druk op de PC MODE-toets tot
de PC MODE-aanduiding
oplicht.
De PC MODE-aanduiding blijft
branden.
3
Zet gegevens over tussen de
"WALKMAN" en de computer.
Raadpleeg de
Bedieningshandleiding van de
"WALKMAN" voor meer
informatie over het overzetten van
gegevens.
Wanneer de overdracht van de
gegevens voltooid is en u het
afspelen wilt starten, drukt u op de
PC MODE-toets tot de PC MODE-
aanduiding dooft.
4
Druk op de /-toets om het
hoofdapparaat uit te schakelen
na het gebruik.
De /-aanduiding dooft.
Opmerkingen
Vooraleer u op de knop PC MODE
drukt, controleert u of de melding
"Creating Library" (bibliotheek
aanmaken) niet langer wordt
weergegeven op het scherm van de
"WALKMAN".
Tijdens het overzetten van gegevens
van uw computer mag u de USB-
kabel of de netspanningsadapter niet
aansluiten of loskoppelen, en
evenmin drukken op de PC MODE-
toets. Doet u dit wel, dan is het
mogelijk dat uw computer de
"WALKMAN" niet herkent of dat de
gegevensoverdracht onderbroken
wordt.
Wanneer u de "WALKMAN"
loskoppelt via de computer, dooft de
PC MODE-aanduiding niet. Druk
op de PC MODE-toets om de PC
MODE-aanduiding uit te schakelen.
Als u overschakelt van
gegevensoverdracht naar
muziekweergave door te drukken op
de knop PC MODE, produceert de
luidspreker mogelijk geluid,
afhankelijk van uw "WALKMAN".
Dit duidt niet op een storing.
Als de "WALKMAN" losgekoppeld
wordt van het hoofdapparaat tijdens
het overzetten van gegevens, koppelt
u deze weer vast en start u de
gegevensoverdracht opnieuw.
In de volgende gevallen licht de PC
MODE-aanduiding niet op, zelfs
niet wanneer u op de PC MODE-
toets drukt. (Na enkele keren
knipperen, dooft de aanduiding.)
- Wanneer de USB-kabel niet
aangesloten is op de WM-PORT-
aansluiting
- Wanneer de aangesloten computer
uitgeschakeld is
Wanneer de PC MODE-aanduiding
brandt, zal de "WALKMAN" die op
de WM-PORT-stekker geplaatst is
geen geluid produceren.
Als het hoofdapparaat verbonden is
met de computer door de USB-kabel
aan te sluiten op de WM-PORT-
aansluiting, kan het geluid van de
computer niet weergegeven worden.
Om dit te kunnen doen, sluit u de
computer aan op de LINE IN-
aansluiting van het hoofdapparaat
met behulp van een geschikte kabel
(niet bijgeleverd).
Zelfs als de audio/video-kabel
aangesloten is op de WM-PORT-
aansluiting, kunnen er geen audio-
en videosignalen uitgevoerd worden.
Tips
Als de LINE INPUT-aanduiding oplicht
door te drukken op de LINE INPUT-toets,
kan het geluid van het apparaat dat
aangesloten is op de LINE IN-aansluiting
uitgevoerd worden tijdens het overzetten
van gegevens vanaf de computer.
Zelfs als de stand-bystand geactiveerd
wordt op het hoofdapparaat door te
drukken op de /-toets tijdens de
gegevensoverdracht, wordt de
gegevensoverdracht voortgezet.
"WALKMAN"-
modellen die
worden
ondersteund door
het hoofdapparaat
Het hoofdapparaat ondersteunt alle
"WALKMAN"-modellen die
compatibel zijn met WM-PORT (22
pinnen).
Meer informatie over de
"WALKMAN"-modellen die
compatibel zijn met het hoofdapparaat
vindt u op de volgende website voor
klantenondersteuning of in de
catalogus.
Europa:
http://support.sony-europe.com/DNA
Zie afb. voor meer informatie over
"WALKMAN"-modellen die
compatibel zijn met hulpstukken type
A en type B.
Wanneer u een andere "WALKMAN"
gebruikt dan deze modellen (afb. ),
gebruikt u het hulpstuk dat geleverd is
bij de "WALKMAN".
Opmerkingen
Alleen muziek op een "WALKMAN" wordt
gegarandeerd afgespeeld op het
hoofdapparaat. De werking van niet
opgesomde "WALKMAN"-modellen wordt
niet gegarandeerd.
De werking kan niet altijd gegarandeerd
worden, zelfs niet wanneer u ondersteunde
"WALKMAN"-modellen gebruikt.
Sommige "WALKMAN"-modellen worden
in bepaalde regio's niet verkocht.
Problemen
oplossen
U kunt steeds terecht bij uw
dichtstbijzijnde Sony-verdeler voor alle
vragen over of eventuele problemen met
dit toestel die niet worden behandeld in
deze handleiding.
Raadpleeg de dichtstbijzijnde Sony-
verdeler als een probleem niet opgelost
raakt.
Er is geen geluid.
Controleer de aansluitingen.
Druk op VOLUME + op het
hoofdapparaat. Als het volume nog steeds
zacht is, plaatst u de "WALKMAN" stevig
op de WM-PORT-stekker van het
hoofdapparaat.
Verwijder de beschermende hoes van de
"WALKMAN" en controleer of de
"WALKMAN" stevig is aangesloten.
Controleer of er muziek wordt afgespeeld
op de "WALKMAN".
Druk op de PC MODE-toets tot de PC
MODE-aanduiding dooft.
Druk op MUTING op de
afstandsbediening om MUTING in te
stellen op OFF.
Als het probleem niet kan worden
verholpen met de bovenstaande
oplossingen, drukt u op de RESET-toets
van de "WALKMAN" om deze te resetten.
De afstandsbediening kan niet
worden gebruikt voor het
hoofdapparaat of de
"WALKMAN".
Gebruik de afstandsbediening dicht bij de
afstandsbedieningssensor van het
hoofdapparaat.
Verwijder eventuele obstakels tussen het
hoofdapparaat en de afstandsbediening.
Plaats de "WALKMAN" stevig op de WM-
PORT-stekker.
Vervang de batterij.
Plaats het hoofdapparaat uit de buurt van
fluorescerende verlichting.
Druk op de LINE INPUT-toets om de
LINE INPUT-aanduiding uit te schakelen.
Er is gezoem of geruis
hoorbaar.
Plaats het hoofdapparaat uit de buurt van
de storingsbron.
Sluit het hoofdapparaat aan op een andere
stroomkring.
Het geluid is vervormd.
Druk op de toets VOLUME – op het
hoofdapparaat om het volume te verlagen.
Stel de geluidsmodus van de "WALKMAN"
in op "Off" of kies een neutralere instelling.
Zet het volume lager op de externe
apparatuur die aangesloten is op de LINE
IN-aansluiting.
De batterij kan niet in de
afstandsbediening worden
geplaatst.
Controleer de polen (+/–) en plaats de
batterij in de juiste richting.
Geen radio-ontvangst.
Wanneer u het hoofdapparaat aansluit op
een "WALKMAN" met een ingebouwde
radio of op een radio via de LINE IN-
aansluiting, is er mogelijk geen radio-
ontvangst of wordt de gevoeligheid
verminderd.
Als de /-aanduiding (aan/stand-by)
knippert of als het hoofdapparaat
automatisch uitgeschakeld wordt wanneer er
wordt afgespeeld met het volume ingesteld
op het maximum, betekent dit dat het
beveiligingscircuit geactiveerd is. Koppel in
dit geval de netspanningsadapter los van het
stopcontact en sluit deze daarna opnieuw
aan. Als het apparaat nog steeds niet correct
werkt, raadpleegt u uw dichtstbijzijnde Sony-
verdeler.
1
2
Lithium battery CR2025 (not supplied)
Pile au lithium CR2025 (non fournie)
CR2025-Lithiumbatterie (nicht mitgeliefert)
Pila de litio CR2025 (no suministrada)
CR2025-lithiumbatterij (niet bijgeleverd)
1
2
To LINE OUT jack of portable
audio device
Vers la prise LINE OUT du
périphérique audio portatif
An LINE OUT-Buchse eines
tragbaren Audiogeräts
A la toma LINE OUT del
dispositivo de audio portátil
Naar LINE OUT-aansluiting van
draagbaar audioapparaat
Connecting cord (not supplied)
Cordon de raccordement (non fourni)
Verbindungskabel (nicht mitgeliefert)
Cable de conexión (no suministrado)
Verbindingskabel (niet bijgeleverd)
To LINE IN jack/Vers la prise LINE IN/
An Buchse LINE IN/A la toma LINE IN/
Naar LINE IN-aansluiting
To a computer, etc.
Vers un ordinateur, etc.
An einen Computer usw.
A un ordenador, etc.
Naar een computer enz.
USB cable (supplied with “WALKMAN”)
Câble USB (fourni avec le « WALKMAN »)
USB-Kabel (mit dem „WALKMAN“
mitgeliefert)
Cable USB (suministrado con el
“WALKMAN”)
USB-kabel (geleverd bij de "WALKMAN")
To WM-PORT jack/Vers la prise
WM-PORT/An WM-PORT-Buchse/
A la toma WM-PORT/Naar WM-
PORT-aansluiting
Attachment
Fixation
Adapter
Accesorio
Hulpstuk
Product name
Nom du produit
Produktbezeichnung
Nombre del
producto
Productnaam
Model name/Nom du modèle/Modellbezeichnung/
Nombre del modelo/Modelnaam
Type A
A Series
NWZ-A820 series
NWZ-A826/A828/A829/
A826K/A828K/A829K
NWZ-A810 series
NWZ-A815/A816/A818
NW-A800 series
NW-A808/A806/A805
NWZ-A720 series
NWZ-A726/A728/A729
S Series
NWZ-S730 series
NWZ-S736F/S738F/S739F
NWZ-S630 series
NWZ-S636F/S638F/S639F/
S636FK
E Series
NWZ-E430 series
NWZ-E435F/E436F/E438F/
E436FK
Type B
X Series
NWZ-X1000 series
NWZ-X1050/X1060
S Series
NWZ-S710 series
NWZ-S715F/S716F/S718F
NWZ-S610 series
NWZ-S615F/S616F/S618F
NWZ-S510 series
NWZ-S515/S516
Type A/Type A/Typ A/Tipo A/
Type A
Type B/Type B/Typ B/Tipo B/
Type B