4 connecting the video out to your tv, 5 connecting audio from external components, 6 listening to radio – Samsung HT-BD2T-XAA User Manual
Page 2
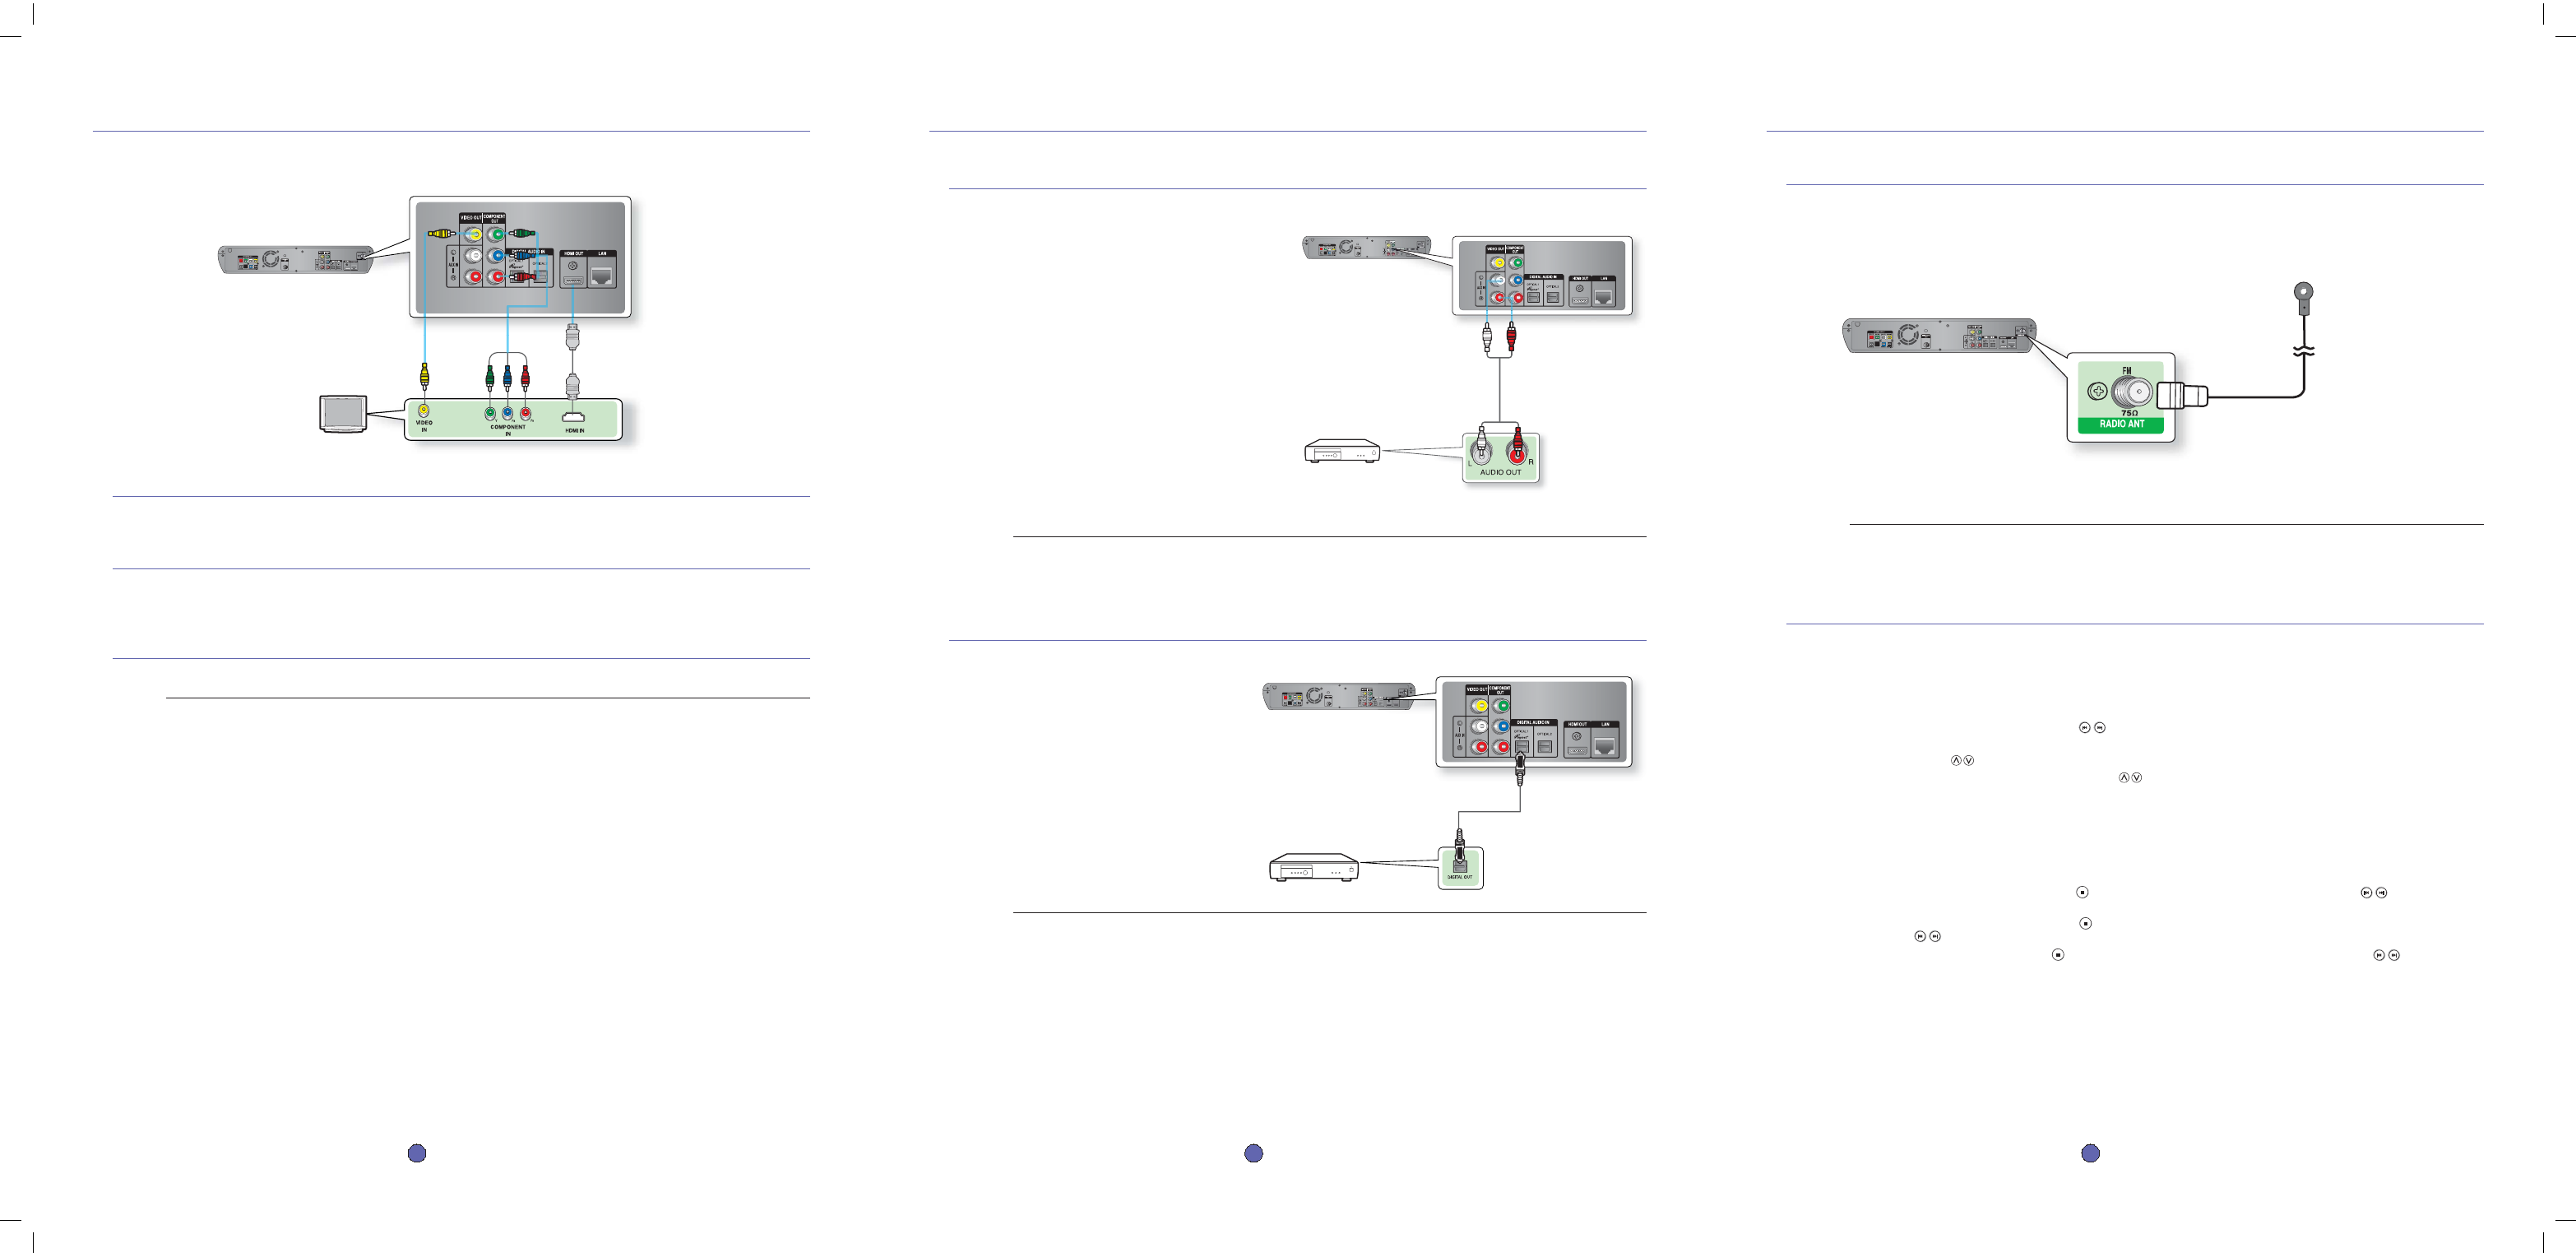
4 connecting the video out to your tv
METHOD3
(supplied)
METHOD2
METHOD1
METHOD 1 : HDMI ....... (Best Quality)
Connect the HDMI cable from the HDMI OUT jack on the back of the
Blu-ray Home Theater
to the HDMI IN jack on your TV.
METHOD 2 : Component Video .... (Better Quality)
If your television is equipped with Component Video inputs, connect a Component video cable(not supplied) from the Component Video
Output (Pr, Pb and Y) Jacks on the back of the
Blu-ray Home Theater
to the Component Video Input Jacks on your TV.
METHOD 3 : Composite Video ....... (Good Quality)
Connect the supplied Video cable from the VIDEO OUT jack on the back of the
Blu-ray Home Theater
to the VIDEO IN jack on your TV.
Depending on your TV, certain HDMI output resolutions may not work.
If an HDMI cable is connected from the player to a TV, the Blu-ray Home Theater’s output is set to
HDMI automatically within 10 seconds.
If Component and HDMI are both connected, HDMI mode is automatically selected. (See page 40)
When you connect the player to the TV using the HDMI cable for the fi rst time or to a new TV, the
HDMI output resolution will be automatically set to the highest provided by the TV.
If you connect a Samsung TV to the Blu-ray Home Theater using an HDMI cable, the player can be easily
operated using the TV remote control.
(This is only available with Samsung TVs that support the Anynet+ feature.)
If the HDMI cable is connected or removed during playback of a CDDA, MP3 or JPEG fi le, the player will stop
playing.
After making the video connection, set the Video input source on your TV to match the Corresponding Video
output (HDMI, Component or Composite) on your Home theater.
See your TV owner’s manual for more information on how to select the TV’s Video Input source.
You can select from a variety of resolution settings such as 1080p, 1080i, 720p, 480p and 480i, depending on
the disc type.
The actual resolution may differ from the setting in the SETUP menu if both Component and HDMI cables are
connected. The resolution may also be different depending on the disc.
If the resolution is set to ‘i’ (ex: 480i or 1080i), the output is displayed in 30 frames per second and if set to ‘p’
(ex: 480p, 720p, 1080p), it will be displayed in 60 frames per second.
i : interlaced mode (30 frames) p : progressive mode (60 frames)
M
Choose one of the three methods for connecting to a TV.
4
- English
5 connecting audio from external components
AUX : Connecting an External Analog Component
Analog signal components such as a VCR.
Connect AUX IN (Audio) on the Blu-ray Home
Theater to the Audio Out of the external analog
component.
Be sure to match connector colors.
Press the AUX button on the remote control to
select AUX input.
You can also use the FUNCTION button on
the main unit.
The mode switches as follows :
BD/DVD
➞ D.IN 1 ➞ D.IN 2 ➞ AUX ➞ FM
You can connect the Video Output jack of your VCR to the TV, and connect the Audio Output jacks of the VCR
to this product.
OPTICAL : Connecting an External Digital Component
Digital signal components such as a Cable Box/Satellite receiver (Set-Top Box).
Connect the Digital Input
(OPTICAL 1 or OPTICAL 2) on the
Blu-ray Home Theater to the Digital Output of
the external digital component.
Press the D.IN button on the remote control
to select D.IN 1 or D.IN 2 input.
You can also use the FUNCTION button
on the main unit.
The mode switches as follows :
BD/DVD
➞ D.IN 1 ➞ D.IN 2 ➞ AUX ➞ FM
To see video from your Cable Box/Satellite receiver, you must connect it’s video output to a TV.
1.
•
2.
•
M
1.
2.
•
M
Audio Cable (not supplied)
If the external analog
component has only one
Audio Out, connect either
left or right.
Optical Cable(not supplied)
5
- English
6 listening to radio
Listening to Radio
Remote Control
Press the TUNER button to select the FM band.
Tune in to the desired station.
Automatic Tuning 1 : When the SKIP (
) button is pressed, a preset broadcast station is selected.
Automatic Tuning 2 : Press and hold the
TUNING/CH (
) button to automatically search for active broadcasting stations.
Manual Tuning : Briefl y press the TUNING/CH (
) button to increase or decrease the frequency incrementally.
Main Unit
Press the FUNCTION button to select the FM band.
Select a broadcast station.
Automatic Tuning 1 : Press the STOP (
) button to select PRESET and then press the SKIP (
) button to select
the preset station.
Automatic Tuning 2 : Press the STOP (
) button to select MANUAL and then press and hold the
SKIP (
) button to automatically search the band.
Manual Tuning : Press the STOP (
) button to select MANUAL and then briefl y press the SKIP (
) button to tune
in to a lower or higher frequency.
1.
2.
•
•
•
1.
2.
•
•
•
Connecting the FM Antenna
Connect the FM antenna supplied to the FM 75Ω COAXIAL Jack.
Slowly move the antenna wire around until you fi nd a location where reception is good, then fasten it to a wall or other rigid
surface.
This unit does not receive AM broadcasts.
1.
2.
M
FM Antenna(supplied)
6
- English
HT-BD2_QG_1023.indd 4-6
HT-BD2_QG_1023.indd 4-6
2007-10-23 6:18:58
2007-10-23 6:18:58