Waterloo F1881 User Manual
Page 3
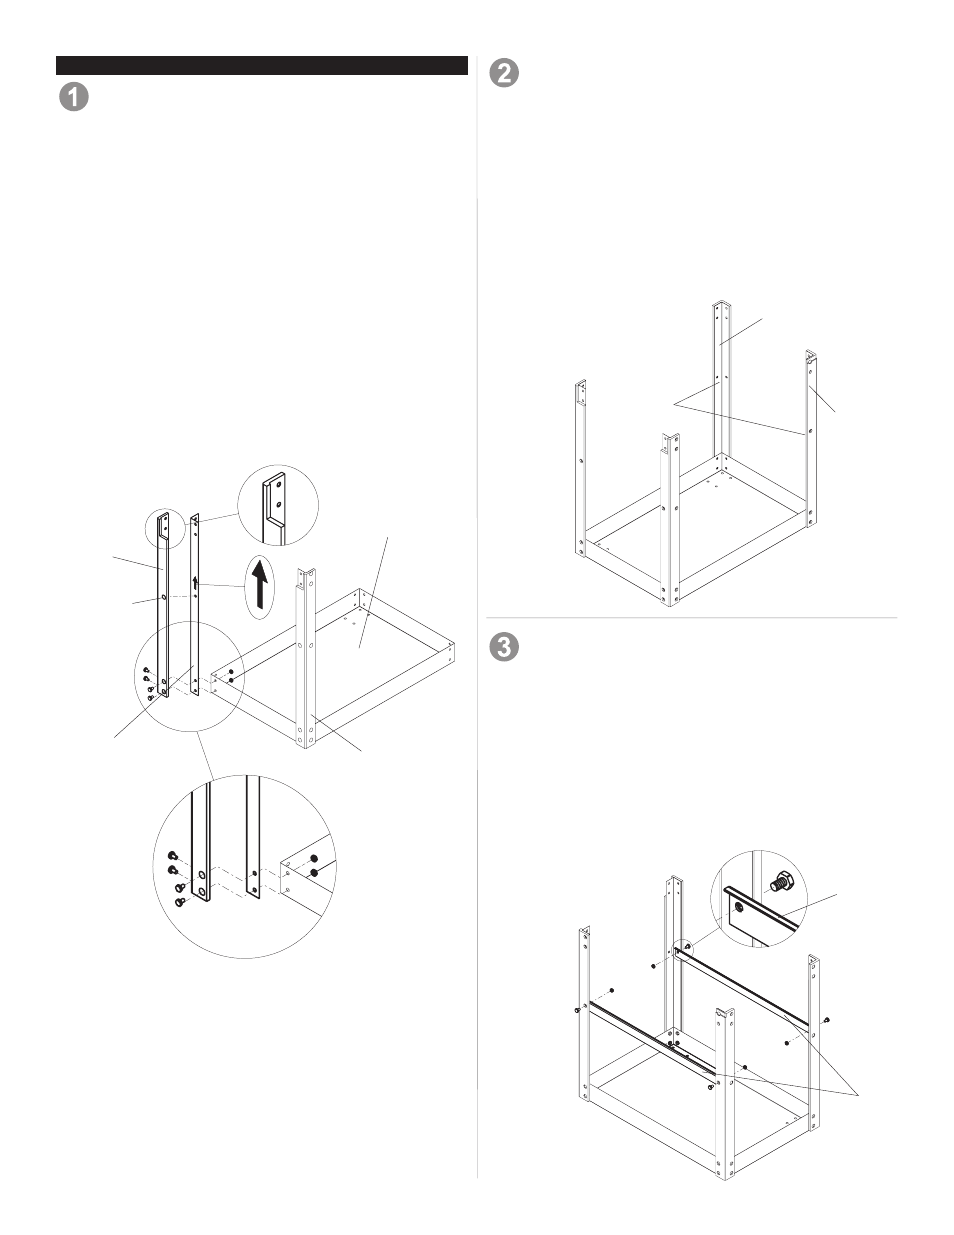
Process:
NOTE: Remove all components from drawers before
assembling this unit. Make sure the arrows on the legs are
pointing upwards. Failure to follow this will cause the legs
to be misaligned.
• Assemble Bottom Tray, Left Rear Bumper, Left Front
Bumper, and (2) Leg, as shown, using (4) M8-1.25 x
16mm Carriage Bolt, (4) M8 Washer, and (4) M8-1.25
Hex Lock Nut in each Leg.
•
Finger tighten.
LEFT LEG ASSEMBLY
Items Needed:
Leg (Qty: 2)
Left Rear Bumper (Qty: 1)
Left Front Bumper (Qty: 1)
Bottom Tray (Qty: 1)
M8-1.25 x 16mm Carriage Bolt (Qty: 8)
M8 Washer (Qty: 8)
M8-1.25 Hex Lock Nut (Qty: 8)
Process:
• Attach Right Front Bumper, Right Rear Bumper, and
remaining Leg to opposite end of Bottom Tray in the
same manner from Step 1.
•
Finger tighten.
RIGHT LEG ASSEMBLY
Items Needed:
Right Front Bumper (Qty: 1)
Right Rear Bumper (Qty: 1)
Leg (Qty: 2)
Bottom Tray Assembly (from Step 1)
M8-1.25 x 16mm Carriage Bolt (Qty: 8)
M8 Washer (Qty: 8)
M8-1.25 Hex Lock Nut (Qty: 8)
Process:
• Attach (2) Support Rail, as shown, using (4) M8-1.25 x
16mm Carriage Bolt, (4) M8 Washer, and (4) M8-1.25
Hex Lock Nut in each Support Rail.
•
Finger tighten.
SUPPORT RAIL INSTALLATION
Items Needed:
Support Rail (Qty: 2)
M8-1.25 x 16mm Carriage Bolt (Qty: 4)
M8 Washer (Qty: 4)
M8-1.25 Hex Lock Nut (Qty: 4)
Flanges
inside
Support
Rail
Leg
Left Rear
Bumper (D)
Bottom Tray
Left Front
Bumper (E)
Align
holes
3
ASSEMBLY
Right Front
Bumper (M)
Right Rear
Bumper (N)
Leg (2)