Kenwood KSC-510CTR User Manual
Page 6
IT
ALIANO
ESP
AÑOL
KSC-510CTR
27
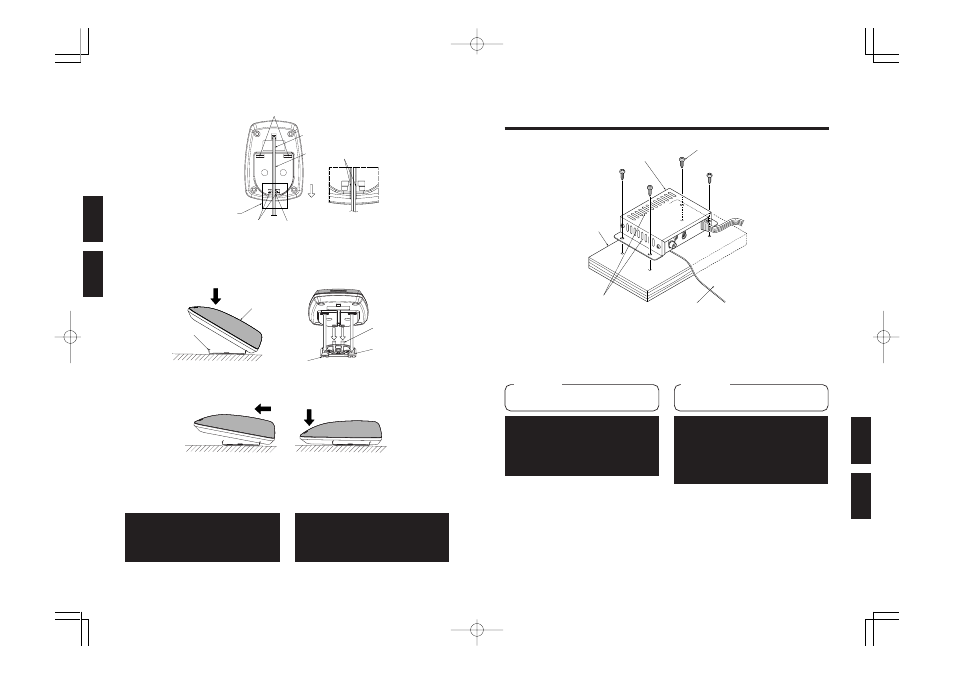
Esempio di installazione dell’amplificatore /
Ejemplo de montaje del amplificador
Legno compensato o altro
pannello di legno
Panel de contrachapado u otro
tipo de panel
3
Vite filettante
×
4
3
Tornillo de cubierta
×
4
Valvola dell’aria
Conducto de ventilación
Tappetino del veicolo
Alfombrilla del vehículo
5
Amplificatore
5
Amplificador
1. Preparate un pezzo di legno compensato o altro
legno e posizionate lo stesso sotto il tappetino del
veicolo.
2. Usate le viti filettanti in dotazione (
φ
4
×
16)
3
ed
installate l’amplificatore.
Assicuratevi di:
Effettuare il fissaggio in modo ben saldo per
garantire la sicurezza dell’unità.
ATTENZIONE
Le valvole dell’aria sono aperte per disperdere il
calore dell’amplificatore. Se queste valvole vengono
bloccate, la parte interna dell’unità si surriscalda e
si può danneggiare. Fate attenzione a non bloccare
le valvole.
1. Prepare un panel de contrachapado grueso u otro
panel y colóquelo debajo de la alfombrilla del
vehículo.
2. Utilice los tornillos de cubierta provistos (
φ
4
×
16)
3
y monte el amplificador.
Asegúrese de:
Sujetar firmemente por motivos de seguridad.
PRECAUCIÓN
Para eliminar el calor, los conductos de ventilación
del amplificador están bien abiertos. Si se bloquean
estos conductos, el interior de la unidad se
sobrecalentará y puede resultar dañado. Tenga
cuidado de no bloquear los conductos de
ventilación.
FRANÇAIS
ENGLISH
6
KSC-510CTR
[Step 3]
[Etape 3]
1. When bringing out the speaker cord from the back,
slide the cord along the slot on the bottom of the
speaker
1
, and fix by hooking the cord between
the notches.
2. Insert the two back side lugs of the bracket
2
into
the back two holes of the speaker.
3. Insert the two front side lugs of the bracket
2
into
the front two holes of the speaker, by pulling the
speaker
1
towards the front.
4. Fix completely by pushing down the front of the
speaker
1
.
CAUTION
Do not apply strong pressure onto the surface of
saran net, including manual push or thrust; other-
wise the speaker system installed inside may be
damaged.
The front holes of the speaker
Orifices avant du haut-parleur
1
Speaker
1
Haut-parleur
Speaker Cord
Câble de haut-parleur
The back holes of the speaker
Orifices arrière du haut-parleur
Notch
Entaille
Slot
Fente
Notch
Entaille
Bottom View (Detail A)
Vue du bas (Détail A)
A
2
Bracket
2
Support
2
Bracket
2
Support
The back side lug
Barrette côté arrière
The front side lug
Barrette côté avant
3. Insérez les deux barrettes côté avant du support
2
dans les deux orifices avant du haut-parleur en tirant
le haut-parleur
1
vers l’avant.
4. Fixez complètement en appuyant l’avant du haut-
parleur
1
vers le bas.
ATTENTION
Ne pas appliquer de pression sur la surface de la
grille en saran, y compris avec la main ou dans un
élan, car cela pourrait endommager le système de
haut-parleur installé à l'intérieur.
1. Lorsque vous faites ressortir le cordon de haut-
parleur de l’arrière, faites glisser le cordon le long de
la fente au bas du haut-parleur
1
, et fixez-le en
accrochant le cordon dans les entailles.
2. Insérez les deux barrettes côté arrière du support
2
dans les deux orifices arrière du haut-parleur.