Installing the new water heater (cont’d), Filling the water heater, Wiring diagrams – State P6 40 20T4 W User Manual
Page 8
8
Installing the New Water Heater (cont’d)
Filling the Water Heater
To fill the water heater with water:
1. Close the drain valve by turning the handle to the right
(clockwise). The drain valve is on the lower front of the
water heater.
2. Open the cold water supply valve to the water heater.
NOTE: The cold water supply valve must be left open
when the water heater is in use.
3. To insure complete filling of the tank, allow air to exit by
opening the nearest hot water faucet. Allow water to run
until a constant flow is obtained. This will let air out of
the water heater and the piping.
4. Check all new water piping for leaks. Repair as needed.
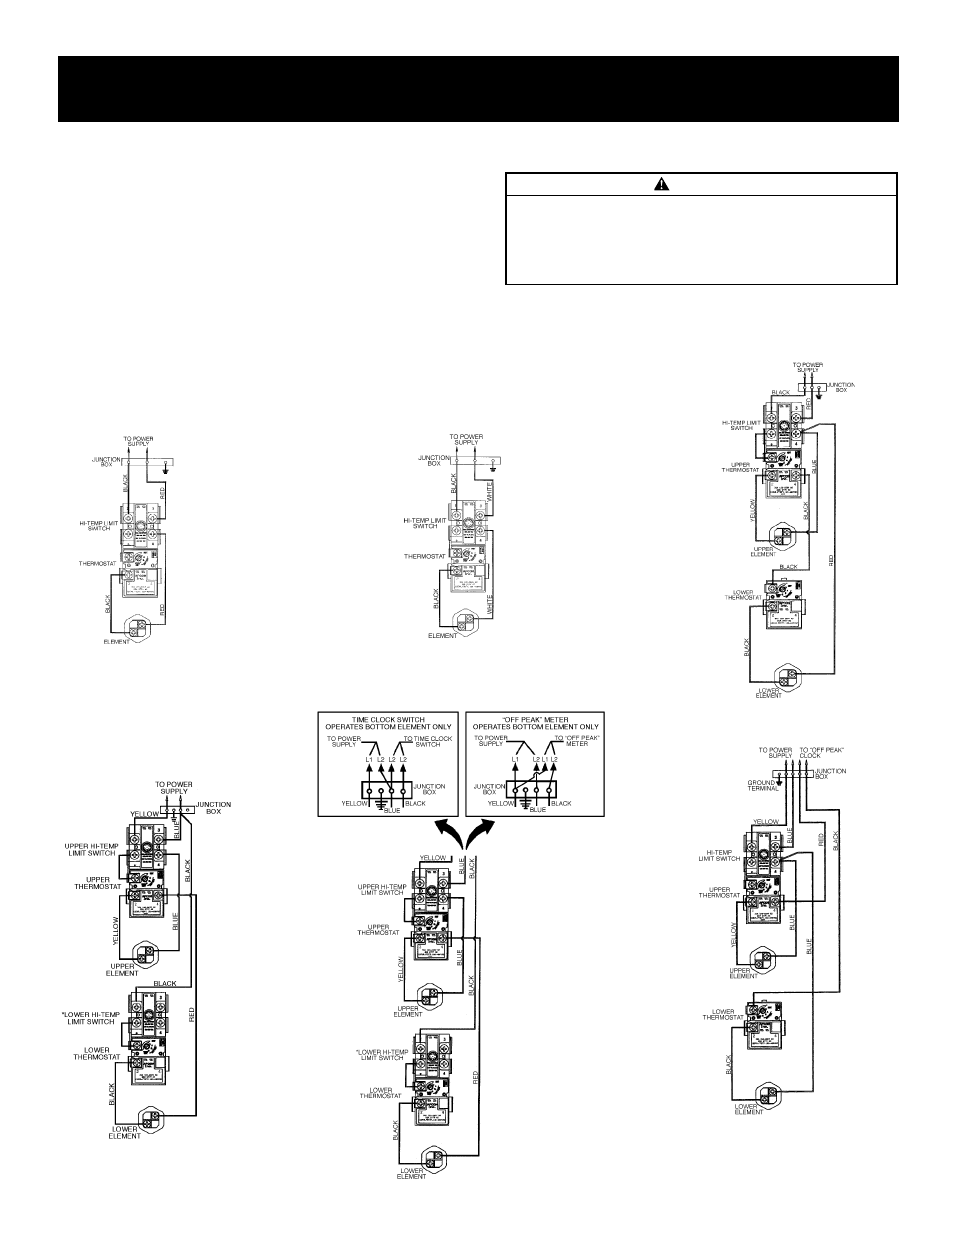
Wiring Diagrams
STANDARD SINGLE ELEMENT
120 VOLT
2 WIRE 240 VOLT POWER
SUPPLY NON-SIMULTANEOUS
OPERATION
WIRING FOR 3 WIRE LEAD
WATER HEATERS
*Note: Some Lower Hi-
Temp. Limit Switches may
have 4 terminals. Use only
the 2 terminals on left.
STANDARD WIRING FOR
2 WIRE LEAD WATER HEATERS
STANDARD SINGLE ELEMENT
240 VOLT
WIRING FOR 4 WIRE LEAD
WATER HEATERS
240 VOLT “OFF PEAK” NON-SIMULTANEOUS OPERATION
BOTTOM ELEMENT ON SEPARATE TIME CLOCK OR “OFF PEAK” METER
Note: If a 2 wire circuit is
required, connect the red
and black wires together
and cap. Apply power to the
blue and yellow leads only.
CAUTION
Never use this water heater unless it is completely full
of water. To prevent damage to the tank and heating ele-
ment, the tank must be filled with water. Water must
flow from the hot water faucet before turning “ON”
power.