Sol Transit Shelter Security Lighting User Manual
Page 5
5 rev. 0212 MKTG-IM-TSSL-001
Installation and Owner’s Manual
|
TSSL
Back side of
shelter
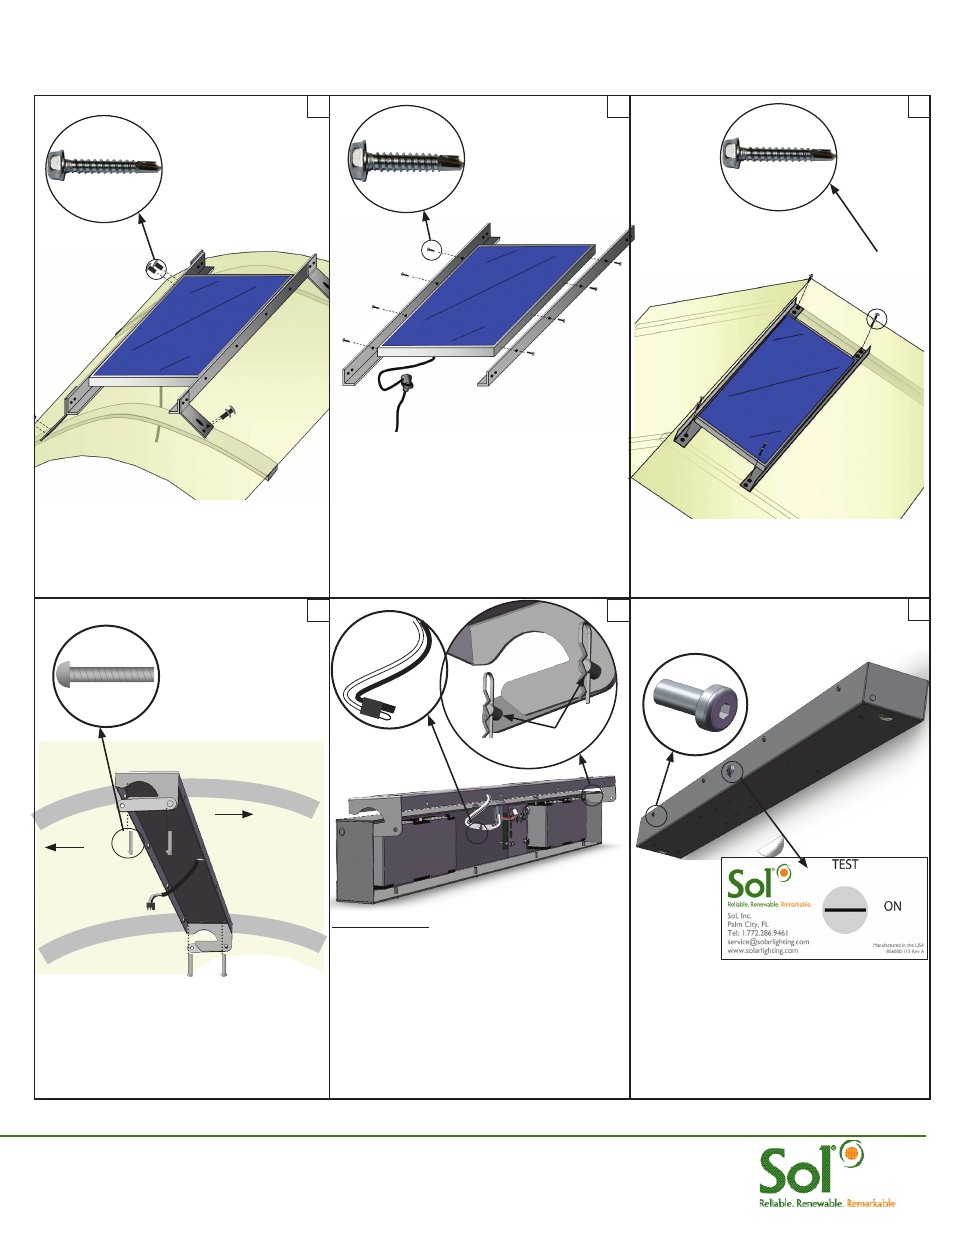
Feed the hanging PV harness cord
through the upper section of the light
assembly, secure cord grip, and mount
it to roof bows with 4x 1/4-20 x 1” jack
screw bolts.
Back side of
shelter
Front side of
shelter
Close unit and ensure all wires are tucked
into unit. Secure with 3-4 tamper resistant
screws. Insert TEST key and turn to TEST
position. Wait 3-4 minutes for light to come
on. Turn back to ON position, remove key
and add remaining security screws.
IMPORTANT!
Hang the lower part of light assembly as
shown and reinstall the cotter pins and
keys before proceeding further. Connect
battery plug first followed by PV connector.
LED’s will flash briefly to indicate correct
connection. See wiring diagram for details.
Note: Optional Occupancy sensor
comes pre wired to the TSSL.
Cotter keys
& pins
7
8
9
Barrel Roof Mounting: Mount PV
module using 8 x #14 x 1.5” Tek screws
provided.
Peak/Flat Roof Mounting: Fasten the
mounting angles to the PV panel frame
using 16 x #14 x 1” Tek screws provided.
The PV panel(s) should be centered on the
aluminum angles. Insert PV harness cord
into hole of shelter roof. Position panel to
cover the fitting when mounted. Let 15” of
cord hang inside the shelter.
Peak/Flat Roof Mounting: Mount PV
module using 8 x #14 x 1.5” Tek screws
provided. Ensure that the panel is mounted
on the surface most facing towards the
equator or due South in the Northern
hemisphere.
6B
6D
6C
Tek screw
Tek screw
Tek screw