Sol Transit Shelter Security Lighting User Manual
Page 4
4 rev. 0212 MKTG-IM-TSSL-001
Installation and Owner’s Manual
|
TSSL
5 rev. 0212 MKTG-IM-TSSL-001
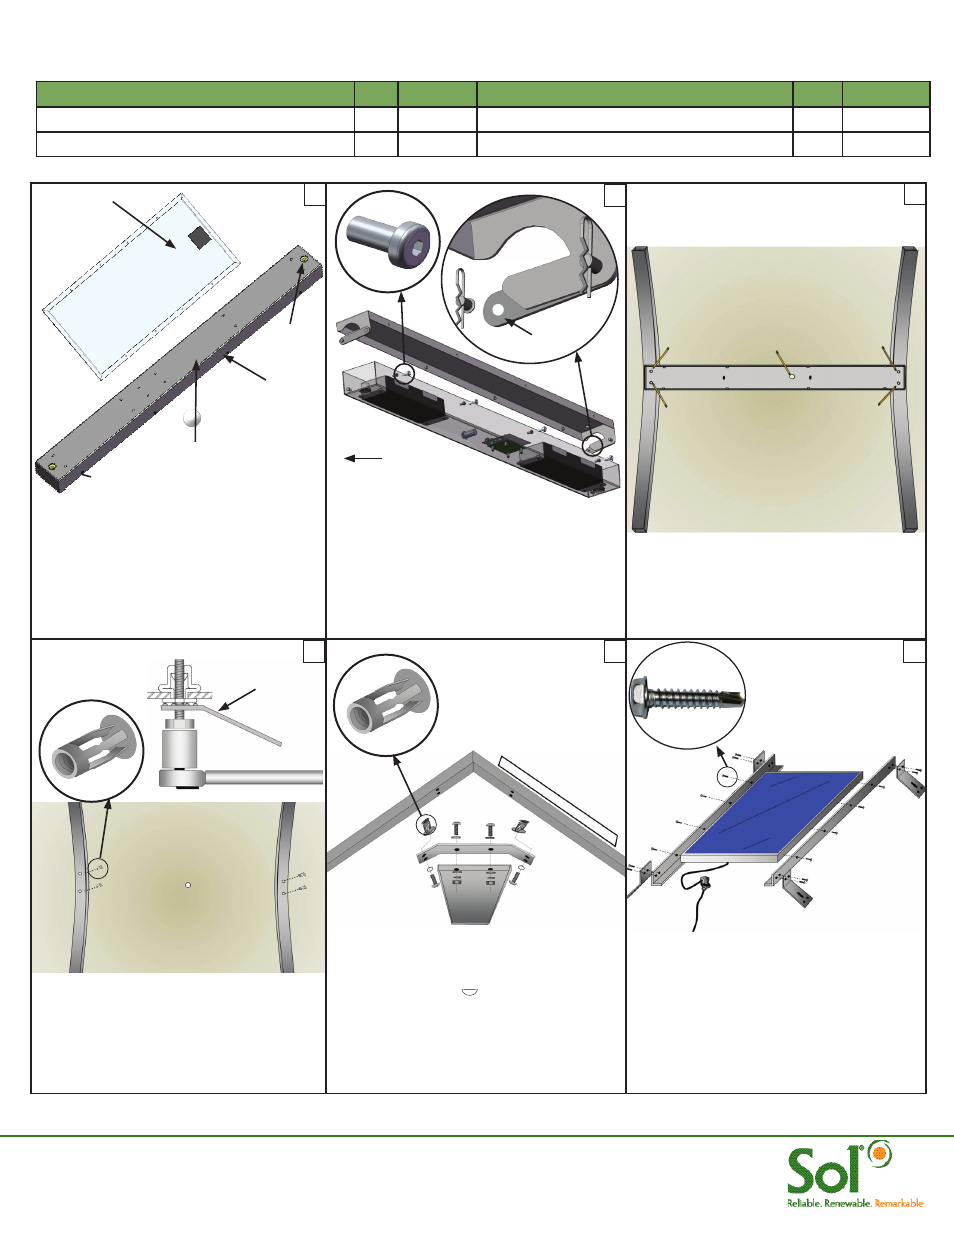
Fastener List - Refer to Packing list for complete parts list
* Recommended Torque
Fastener
Qty. Torque*
Qty.
Torque*
1/4-20 jack nut
4
#14 x 1.5” Tek screws
8
20 in lbs
#14 x 1” Tek screws
16
20 in lbs
1/4-20 x1” jack screw bolts
4
20 in lbs
Insert and fasten 4x 1/4-20 jack nut in the
four mounting holes. Hold the friction tool
stationary and collapse the jack nut. Use
constant pressure against the friction tool
with a ratchet.
Do not use a power drill
to install the jack nuts.
Jack Nut
Friction Tool
For high peak roof shelter types, use
the supplied adapter plate as a template
for the jack nut mounting holes (4 per
plate). The main housing is attached to
the adapter plate using through bolts.
Barrel Roof Mounting: Fasten the
mounting angles to the PV panel frame
using 16 x #14 x 1” Tek screws provided.
The PV panel(s) should be centered on
the aluminum angles. Insert PV harness
cord into hole of shelter roof. Let 15” of
cord hang inside the shelter.
Tek screw
Using the upper housing as a template,
mark the five holes to be drilled in the
shelter. Drill 3/8” through shelter mounting
channels and drill 7/8” hole in shelter roof.
Open the cartons and place components
on the cardboard packaging to protect
the powder coated surfaces and surface
of PV module(s). Open the light assembly
by removing the tamper proof security
screws and remove the bottom cotter key
and pin from upper housing.
Bottom cotter
key & pin
Back side of
shelter
1
2
3
6A
5
4
TSSL system is packed in two cartons.
One contains the solar module, and the
other contains the light bar assembly,
solar panel mounting angles, mounting
brackets, and hardware. Everything
comes fully wired and the control system
is factory set for dusk to dawn operation.
PV Modules
Clear view of sun
without trees
shading it
TSSL Light
Assembly
LED Light
LED Light
Occupancy Sensor
(Option)