Dee Zee DZ371641 User Manual
Page 2
SIDEBAR
07-13 WRANGLER 4DR
Page 1 of 3 2/27/12 Rev3 (DP)
Parts List
1
Driver/Left Sidebar
6
10mm x 34mm OD x 3mm Flat Washers
1
Passenger/Right Sidebar
6
8-1.25mm x 35mm Hex Bolts
1
Driver/Left Front Mounting Bracket (medium length)
12 8-1.25mm x 25mm Hex Bolts
1
Passenger/Right Front Mounting Bracket (medium
length)
18 8mm Lock Washers
1
Driver/Left Center Mounting Bracket (long)
12 8mm x 24mm OD x 2mm Flat Washers
1
Passenger/Right Center Mounting Bracket (long)
6
8mm x 28mm OD x 3mm Large Flat Washers
1
Driver/Left Rear Mounting Bracket (short)
12 6-1.0mm x 25mm Button Head Bolts
1
Passenger/Right Rear Mounting Bracket (short)
24 6mm ID x 18mm OD x 1.6mm Flat Washers
6
10mm Nut Plates
12 6mm Nylon Lock Nuts
6
10-1.5mm x 35mm Hex Bolts
1
4mm Allen Wrench
6
10mm Lock Washers
PROCEDURE:
1. REMOVE CONTENTS FROM BOX. VERIFY ALL PARTS ARE PRESENT. READ INSTRUCTIONS
CAREFULLY BEFORE STARTING INSTALLATION. FACTORY INSTALLED OR AFTERMARKET
"ROCK RAILS," SIDE STEPS OR RUNNING BOARDS MUST BE REMOVED.
2. Start installation toward the front of the passenger side of the vehicle. Determine if the vehicle has an
open floor panel or a threaded hole in the floor panel for the top tab on the Bracket, (Figures 1 - 2).
Remove any insulation that may be covering the mounting locations.
3. Select the passenger side front Bracket. VERY IMPORTANT: The 6 Mounting Brackets look very
similar. Use the instructions to properly identify the front, center and rear Brackets for either side of the
vehicle. Each bracket has been designed for a specific location for proper installation.
a. Vehicles with open mounting location: Insert (1) 10mm Nut Plate into the large square
opening in the floor panel. Line up the threaded nut with the small hole in line with the tab on the
Bracket, (Figure 1). Bolt the Bracket to the Nut Plate with (1) 10mm x 35mm Hex Bolt, (1)
10mm Lock Washer and (1) 10mm Flat Washer, (Figure 3A). Do not tighten hardware.
b. Vehicles with factory threaded hole in floor panel: Bolt the tab on the Bracket to the
threaded hole in the floor panel with (1) 8mm x 35mm Hex Bolt, (1) 8mm Lock Washer and (1)
8mm x 28mm OD Large Flat Washer, (Figures 2 & 3A). Do not tighten hardware.
4. Line up the mounting plate on the Bracket with the (2) factory holes in the pinch weld. Bolt the Mounting
Bracket to the back of the pinch weld using the included (2) 6mm x 25mm Button Head Allen Bolts, (2)
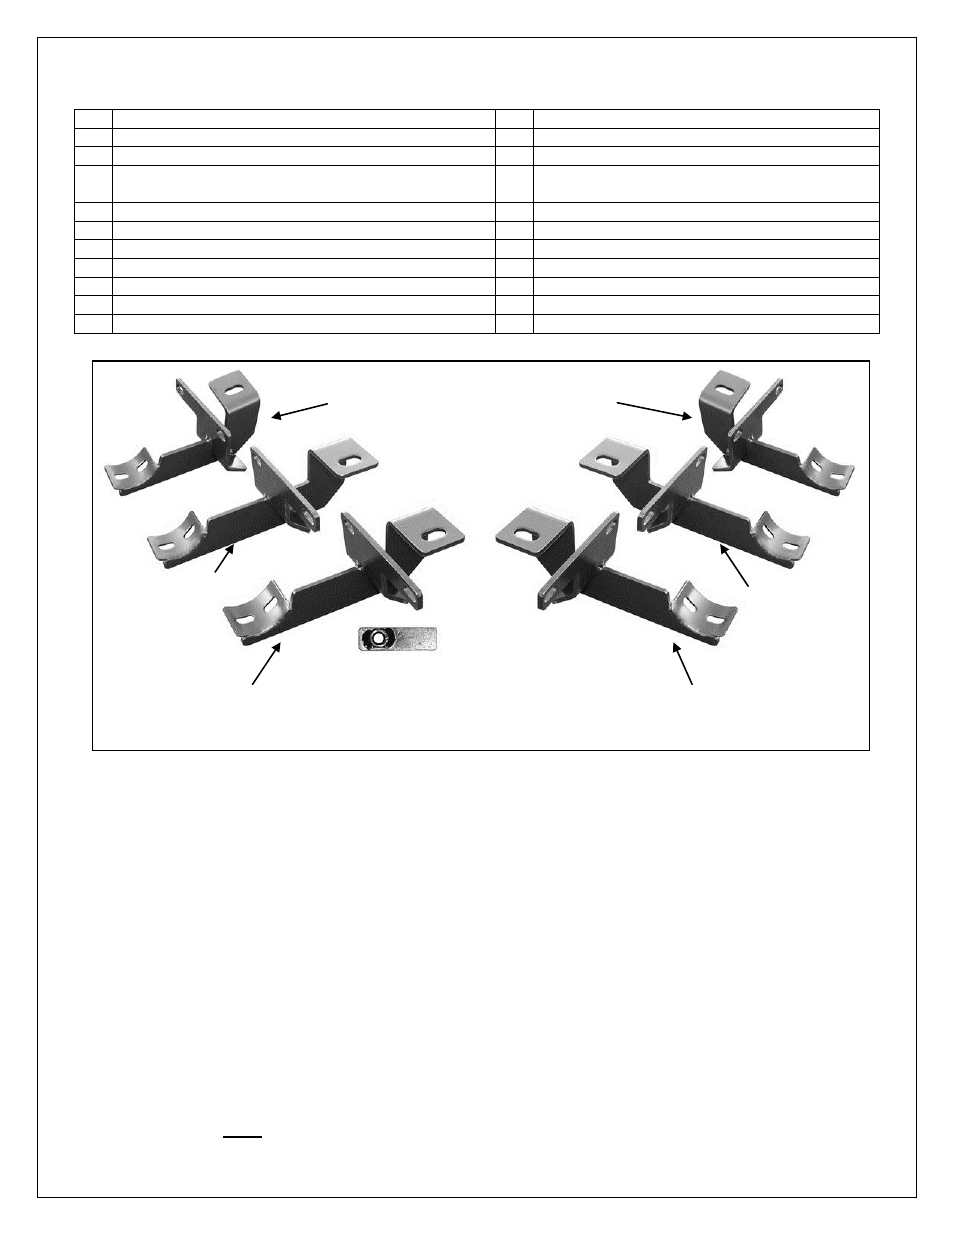
Passenger Side Rear
Mounting Bracket (short)
(6) 10mm Nut Plates
Passenger Side Front (mid
length) Mounting Bracket
Passenger Side
Center (long)
Mounting
Bracket
Driver Side Rear Mounting
Bracket (short)
Driver Side
Center (long)
Mounting
Bracket
Driver Side Front (mid
length) Mounting Bracket