Yetter 6300 Coulter Cart User Manual
Page 33
33
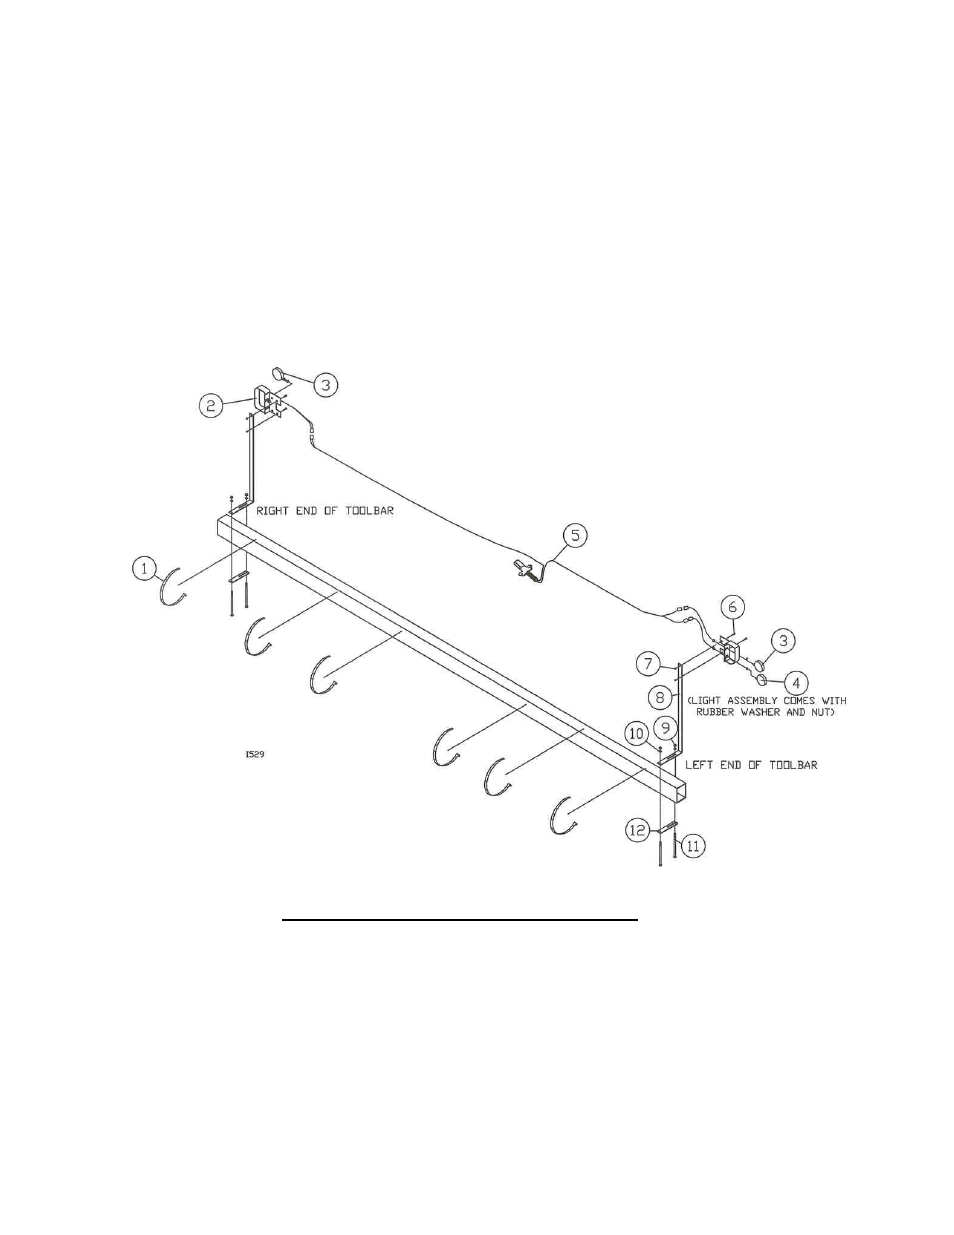
6600-181 LIGHT KIT
ASSEMBLY
1. Mount amber lights, one on each side, in the top slot of the warning light bracket. The red light is
mounted on the left side in the bottom slot of the bracket. The rubber washers and nuts are
provided in the lights.
2. Attach warning light bracket (2) to mounting strap with two 3/8 x 1” bolts and locknuts.
3. Mount mounting strap (8) to each end of toolbar with a mounting bracket pad (7) on the bottom of
the toolbar, two ½” bolts, lock washers and nuts.
NOTE: Five different lengths of bolts are included, choose the appropriate length of bolt for toolbar size.
4. Attach wiring harness to lights.
5. Use cable ties to strap wiring harness to toolbar at regular intervals.
KEY
QTY.
PART
NO.
DESCRIPTION
1.
6
2515-405
CABLE
TIE,
BLACK
2.
2
6600-263
WARNING
LIGHT
BRACKET
W.A.
3.
2
6600-522
LAMP,
AMBER
W/BULB
4.
1
6600-523
LAMP, RED W/BULB
5.
1
6600-524
HARNESS,
COMMON
WIRING
6.
4
2502-237
3/8-16 X 1” HHCS GR 5 ZYD
7.
4
2520-255
3/8-16 LOCK HEX NUT ZYD
8.
2
6600-496
MOUNTING STRAP
9.
4
2520-352
½-13 HEX NUT ZYD
10.
4
2525-352
½ MED. LOCKWASHER ZYD
11.
4
2502-362
½-13 X 5” HHCS GR 5 ZYD
4
2502-373
½-13 X 6” HHCS GR 5 ZYD
4
2502-371
½-13 X 7” HHCS GR 5 ZYD
4
2502-369
½-13 X 8” HHCS GR 5 ZYD
4
2502-374
½-13 X 9” HHCS GR 5 ZYD
12.
2
6600-446
MOUNTING BRACKET PAD