Rear panel – Manley Langevin Dual Vocal Combo 1999 - 4/2001 LDVC000 - LDVC178 User Manual
Page 6
6
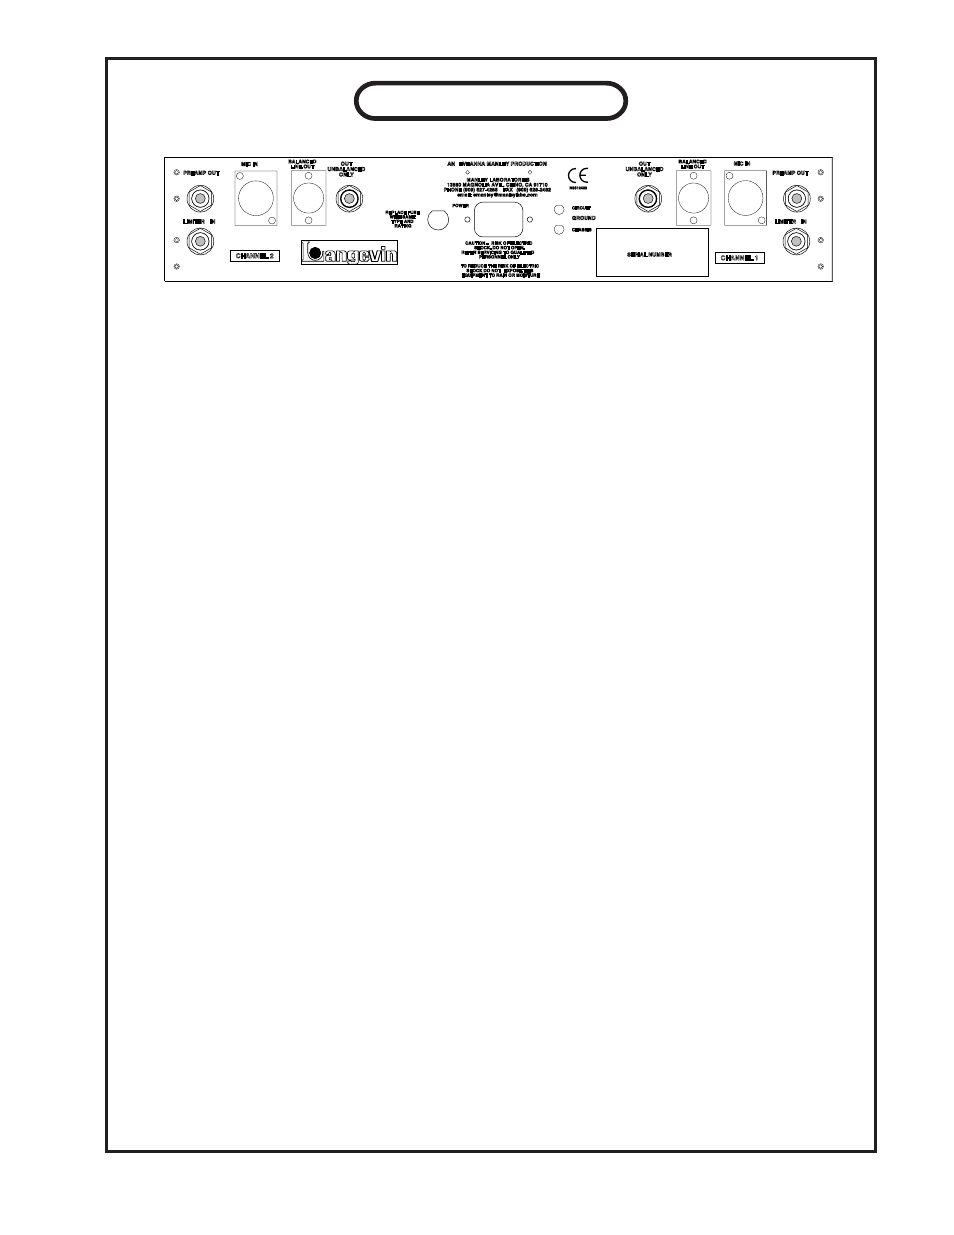
A) PREAMP OUT. This balanced output comes directly from the mike pre and allows you to use the mike pre
separate from the limiter. Inserting a TRS plug into this jack breaks the normal signal path between the mike
pre output and the limiter input. TIP= +, hot or positive going signal
RING= -, or negative going signal
SLEEVE= Ground (shield)
B) LIMITER IN. This balanced input allows you to insert a signal directly into the opto-limiter, bypassing the
mike pre and EQ. Utilizing the PREAMP OUT and LIMITER IN jacks with a patch bay allows the mike pre
and limiter sections to be used independently or linked externally. With no plugs inserted in either of these
jacks, the mike pre and opto-limiter sections are automatically linked together.
C) MIC IN. This is where you plug in the mic cable. Because this input has up to 50 dB of gain and can have
Phantom power, we strongly suggest that the INPUT ATTENUATE and/or monitor level is turned way down to
avoid huge pops or thumps when you plug a cable in here.
Pin 1 = Ground (shield)
Pin 2 = +, hot or positive going signal
Pin 3 = -, low or negative going signal
D) BALANCED LINE OUT. This is the final output after the Mic Pre, EQ and Opto-Limiter. It is ONLY meant to
drive balanced inputs. If you are driving an unbalanced input, use the OUT UNBALANCED ONLY jack.
E)
OUT UNBALANCED ONLY
. Use a regular 1/4" plug here to connect to an unbalanced or balanced input.
The nominal output here is +4dBm and not the -10dBu "consumer" level found on some budget semi-pro
gear. To feed that kind of input, you have to turn down the INPUT ATTENUATOR or better yet, the Limiter's
GAIN and ignore the VU meter which is set up for +4 levels.
TIP = +, hot or positive going signal
SLEEVE = Ground (shield)
F) FUSE. This is a 1/4" 1 amp slo-blo fuse. The fuse is a protection device intended to protect you and the
unit in case something is very wrong. Sometimes it is just the fuse that fails for some unknown reason, so if it
blows and you can't power up the unit, try another fuse (same type and value). If it blows too, prepare to send
in the unit for repair.
G) POWER. This is where the power cable gets plugged in. You Dual Vocal Combo should come with an IEC
power cable appropriate for your country and voltage.
H) GROUND TERMINALS. These 'ground posts' are intended to help in some installations particularly where
a special audio grounding scheme is used. The top post is the audio circuit ground and the bottom is chassis
and AC third pin ground. For almost all applications these posts are connected together with a strap or solid
piece of wire. If you are getting hums and buzzes, this is a good place to start experimenting, and why we
include them.
A
B
C D E F G H E D C
IN
IN
S
T
CHASSI
GROUND
CIRCUI
CHANNEL 1
- R
SERIAL NUMBER
N9512423
OUT
UNBALANCED
ONLY
MIC IN
FAX
BALANCED
LINE OUT
PREAMP OUT
LIMITER
EXPOSE THIS
ISK OF ELECTRIC
D
Y
AN
(909) 628-2482
m
TO REDUCE THE RISK OF ELECTRIC
SHOCK DO NOT
EQUIPMENT TO RAIN OR MOISTURE
POWER
CAUTION
SHOCK. DO NOT OPEN.
REFER SERVICING TO QUALIFIE
PERSONNEL ONL
EVEANNA MANLEY PRODUCTION
MANLEY LABORATORIES
13880 MAGNOLIA AVE., CHINO, CA 91710
PHONE (909) 627-4256
email: [email protected]
G
REPLACE FUSE
WITH SAME
TYPE AND
RATIN
BALANCED
OUT
UNBALANCED
ONLY
LINE OUT
MIC IN
CHANNEL 2
PREAMP OUT
LIMITER
REAR PANEL
A
B
C D E F G H E D C
A) PREAMP OUT. This balanced output comes directly from the mike pre and allows you to use the mike pre
separate from the limiter. Inserting a TRS plug into this jack breaks the normal signal path between the mike
pre output and the limiter input.
TIP= +, hot or positive going signal
RING= -, or negative going signal
SLEEVE= Ground (shield)
B) LIMITER IN. This balanced input allows you to insert a signal directly into the opto-limiter, bypassing the
mike pre and EQ. Utilizing the PREAMP OUT and LIMITER IN jacks with a patch bay allows the mike pre
and limiter sections to be used independently or linked externally. With no plugs inserted in either of these
jacks, the mike pre and opto-limiter sections are automatically linked together.
C) MIC IN. This is where you plug in the mic cable. Because this input has up to 50 dB of gain and can have
Phantom power, we strongly suggest that the INPUT ATTENUATE and/or monitor level is turned way down to
avoid huge pops or thumps when you plug a cable in here.
Pin 1 = Ground (shield)
Pin 2 = +, hot or positive going signal
Pin 3 = -, low or negative going signal
D) BALANCED LINE OUT. This is the final output after the Mic Pre, EQ and Opto-Limiter. It is ONLY meant to
drive balanced inputs. If you are driving an unbalanced input, use the OUT UNBALANCED ONLY jack.
E) OUT UNBALANCED ONLY. Use a regular 1/4” plug here to connect to an unbalanced or balanced input.
The nominal output here is +4dBm and not the -10dBu “consumer” level found on some budget semi-pro
gear. To feed that kind of input, you have to turn down the INPUT ATTENUATOR or better yet, the Limiter’s
GAIN and ignore the VU meter which is set up for +4 levels.
TIP = +, hot or positive going signal
SLEEVE = Ground (shield)
F) FUSE. This is a 1/4” 1 amp slo-blo fuse. The fuse is a protection device intended to protect you and the
unit in case something is very wrong. Sometimes it is just the fuse that fails for some unknown reason, so if it
blows and you can’t power up the unit, try another fuse (same type and value). If it blows too, prepare to send
in the unit for repair.
G) POWER. This is where the power cable gets plugged in. You Dual Vocal Combo should come with an IEC
power cable appropriate for your country and voltage.
H) GROUND TERMINALS. These ‘ground posts’ are intended to help in some installations particularly where
a special audio grounding scheme is used. The top post is the audio circuit ground and the bottom is chassis
and AC third pin ground. For almost all applications these posts are connected together with a strap or solid
piece of wire. If you are getting hums and buzzes, this is a good place to start experimenting, and why we
include them.
6