Help – Audiovox 128-4874A User Manual
Page 2
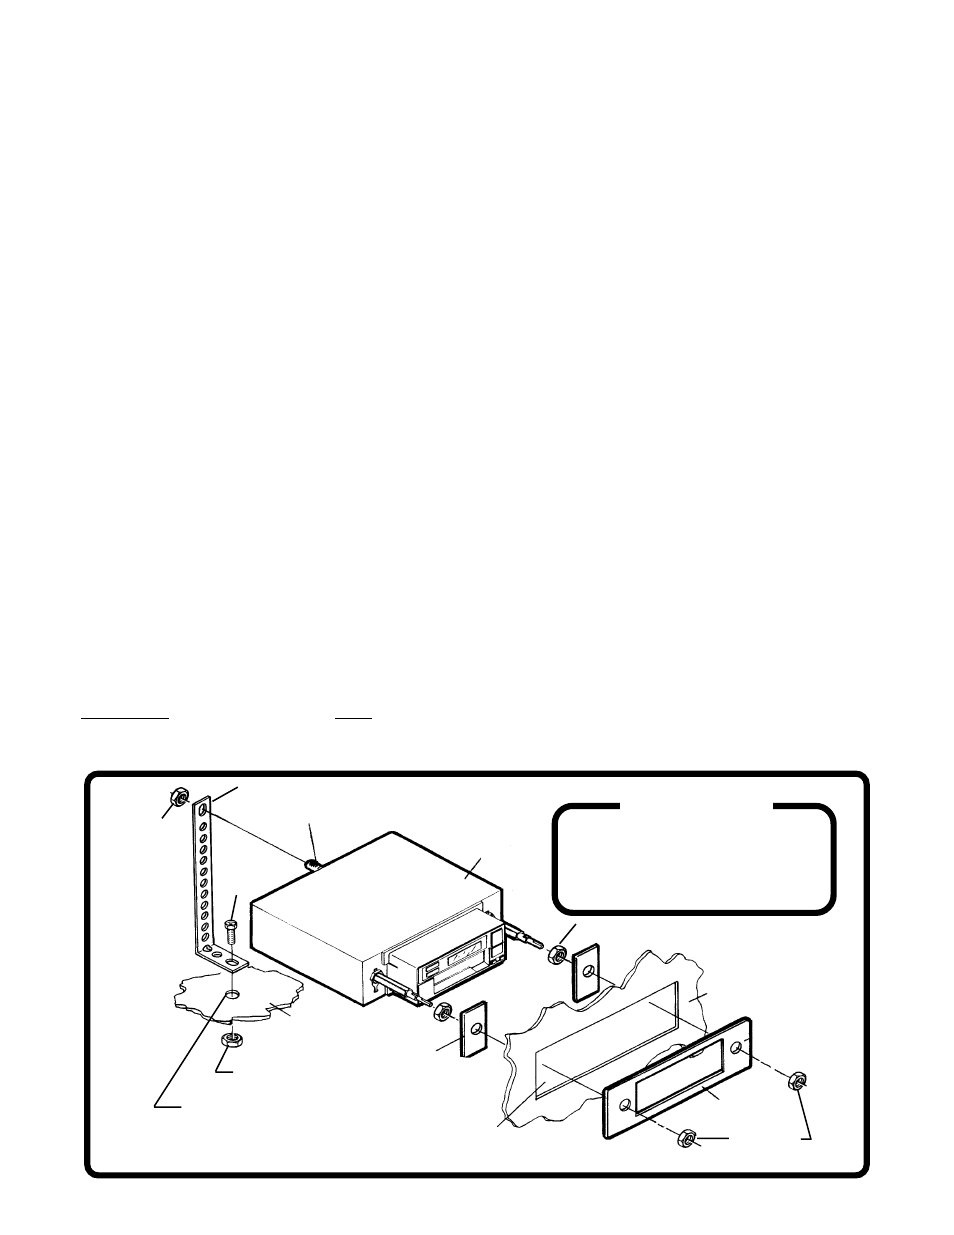
HEX NUT
PERFORATED STRAP
SCREW
STUD
TRIMPLATE
EXISTING OPENING
METAL PART OF
DASHBOARD
DRILL HOLE IF NECESSARY
HEX NUT
SCREW
SHAFT NUT
DASHBOARD
RADIO
SHAFT NUTS
BACK-UP PLATE
-2-
UNI
UNI
UNI
UNI
UNI VERSAL INST
VERSAL INST
VERSAL INST
VERSAL INST
VERSAL INSTALL
ALL
ALL
ALL
ALL A
A
A
A
AT
TT
TT ION FOR VEHICLES
ION FOR VEHICLES
ION FOR VEHICLES
ION FOR VEHICLES
ION FOR VEHICLES
WI
WI
WI
WI
WITH A
TH A
TH A
TH A
TH AN E
N E
N E
N E
N EXIST
XIST
XIST
XIST
XISTING R
ING R
ING R
ING R
ING R A
A
A
A
A DIO OPENING
DIO OPENING
DIO OPENING
DIO OPENING
DIO OPENING
This installation is designed for cars, trucks, vans, and boats that have an existing radio opening. It can also be
used as an option on some of the vehicles listed as requiring the AX-88-SNP kit. It will not work on all vehicles,
but can be used on most newer Fords and many imports.
1. Inspect the Existing Radio Opening:
A. Use the trimplate supplied with the radio to cover the existing opening. If it completely covers the opening,
you can install the radio as explained below. If it does not cover the opening, you will need an installation
kit.
B. Check that there will be sufficient space behind the dashboard for the radio chassis.
2. Wire the Radio to the Vehicle's Wiring:
A. In most cases it is easier to wire the radio before mounting it. Place the radio near the dashboard so the
wires can be led through the opening.
B. Carefully follow the diagram on page 8 to wire the radio, making certain all connections are secure and
insulated with wire nuts or electrical tape to insure proper operation of the unit.
C. After completing the wiring, turn the unit on to confirm operation (ignition switch must be "on"). If unit does
not operate, re-check all wiring until problem is corrected. Once proper operation is achieved, turn off unit
and ignition switch, and proceed with final mounting of the radio.
3. Mounting the Radio:
A. Thread a shaft nut half-way down each radio shaft.
B. Place a metal back-up plate on each radio shaft against the shaft nut.
C. Position the radio behind the dashboard opening so that the back-up plates are snug against the back of
the opening. Adjust the shaft nuts behind the back-up plates so that the desired amount of radio extends
through the opening. If possible, the best appearance is usually achieved when there is enough of the radio
extending to be flush with the front of the trimplate.
D. Place the trimplate over the front of the radio and secure it with a shaft nut on each radio shaft.
E. Attach one end of the perforated support strap (supplied) to the screw stud on the radio using the hex nut
provided. Fasten the other end of the perforated strap to a secure part of the dashboard either above or
below the radio using the screw and nut provided. Bend the strap to position it as necessary.
CAUTION: The rear of the radio must be supported with the strap to prevent damage to the dashboard from
the weight of the radio or improper operation of the radio due to vibration.
F. Install knobs on radio shafts.
8:30am - 7:00pm Eastern
9:00am - 5:00pm Eastern
Monday - Friday
Saturday
HELP!
1-800-645-4994
1-800-645-4994
1-800-645-4994
1-800-645-4994
1-800-645-4994