Amerex 05608 User Manual
Page 10
9
TROUBLESHOOTING GUIDE
WARNING:
Before attempting to correct any leakage problem, be sure that the agent
cylinder and hose are completely depressurized. Check to determine the
source of a leak before the extinguisher is depressurized. Leakage repairs
will require depressurization and removal of the valve assembly.
Depressurize by discharging into a Closed Recovery System or inverting
the extinguisher. After depressurizing the extinguisher and correcting the
problem, it will be necessary to clean all valve parts thoroughly.
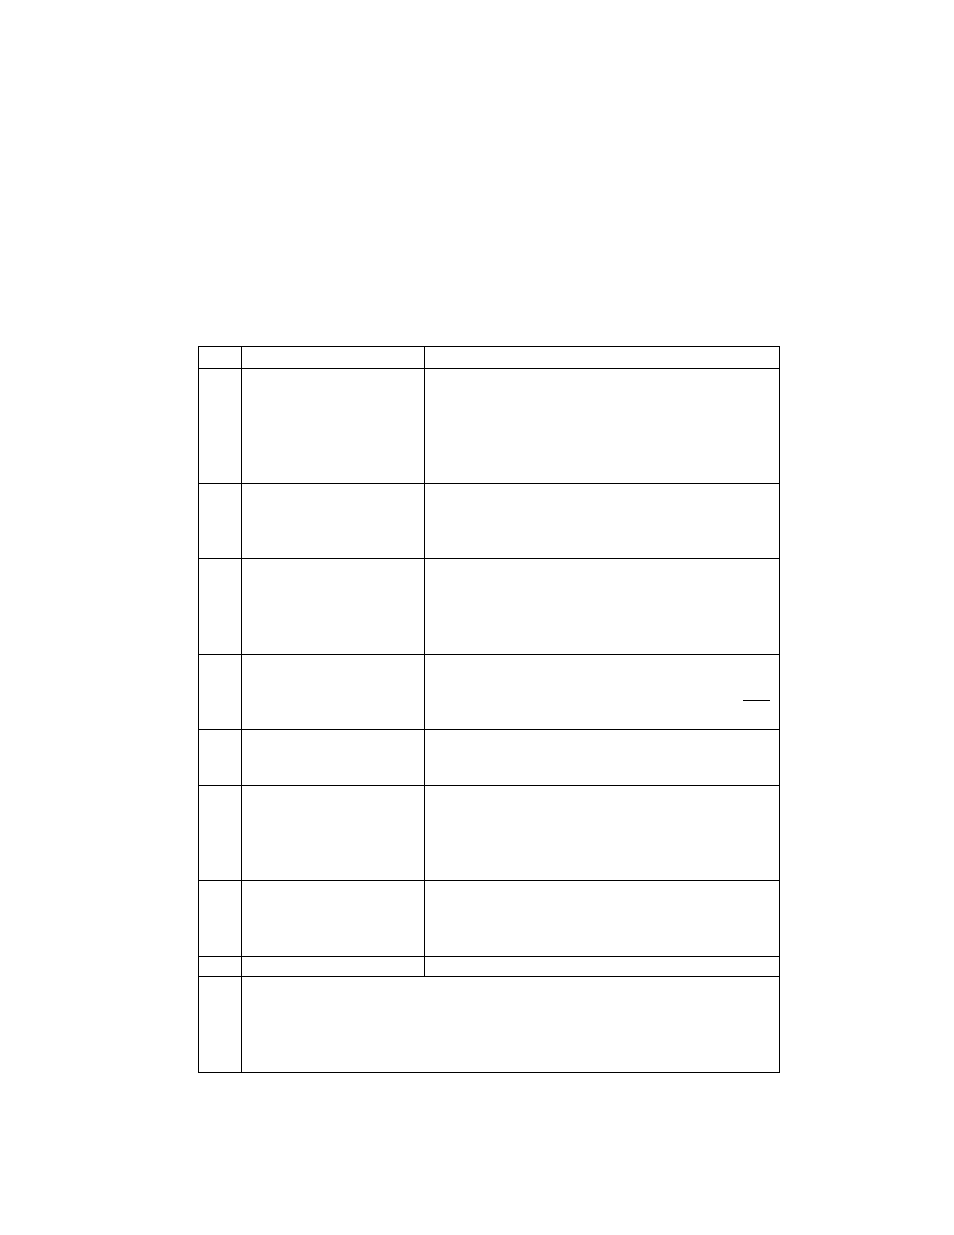
PROBLEM
CORRECTIVE ACTION
1.
Leak at collar o-ring
Remove valve assembly, remove and
discard o-ring, clean collar and lube lightly
with Visilox V-711. Clean o-ring groove on
valve and install new collar o-ring. Lubricate
with Visilox V-711.
2.
Leak at agent fill cap
Remove cap, clean threads thoroughly and
install new o-ring. Lubricate o-ring with
Visilox V-711.
3.
Leak through valve
Check valve stem seating area for scratches
or foreign matter. Clean seating area with a
tooth brush and soft cloth. Install new valve
stem assembly.
4.
Leak
at
"bleeder"
valve.
Remove and reinstall valve using Teflon
tape on threads. Note: "Bleeder" valve cap
must be installed to prevent leakage.
5.
Leak around gauge
threads
Remove gauge*, clean threads and reinstall
using Teflon tape on the gauge threads.
6.
Defective gauge
Remove defective gauge* an install the
proper Amerex pressure gauge (P/N 05225
240 psi) using Teflon tape on the gauge
threads.
7.
Leak in the cylinder
Contact
Amerex
if
under
warranty,
otherwise mark "REJECTED" and remove
from service or return to owner.
* Pressure gauge threads are coated with a special epoxy at the
factory. For easy removal, soak the valve assembly in hot water
(180°F) for two to four minutes. Remove gauge with a thin 7/16"
open end wrench.