Amerex 05604 User Manual
Page 5
4
11.
Remove the recharge adapter. Some residual Halon vapor may remain in the valve outlet as a
result of the charging procedure. Before attempting to leak detect, vacuum or blow the vapor away
from the areas to be checked. Check extinguisher for leaks at the valve outlet, around the collar
seal, cylinder welds and gauge using a Halogen Leak Detector (Preferred Method). The alternate
method is to apply leak detecting fluid or a solution of soapy water to these areas. Use dry
nitrogen to blow all liquid residue out of the valve and wipe the extinguisher to dry the exterior. DO
NOT LEAVE ANY LIQUID INSIDE THE VALVE BODY.
12.
Install nozzle or hose and horn assembly to the extinguisher discharge valve.
13.
Weigh extinguisher to confirm that the total weight is within the tolerances indicated in the
Maintenance section on the extinguisher nameplate.
14.
Record service date and attach new tag in accordance with the requirements of the "Authority
Having Jurisdiction".
TROUBLESHOOTING GUIDE
WARNING:
ANY HALON 1211 EXTINGUISHER MUST BE COMPLETELY DEPRESSURIZED
BEFORE ANY ATTEMPT IS MADE TO REMOVE THE VALVE AND CORRECT A LEAKAGE
PROBLEM.
To depressurize, see instructions in the Complete Maintenance section. Halon 1211 is a liquid
under nitrogen pressure. Variations in the temperature may affect gauge readings. The gauge
dial has been calibrated to reflect the tested extinguisher temperature extremes (-65°F to
+120°F). When in doubt about a gauge reading, place the extinguisher at room temperature
(70°F) for several hours to obtain a true reading.
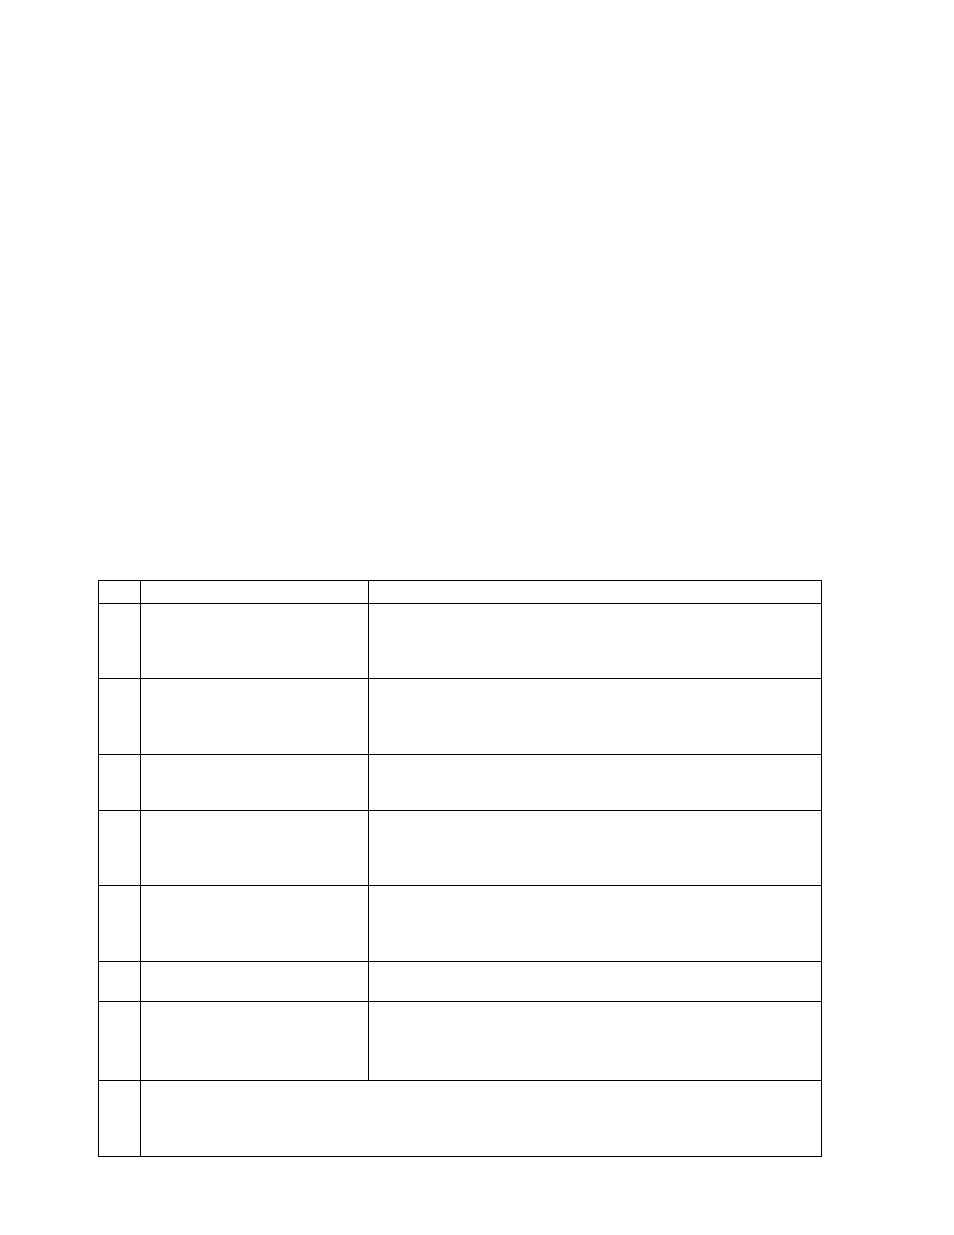
PROBLEM
CORRECTIVE ACTION
1.
Leak at collar o-ring
Remove valve assembly, remove and discard o-ring,
clean collar thoroughly. Install new collar o-ring.
Lubricate o-ring with Visilox V-711.
2.
Leak through valve
Check valve stem seating area for scratches or foreign
matter. Clean seating area with a tooth brush and soft
cloth. Install new valve stem assembly.
3.
Leak around gauge
Remove gauge*, clean threads and reinstall using Teflon
tape on the gauge threads.
4.
Defective gauge
Remove defective gauge* an install a new Halon 1211
gauge (see parts list) using Teflon tape on the gauge
threads.
5.
Leak in the cylinder
Contact Amerex if under warranty, otherwise mark
"REJECTED" and remove from service or return to
owner.
6.
Leak under operating lever
during discharge
Replace valve stem assembly.
7.
Gauge indicator high or low
in green operable area, no
detectable temperature
leakage
Extinguisher may have been subjected to extreme heat
or cold. Condition the extinguisher to room temperature
(70°F) overnight and check gauge reading.
* Pressure gauge threads are coated with a special epoxy at the factory. For easy
removal, soak the valve assembly in hot water (180°F) for two to four minutes.
Remove gauge with a thin 7/16" open end wrench.