Assembly of single tier lockers -- three wide unit – Tennsco Single Tier Lockers Three Wide User Manual
Page 2
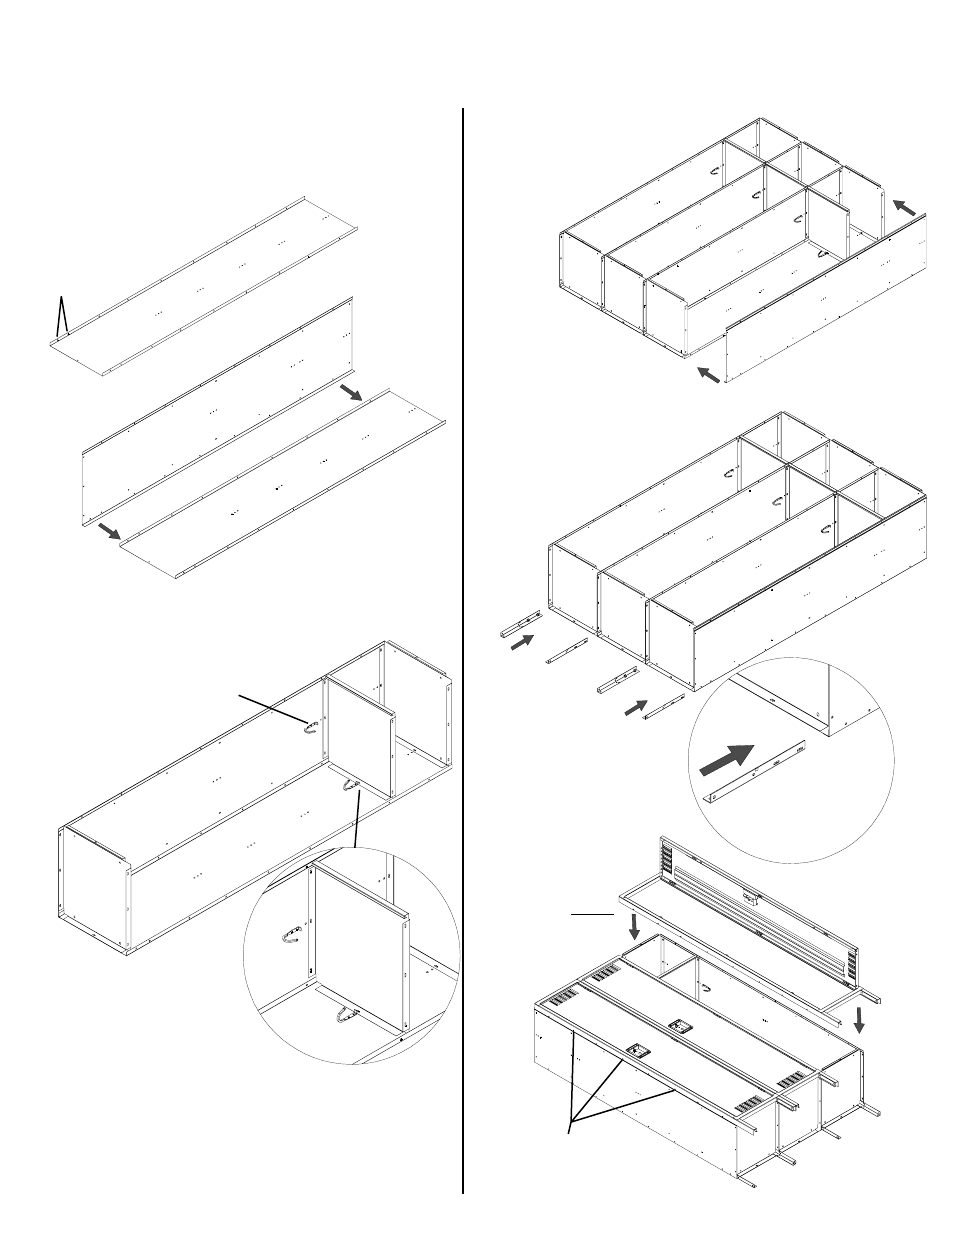
1.
Place back on a protected flat surface so
that the flanges are upward. If available use
a pair of "Saw Horses" to assemble units
on for easier installation.
Refer to Figure 2 for
reference numbers.
2.
Bolt left side
(Ref. No.2)
to the back
so that side
flange fits
around back.
ASSEMBLY OF SINGLE TIER LOCKERS -- THREE WIDE UNIT
Assemble lockers individually or in groups of three. Do not tighten bolts until unit is
completely assembled. Tools required: 11/32" nut driver (11/32" socket may be substituted)
3.
Bolt shelf (Ref. No.4) to back and side place
coat hooks (Ref. No.5) as shown. (For lockers
18" and deeper, bolt shelf in place and and
then attach side coat hook through
third and fourth holes
below shelf). Attach
top and bottom to
side and back
as shown.
5.
Bolt right side (Ref. No.7)
to the back so that
side flange fits
around back
and also
attach
to top,
bottom
and shelf.
Attach remaining
coat hook.
4.
Repeat steps 1, 2 and 3 to assemble second
and third sections. Make certain that coat
hooks are attached on each side panel
surface. A right side or left side can be used
as an intermediate side. Save one right side to
be used in step 5.
6.
If the locker has legs, insert
the leg into the corner
between the bottom and the
side. Bolt the leg to the
side using two
#8-32 x 1/2
bolts and
#8-32
nuts.
Back
Two
holes
for
rear
legs
.
Bottom
Top
Left side
Back
Do not bolt
through the
rear leg
holes yet.
Back
Bottom
Shelf
Top
Left side
Right
side
7.
Place door and
frame assembly
(Ref.Nos. 8 & 9)
over the locker
body/bodies and
secure with bolts
and nuts. Make
certain that body
sides are inside
frames -- never
between frames
on multiple units.
Door
& Frame
assembly
Leave out a few bolts
in the outer frames to
be used to attach adjoining units.
Left
side
Intermediate
side
Intermediate
side