Pfister E42-BNFC User Manual
Page 3
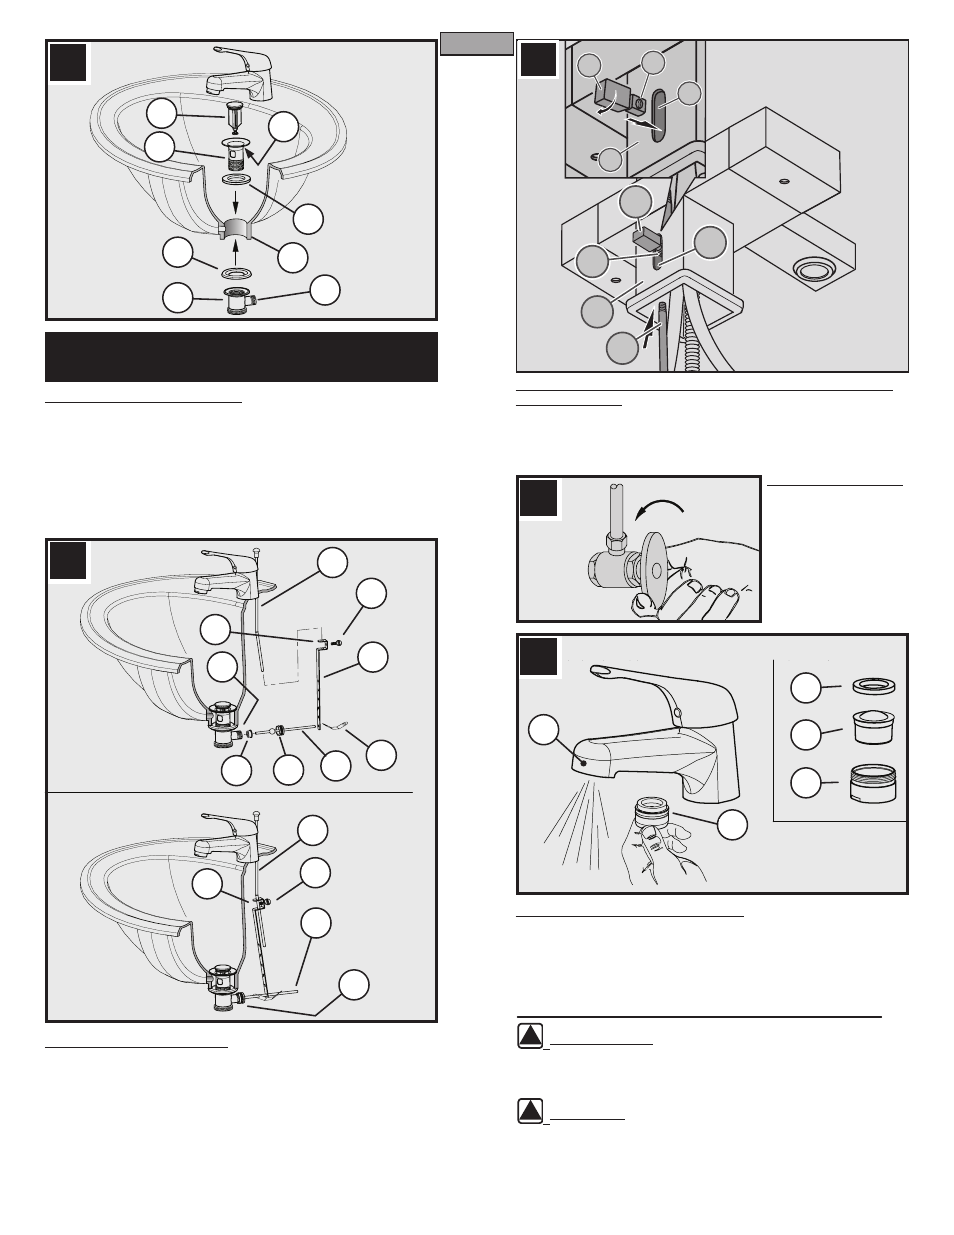
8 DRAIN POP-UP INSTALLATION
Remove Stopper (8A) and apply Plumbers Putty to underside of
Flange (8D) and to all treads. Insert Drain Body (8B) and Washer
(8C) through Sink Hole (8E). From underneith the sink, place Washer
(8F) on the bottom of the Sink Hole (8E) and thread the Lower Body
(8G) securely into the Drain Body (8B). Do not over tighten and
make sure that the Ball Rod Opening (8H) is facing the back of the
sink. Insert Stoper (8A) though the Drain Body opening.
9 POP-UP ROD ADJUSTMENT
Insert the Ball Rod (9A) and Ball Washer (9B) into the Ball Rod
Opening (9C). Place the Clamp Nut (9D) in the Ball Rod (9A) and
tighten securely to the Ball Rod Opening (9C). With Lift Rod (9E)
in position on the faucet, insert Lift Rod Strap (9F) and retain it with
Thumb Screw (9G). Insert one hole from the Spring Clip (9H) into
the Ball Rod (9A). Guide the Ball Rod (9A) one of the holes in the Lift
Strap (9J) and secure it with the second hole in the Spring Clip (9H).
Adjust the height of the Lift Rod (9E) by loosening up the Thunb
Screw (9G) and reseting it tightly.
CAUTION: Maintenance
DISASSEMBLY
• Replacement parts may be available at the store where you purchased your faucet.
• Please contact your local distributor for replacement parts if needed.
• Always turn off water and relieve pressure before working on your faucet.
NOTE: Trim Care
Cleaning Instructions:
For all Handles and decorative finishes, use only a soft cloth dampened with plain water to
clean and shine. Use of polish, detergents, abrasive cleaners, organic solvents or acid may
cause damage. Use of other than a soft damp cloth will nullify our warranty!
Special Trim: Trim products which contain Porcelain or other similar substance are not
acceptable for public areas or Commercial use. Installation of Said Trim is at Users Risk!
9
12
12 FLUSHING & AERATOR CLEANING
After installation is complete, remove Aerator (12A) from Spout (12B).
Turn water supply valves on and turn faucet on. Allow both hot and
cold water to run at least one minute each until all foreign matter has
cleared the line. While water is running, check for leaks. To clean
aerator lift out Insert (12C) and screen (12D) from aerator Basket
(12E). Rinse parts and replace.
8
11 FAUCET START UP
Turn on hot and cold
water supplies, and
check for leaks above
and below the sink
11
10D
10C
10A
10A
10E
10B
10D
10C
10B
10
10 POP-UP ROD INSTALLATION for E40-ENFC/E40-ENFCC; E42-
ENFC/E42-ENFCC
From back of Spout (10A) insert Knob (10B) vertically into Hole (10C)
as shown. Rotate Knob (10B) to horizontal with Threaded Hole (10D)
facing down. Insert Pop-Up Rod (10E) through the Base of Spout (10A)
and thread onto Knob (10B).
For Models E40-ENFC/E40-ENFCC/E42-ENFC/E42-ENFCC
please see Step 10 for specific Pop-Up Rod Installation.
3
ENGLISH
12B
12A
12C
12D
12E
8A
8C
8B
8D
8E
8F
8G
8H
9C
9A
9F
9D
9H
9G
9E
9B
9J
9D
9A
9J
9G
9E