Panther™ push pull gun - installation, Push-pull gun familiarization – Lincoln Electric IM10033 PANTHER K2874-1, K2874-2, K2874-3, K2875-2 User Manual
Page 10
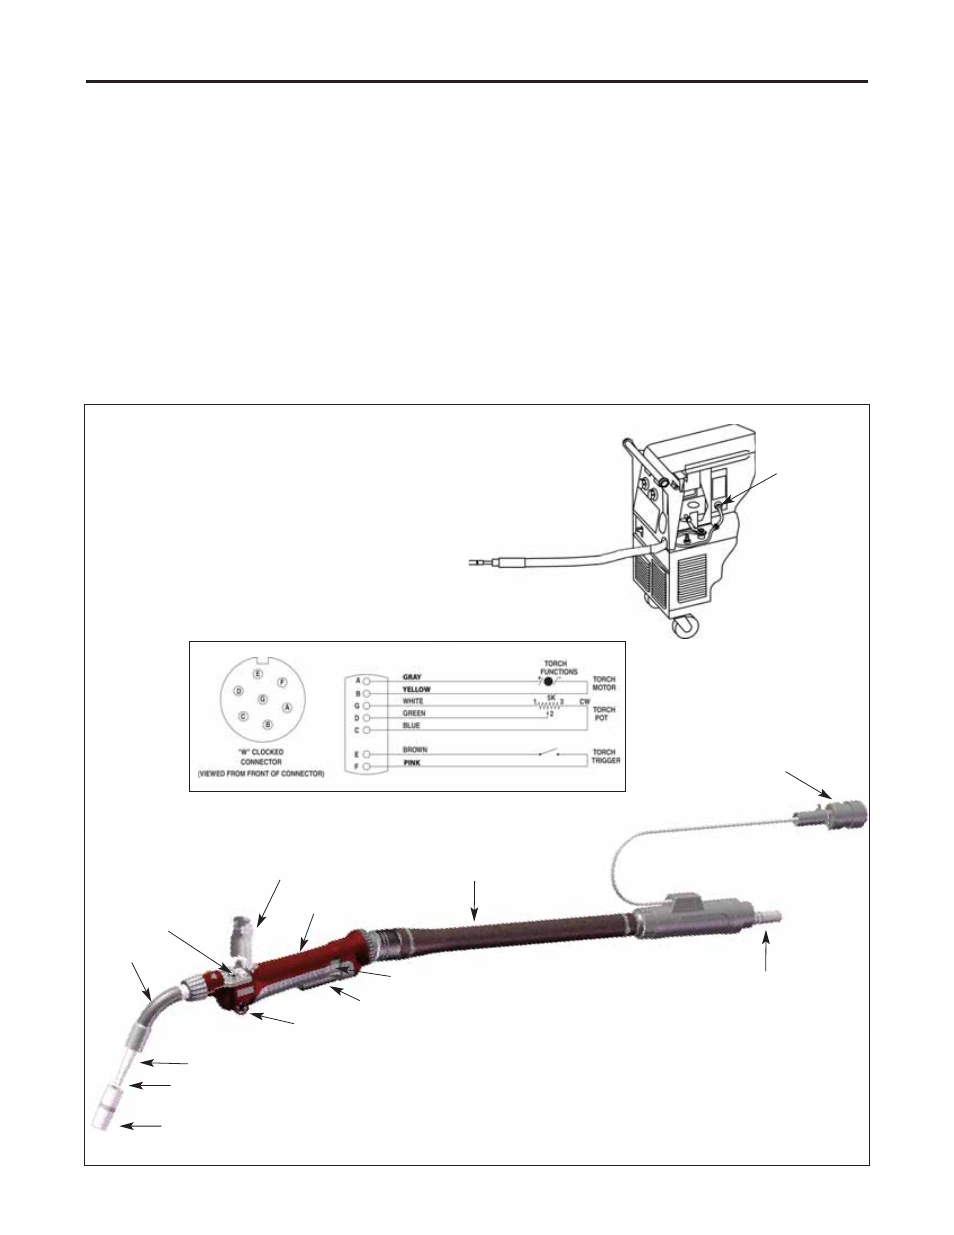
PANTHER™ Push Pull Gun - INSTALLATION
3
GAS NOZZLE
CONTACT TIP
GAS DIFFUSER
GUN BARREL
HANDLE
CABLE ASSEMBLY
DRIVE ROLL &
RETAINING
THUMB
SCREW
DRIVE ROLL
ACCESS
COVER
DRIVE ROLL
TENSION
ACCESS COVER
WIRE SPEED
CONTROL
LINCOLN
POWER PLUG
CIRCULAR 7-PIN
CONNECTOR
TRIGGER
7-PIN
PUSH-PULL
GUN
RECEPTACLE
CONNECTING TO POWER SOURCE:
(Air-Cooled shown)
1. Power source must be “off” and power cord
disconnected.
2. Connect Push-Pull Gun to wire feeder by inserting
power plug to the machine
3. Connect 7-Pin control cable plug to power
source receptacle.
4. Reconnect power and turn on machine.
Push-Pull Gun Familiarization
Become familiar with your push-pull gun before connecting to
welder. For features described below, refer to Figure on the next
page.
1. Handle, gun can be used in either right or left hand.
2. Trigger operates welding power, gas flow, and wire feed.
3. Remote wire speed control, located at rear of handle, controls
the speed of the drive motor.
4. Open drive roll access cover and observe the drive rolls with
two wire grooves. Narrow groove feeds .035 (0.9mm) diameter
wire. Wide groove feeds 3/64 inch (1.2mm) diameter wire. Gun
is shipped with wide groove or 3/64 in operating position
(toward handle). Reverse roller for .035 inch (0.9mm) diameter
wire.
5. Gas nozzle directs gas flow around arc. Unthread gas nozzle to
see contact tip and gas diffuser. Push-pull gun is shipped with
3/64th inch (1.2mm) contact tip installed.
6. Cable assembly for power, control, and gas. Hold gun and
become familiar with gun's weight and balance.