Specifications, Helmet information, Operating instructions – Lincoln Electric IM10146 MARQUETTE AUTO-DARKENING HELMET User Manual
Page 4: Cartridge operation/features
SPECIFICATIONS
LCD Viewing Area
Cartridge size
UV/IR Protection
Arc Sensors
Light State Shade
Variable Welding Shades
Shade Control
Power Supply
Power On/Off
Light to Dark Switching Time
TIG Rating
Operating Temperature
Storage Temperature
Total Weight
Compliance
(1)
97 x 44mm (3.82 x 1.73in)
110 x 90mm (4.33 x 3.54in)
Up to Shade DIN 16 at all times
2
DIN 4
DIN 9 to 13
External knob - full adjustment
Solar cells - no battery required
Fully automatic
0.0001 sec (1/10,000 sec)
10 amps
23°F ~ 131°F (-5°C ~ 55°C)
-4° ~ 158°F (-20°C ~ 70°C)
496g (17.5 Oz.)
ANSI Z87.1-2003, CE
(1)
Headgear compliance with ANSI Z87.1 is without sweatband installed.
HELMET INFORMATION
This Auto-Darkening Welding Helmet will automatically change from a light state (shade 4) to a
dark state (Shade 9-13) when arc welding starts.
The filter automatically returns to a light state when the arc stops.
Shade control adjustments can be made while welding.
Match your welding application to the shade indicated on the shade chart. (See Page 4)
• Operating temperature: 23°F ~ 131°F (-5°C ~ 55°C).
• Do not use or open the auto-darkening filter if damaged by shock, vibration or pressure.
• Keep the sensors and solar cell clean. Clean the filter cartridge using a soapy water solution
and soft cloth which should be damp but not saturated.
This Auto-Darkening Welding Helmet is designed for use with GMAW, GTAW, MMAW, SMAW,
FCAW welding, or Plasma Arc and air carbon arc cutting.
The cartridge provides protection from harmful UV and IR radiation, in both dark and light states.
The cartridge contains two sensors to detect the light from the welding arc, resulting in the lens
darkening to a selected welding shade.
• Do not use solvents or abrasive cleaning detergent.
• If cover lens is spattered or covered with dirt, it should be replaced immediately.
• Do not use the helmet without inside and outside cover lenses properly installed.
2
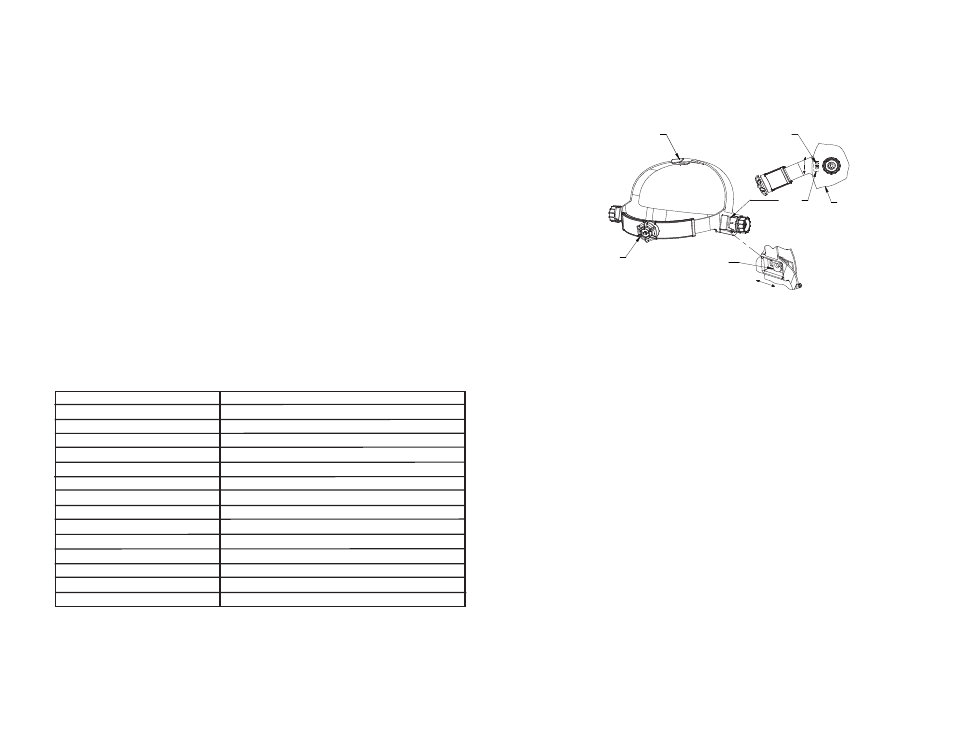
OPERATING INSTRUCTIONS
Headgear Adjustment
Head Size Adjustment: Headband tightness is adjusted by pushing in the ratchet knob and
turning to adjust to desired comfort level. This knob is located at the back of the helmet. HEAD
GEAR CROWN ADJUSTMENT is made by adjusting crown strap for vertical placement on the
head and snapping the pin into the hole to lock securely in place.
Tilt: View angle is adjusted on both the left and right sides of helmet. Adjustment is made by
loosening outside tension knobs of headgear and releasing tilt lever from its current location and
moving it to another location. It is recommended this adjustment be completed one side at a
time. Retighten tension knobs when finished. The view angle adjustment needs to be set the
same for both tilt levers.
Fore/Aft Adjustment: Fore/Aft adjustment is the distance between the userʼs face and lens. To
adjust, loosen the outside tension knobs to allow for headgear to be repositioned to a different
location. This should be done one side at a time and both sides should be located the same for
proper auto-darkening filter operation.
CARTRIDGE OPERATION/FEATURES
Variable Shade Control
The shade can be adjusted from shade 9 to 13 based upon welding process or application (refer to
Shade selection chart on page 4). The variable shade control knob is mounted to shell for external
adjustment.
Solar Power
This helmet is powered by solar energy. As such, there is no battery that requires replacement.
3
HEADGEAR
FORE/AFT
ADJUSTMENT
TILT ADJUSTMENT
CROWN
ADJUSTMENT
SHELL
RATCHET
KNOB
TILT
LEVER