Operating the sierrafc m8-4 system, Connecting via ethernet – Teledyne LeCroy SierraFC M8-4 Quick Start Guide User Manual
Page 4
Trademarks and Servicemarks
Teledyne LeCroy and SierraFC M8-4 are trademarks of Teledyne LeCroy
Corporation. Microsoft and Windows are registered trademarks of Microsoft Inc.
All other trademarks are property of their respective companies.
Changes
Product specifications are subject to change without notice.
Teledyne LeCroy reserves the right to revise the information in this document
without notice or penalty.
Teledyne LeCroy Customer Support
Online Download
Periodically check the Teledyne LeCroy Protocol Solutions Group web site
for software updates and other support related to this product.
Mail:
3385 Scott Blvd., Santa Clara, CA 95054-3115
Web: http://www.teledynelecroy.com/tm/Library/software/PSG
E-mail:
Tel:
(800) 909-7112 (USA and Canada)
Tel:
(408) 653-1260 (worldwide)
Fax:
(408) 727-6622 (worldwide)
Teledyne LeCroy © 2012. All rights reserved.
Part Number: 917990-00 Rev. C
This document may be printed and reproduced without additional permission, but all copies should contain this copyright notice.
Operating the SierraFC M8-4 System
The SierraFC M8-4 application can perform protocol analysis.
To use the software for protocol analysis, first select File > Protocol Analyzer for a new project protocol analysis .fcc file.
(You can also open a .fcs sample file from the Examples folder.)
1. In Easy Mode, on the Capture tab, select to capture Everything or Pattern. For Pattern, select a Pattern. You can
exclude patterns and frames. You can use different patterns for pre-trigger and post-trigger.
2. In Easy Mode, on the Trigger tab, select the trigger type. For Pattern, select the pattern.In Easy Mode, on the Settings
tab, select trigger position and memory use.
3. Change the Analyzer settings if necessary. Change the port Speed if necessary.
4. Use Advanced Mode only after you become familiar with the hardware and software and have special needs.
To change viewer options and see more detail about operation, see the Introduction chapter of the SierraFC M8-4 User
Manual.
10
Connecting via Ethernet
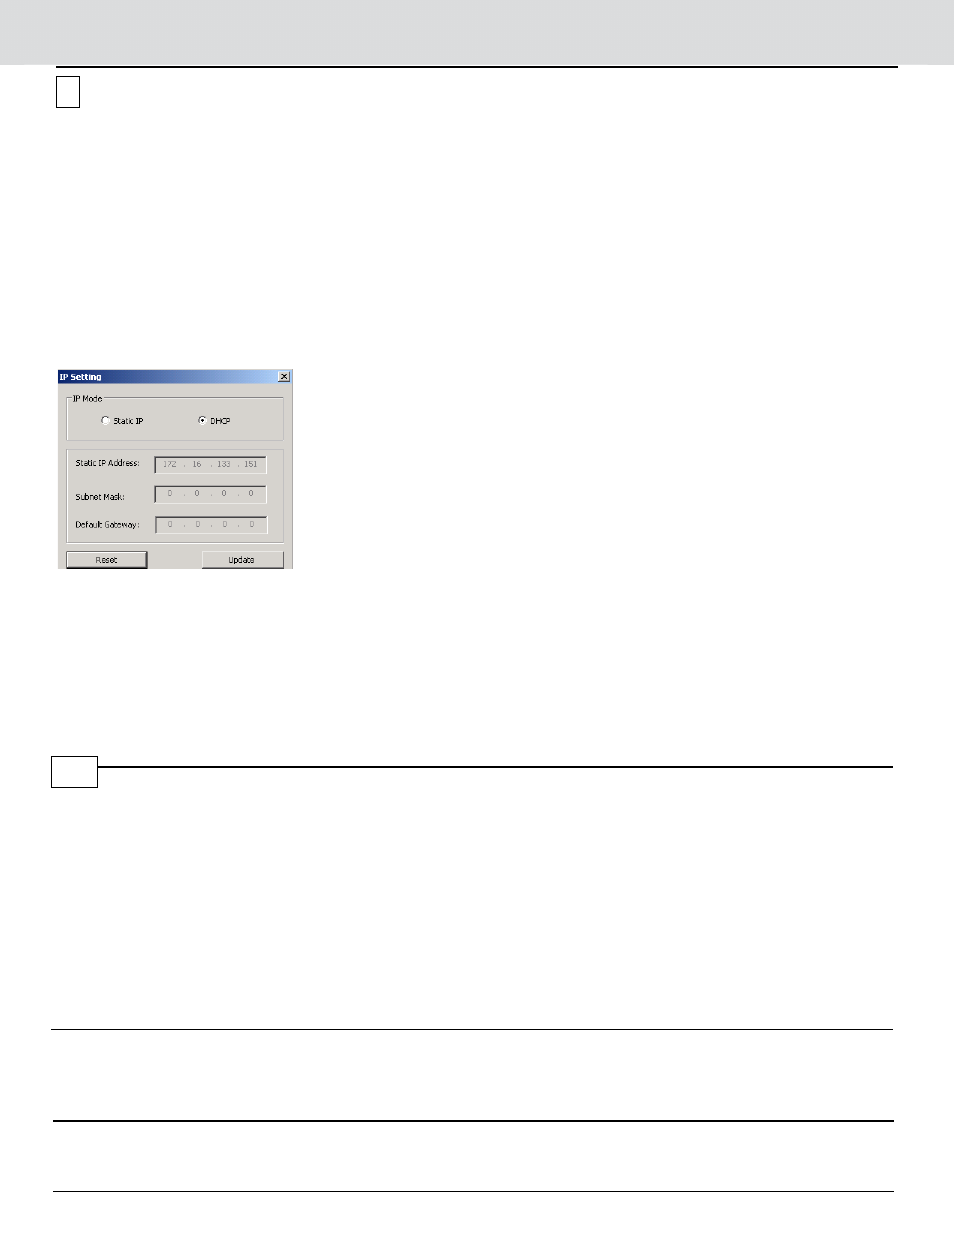
The Ethernet connection can have any of these configurations:
Connecting to a Network using a Hub, Switch, GigE interface, or Similar Device
When connected to a network, the analyzer can communicate with the DHCP server to establish a connection. The DHCP
server continually sends the next available IP address to the analyzer until the software starts.
Note: To connect using a different subnet or for remote operation, see the Introduction chapter of the SierraFC M8-4 User
Manual.
Connecting to a Host Computer using a Hub, Switch, GigE interface, or Similar Device
When connected to the host machine using a hub, switch, GigE interface, or similar device, the Analyzer must
communicate with the host computer to establish a connection. The host computer continually broadcasts the next
available IP address to the Analyzer, until the software starts.
IP_Address: When you start the software, the Internet Protocol (TCP/IP) Properties dialog may prompt you to
automatically use the offered IP address or to assign a specific IP address. (The assigned IP address must be on the same
network segment as the host computer.)
The software searches for all analyzers connected to the network and displays a list of available units in the Find Devices
dialog. After you select a unit, the software assigns the IP address to the selected unit, completing the connection, then
launches the software.
Connecting Directly to the Host Computer using a Cable
Connect SierraFC M8-4 to the Host PC using an Ethernet cable.
Connecting Via USB
To set up the Analyzer using a USB connection, connect the USB port to a USB port on the PC using a USB cable.
Turn on the rear power switch and the front power switch. Click Next after you see the Add New Hardware Wizard window.
Follow the Microsoft® Windows® on-screen Plug-and-Play instructions for the automatic installation of the Analyzer as a
USB device on your PC.
DHCP Address
Static Address
9