Luxor|H.Wilson WPS5CE User Manual
Page 4
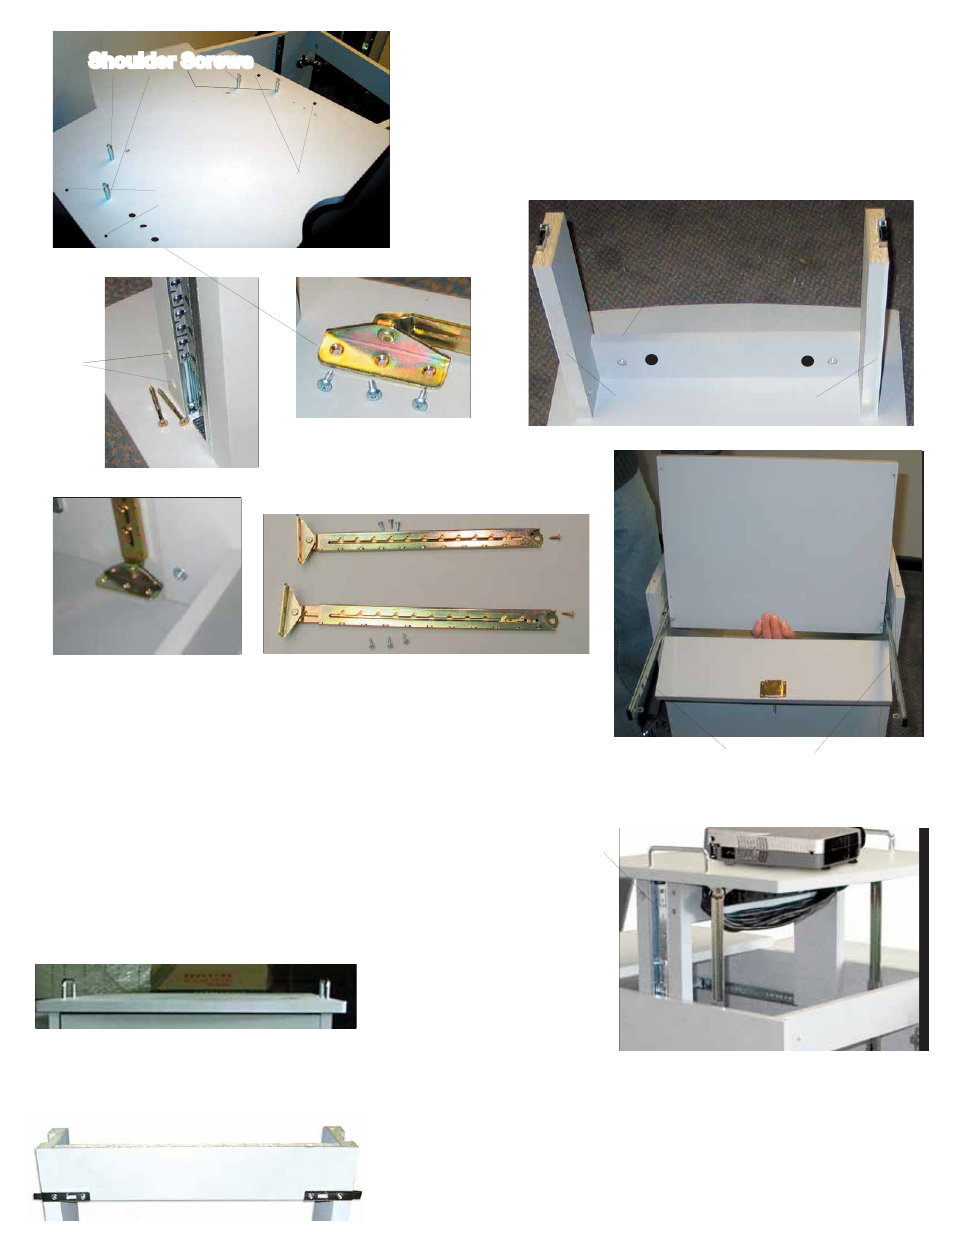
8. Place 4 shoulder screws in Adjustable Shelf (#13) as shown (a).
Place camlocks in Adjustable shelf brace (#9) and put onto the
shoulder screws that are closer together on the Adjustable Shelf.
Place Extension Rails/adjustable brace over remaining shoulder
screws (b) Secure the brace and rail assembly together using
# 8 screws (c). Tighten camlocks. Attach the ratchet lift brackets
to predrilled holes in adjustable shelf using 4mm screws (d, e & f)
Adjustable shelf
Screws
go here
to attach
adjustable
shelf brace
& extension
rails
9. Slide keyboard rails all the way out. Lay keyboard
tray on tabs. Attach Keyboard Tray to Keyboard rails
from underneath using the screws that came packaged
with the rails.
Keyboard Rails
Underneath view of
Keyboard Tray
Keyboard Door
10. Slide Adjustable Shelf Assembly onto the rails that were
factory assembled earlier (right). Attach the right and left lift
brackets to predrilled hole in side panels. Line shelf handles
over predrilled holes on the top of adjustable shelf. Fasten
from underneath with the screws that were packaged
with the handles.
Page 4
Predrilled holes for
shelf handles
Shoulder Screws
Shoulder Screws
12. ELECTRICAL ASSEMBLY (IF PURCHASED) -
Positioning shown Above See adjustable shelf picture at
the top right of this page. Attach electrical assembly
with the cord management wrap on the side closest to
the main door. See enclosed electrical instructions.
11. Attach the slide locks to the adjustable
shelf assembly using 4 pcs 4mm x18mm
wood screw as shown below. (Shown
without top shelf attached.)
A
Adjustable shelf brace
Attach Electrical assembly
onto these holes
After Step 8. these parts are
referred to as the adjustable
shelf assembly.
B
C
e
D
Ratchet Lift Brackets - Attach to Adjustable
Shelf with 4mm x 14mm screws and to side
panels with 10mm x 14mm brass screws
Extension rail assembly
f
Step 9