Detailed instructions cont – Darex V-390 User Manual
Page 10
10
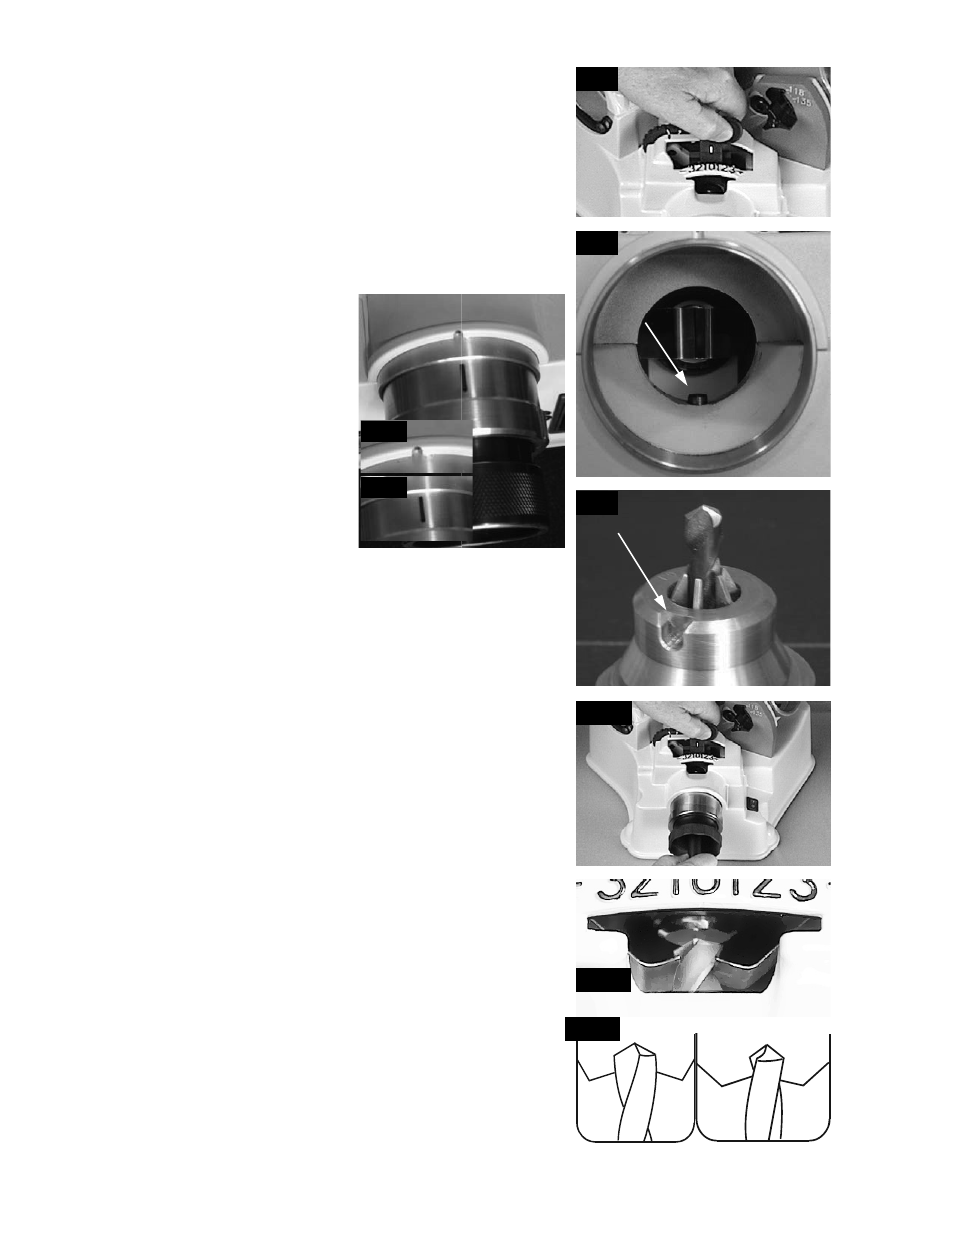
B.
Carefully
push the
relief
paddle back all the way to the rear and
hold it there.
(See Picture #6)
C. In the bottom of the alignment port is a locating pin, (See Pic-
ture #7) and located on the nose of the chuck is a milled slot. (See
Picture #8) To insert the chuck into the alignment port, both the
pin and slot must be aligned.
For easier alignment, a reference line (See Picture #9) has been
milled on the O.D. of the chuck, as well
as an alignment detent located on to
the face of the alignment port. (See
Picture #10) By aligning these two ref-
erence points you have properly posi-
tioned the locating pin and slot. If both
are in alignment you will be able to,
successfully slide the chuck into the
alignment port. At this point the chuck
nose should be entirely hidden inside
the alignment port.
D.
Grasp the shank of the drill bit and push it into the chuck to the
drill stop.
(See Picture #11)
E. Release the
relief
paddle, but continue pushing the drill bit in
against the stop. The two pawls will close onto the drill bit.
(See
Picture# 12)
F.
Look down into the viewing port in front of the
relief
paddle.
Note the location of the two spring steel pawls. Rotate the drill bit
until the pawls slip in and grab the flutes at the narrowest point.
(See Picture #12 and Illustration #12b)
Continue to push the drill
bit against the drill stop.
G.
With the drill point against the drill stop and the pawls in the
flute of the drill, use the other hand to tighten the chuck by turning
the chuck knob clockwise. Push the
relief
paddle back again to
release the drill bit and remove the chuck and drill from the align-
ment port. Snug the chuck knob clockwise using both hands to
secure the drill bit.
NOTE: Short drill bits may be aligned first without the chuck. After
aligning the short drills, slip the chuck over the drill bit and into the
alignment port and tighten the chuck jaws, securing the drill bit.
Before removing the chucked drill bit from the alignment port com-
pare the position of the drill bit against the pawls with the “correct”
illustration. (See Illustration #12b )
Detailed Instructions Cont.
Incorrect
Correct
Pic 6
Pic 7
Pic 8
Pic 9
Pic 10
Pic 11
Pic 12
Pic 12b