Safety guidelines when using this unit, Installation options, Unit set-up – Server FSF (87690) User Manual
Page 2: Unit operation
SAFETY GUIDELINES WHEN
USING THIS UNIT:
According to food and safety regulations, most foods
must be stored and/or served at certain temperatures
or they could become hazardous. Check with local food
and safety regulators for specific guidelines.
Be aware of the product you are serving and the
temperature the product is required to maintain.
Server Products, Inc. can not be responsible for
the serving of potentially hazardous product.
Stainless steel is one of the best materials for food
serving and storage, but there are many products which
can corrode it. If you notice corrosion beginning on
any stainless steel surface, you may need to change
the cleansing agent, sanitizing agent, or the cleaning
procedures you are using.
• Products containing: acids, alkalines, chlorine,
or salt can corrode stainless steel.
INSTALLATION OPTIONS
This unit can be set onto a countertop or mounted onto
a wall. There are four mounting holes available on back
side of unit.
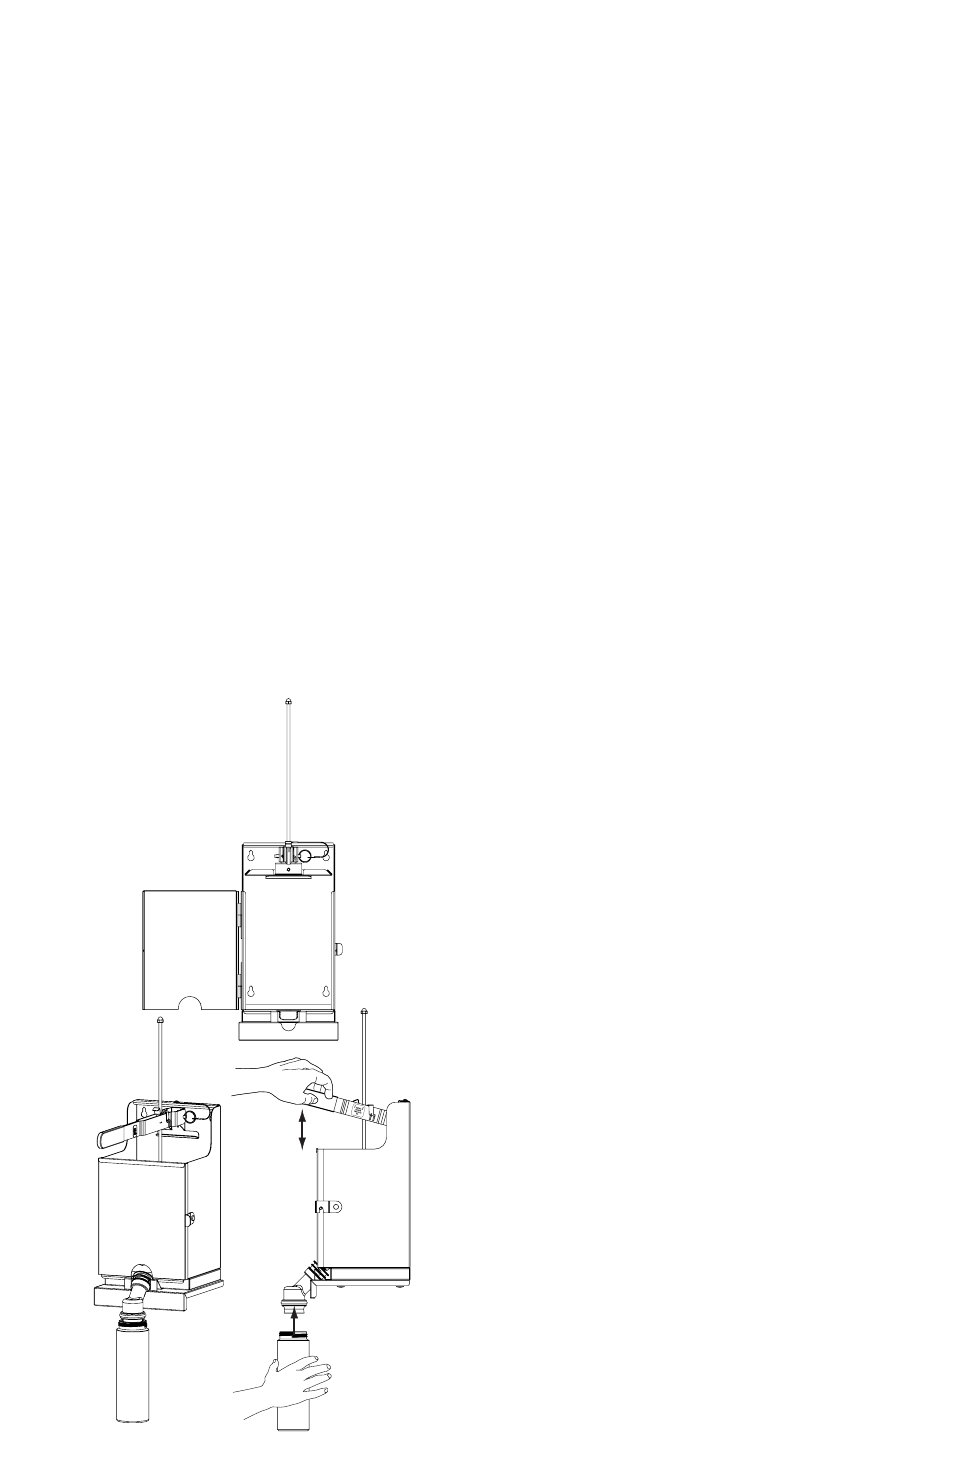
UNIT SET-UP
ALWAYS CLEAN UNIT THOROUGHLY BEFORE EACH USE
AND AFTER USE DAILY.
1
POSITION PLUNGER UP ONTO PLUNGER REST TO
INSTALL PRODUCT POUCH.
• Open unit door by lifting latch.
• Lift up handle and plunger assembly by depressing
handle lever release and lifting handle into
horizontal position to allow plunger rod to move
up freely.
• Tip plunger front up enough to position plunger
back up onto plunger rest on back wall of unit.
2
INSTALL VALVE BODY AND CONNECTOR ASSEMBLY
ONTO PRODUCT POUCH.
• Ensure valve nut is installed onto valve body
with threading facing out.
• Install connector into valve body and secure
with valve nut threading.
• Place product pouch on a counter top
with circular pouch fitment facing upward.
• Position valve body and connector assembly
directly over center of circular pouch fitment.
• Press valve body and connector assembly down to
pierce through film in circular pouch fitment. Valve
body and connector assembly will “snap” securely
onto fitment.
• Valve body and connector assembly is fully
engaged into pouch fitment when surface of
circular pouch fitment is flush with connector.
• Prime valve body by applying light pressure on
end of product pouch while holding valve body like
a cup, so that product does not spill out. Continue
to press on product pouch until valve body is full
of product.
• Install silicone valve onto valve body. Push silicone
valve down around edges of valve body until
silicone valve “snaps” securely into groove on edge
of valve body.
3
INSTALL POUCH, WITH ATTACHED VALVE BODY,
INTO UNIT.
• Align connector grooves onto unit valve body
holder.
• Connector groove which is closest to threaded cap
on valve body is the groove which must align and
slide into holder.
4
RELEASE PLUNGER FROM PLUNGER REST ON BACK
WALL OF UNIT.
• Close unit door and secure latch.
• Tip plunger front up enough to release plunger
back up off of plunger rest on back wall of unit.
• Set plunger into position resting on
product pouch.
UNIT OPERATION
PLACE BOTTLE TO FILL DIRECTLY UNDER VALVE BODY.
PUSH PLUNGER LEVER DOWN TO DISPENSE PRODUCT
FROM POUCH INTO BOTTLE.