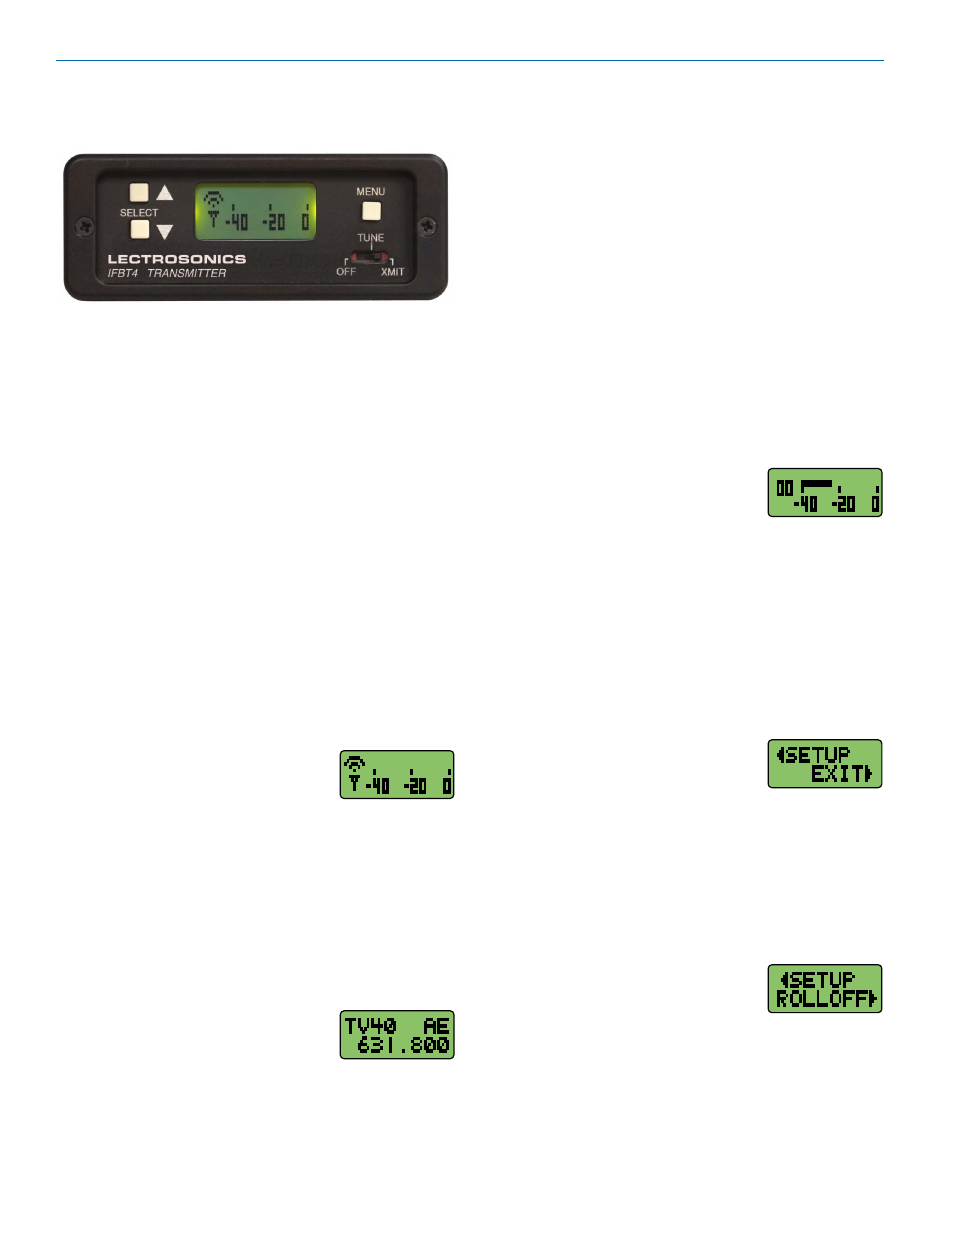
Front panel controls and functions, Ifbt4 front panel, Off/tune/xmit switch – Lectrosonics T4 User Manual
Page 6: Power up sequence, Main window, Frequency window, Audio input gain window, Setup window, Rolloff setup screen, Ifbt4 front panel off/tune/xmit switch
IFBT4
LECTROSONICS, INC.
6
In XMIT mode, it is not possible to change the operating
frequency.
In TUNE mode, the Up and Down buttons may be used
to select a new frequency.
If the TUNING mode is set to NORMAL, the Up and
Down buttons navigate in single channel increments,
and MENU+Up and MENU+Down move 16 channels
at a time. In any of the various group tuning modes, the
currently selected group identifier is displayed to the left
of the hex code, and the Up and Down buttons navigate
among the frequencies in the group. In factory group
tuning modes A thru D, MENU+Up and MENU+Down
jump to the highest and lowest frequencies in the group.
In user group tuning modes U and V, MENU+Up and
MENU+Down permit access to frequencies not currently
in the group.
Pressing and holding the Up or Down button invokes an
autorepeat function, for faster tuning.
Audio Input Gain Window
Pressing the MENU button once from
the Frequency window navigates to the
Audio Input Gain window. This window greatly resembles
the Main window, with the exception that the current audio
input gain setting is displayed in the upper left corner. The
Up and Down buttons may be used to alter the setting
while reading the realtime audio meter to determine what
setting works best.
The gain range is -18 dB to +24 dB with 0 dB nominal
center. The reference for this control can be changed with
the rear panel MODE switches. See the
Installation and
Operation section for more information on the MODE
switches.
Setup Window
Pressing the MENU button once from
the Audio Input Gain window navi-
gates to the Setup window. This window contains a
menu which permits access to various setup screens.
Initially the active menu item is EXIT. Pressing the Up
and Down keys permits navigation among the remain-
ing menu items: TUNING, COMPAT and ROLLOFF.
Pressing the MENU button selects the current menu item.
Selecting EXIT navigates back to the Main window. Select-
ing any other item navigates to the associated setup screen.
ROLLOFF Setup Screen
The ROLLOFF setup screen controls
the low frequency audio response of
the IFBT4 by moving the 3 dB corner of a 4 pole low-
pass digital filter. The 50 Hz setting is the default, and
should be used whenever wind noise, HVAC rumble,
traffic noise or other low frequency sounds may de-
grade the quality of the audio. The 35 Hz setting may
be used in the absence of adverse conditions, for a
fuller bass response.
Press MENU to return to the Setup window.
IFBT4 Front Panel
OFF/TUNE/XMIT Switch
OFF Turns the unit off.
TUNE Allows all functions of the transmitter to be set
up, without transmitting. The operating frequency
may only be selected in this mode.
XMIT Normal operating position. The operating
frequency may not be changed in this mode,
though other settings may be changed, so long
as the unit isn’t “Locked.”
Power Up Sequence
When power is first turned on, the front panel LCD dis-
play steps through the following sequence.
1. Displays Model and frequency block number
(e.g. IFBT4 BLK 25).
2. Displays installed firmware version number
(e.g. VERSION 1.0).
3. Displays the current compatibility mode setting
(e.g. COMPAT IFB).
4. Displays the Main Window.
Main Window
The Main window is dominated by an
audio level meter, which displays the
current audio modulation level in real time. In TUNE
mode, a blinking capital “T” is displayed in the lower left
corner to remind the user that the unit is not yet trans-
mitting. In XMIT mode, the blinking “T” is replaced by
an antenna icon.
Audio limiting is indicated when the audio bargraph
extends all the way to the right and widens somewhat.
Clipping is indicated when the zero in the lower right
corner changes to a capital “C”.
The Up and Down buttons are disabled in this Window.
Frequency Window
Pressing the MENU button once from
the Main window navigates to the Fre-
quency window. The Frequency window displays the cur-
rent operating frequency in MHz, as well as the standard
Lectrosonics hex code for use with transmitters equipped
with hex switches. Also displayed is the UHF television
channel to which the selected frequency belongs.
Front Panel Controls and Functions