Setup window, Level setup screen, Tone setup screen – Lectrosonics UCR411a User Manual
Page 12: Txbat setup screen, Phase setup screen, Smartnr setup screen
UCR411A
LECTROSONICS, INC.
12
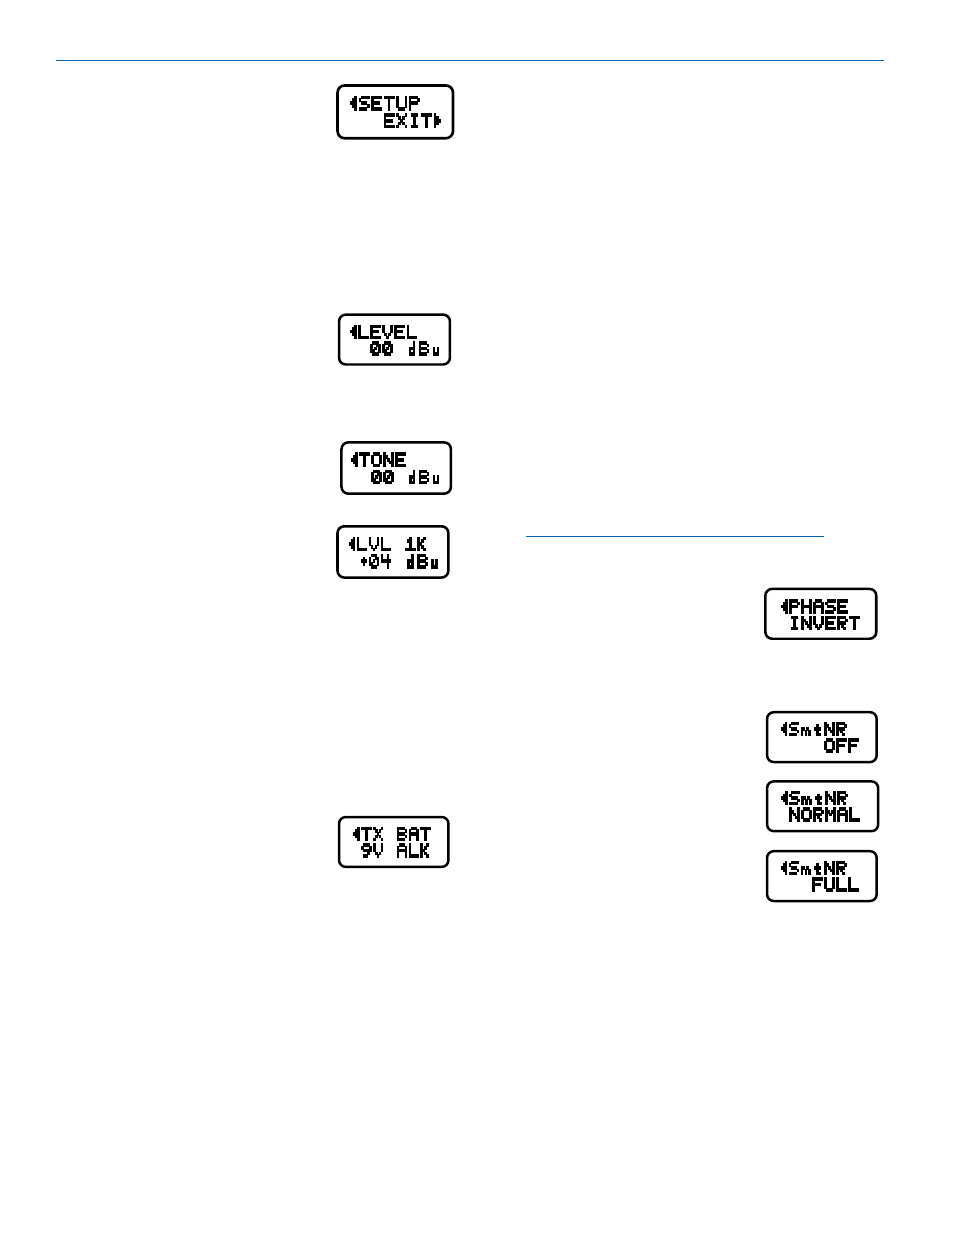
SETUP Window
In the SETUP window, the SEL Up
and Down buttons scroll through a
list of eight possible setup screens:
EXIT, LEVEL, TONE, TXBAT, PHASE, SmtNR (in 400
Series mode only), TUNING and COMPAT. Each of
these setup screens allows the user to change the as-
sociated operating parameters. Pressing the MENU
button accesses whatever mode is identified in the
Setup window. Pressing the MENU button whenever
EXIT is displayed returns the user to the Main window.
LEVEL Setup Screen
The
LEVEL setup screen displays
the audio output level of the receiver
in dBu. Use the SEL Up or Down
buttons to change the level. Range is
from -50 to +5 dBu in 1 dB steps. Press the MENU but-
ton to leave this screen.
TONE Setup Screen
The
TONE setup screen enables an
audio test tone at the receiver output
for precise level matching with other
equipment. The first screen prompts
you to press the SEL Up button to
enable the tone at the receiver output
jack. The next screen that appears
allows the level to be adjusted in 1dB
steps using the SEL Up and Down buttons.
When the audio test tone is enabled, the received audio
is muted and an internally generated 1 kHz test tone is
routed to the XLR connector. Since there is only one
audio output level setting for both the received audio
and test tone, the level set here will be retained in the
receive mode (it will supersede the setting made in the
LEVEL setup screen.) The test tone has 1% distortion
and is intended for confirmation of output levels only.
To exit the test tone screen and stop the tone press the
MENU button.
TXBAT Setup Screen
The
TXBAT setup screen allows you
to select the exact battery being used
in the transmitter to provide more
accurate battery level monitoring. Four different types
of batteries are commonly used in Lectrosonics trans-
mitters: 9 Volt alkaline, 9 Volt lithium, AA alkaline, and
AA lithium. Correctly set, this will ensure that adequate
warning will be provided in advance of battery failure.
Use the SEL Up and Down buttons to select the trans-
mitter battery. Press MENU to leave this screen.
In native 400 Series mode as well as in the 200 Series
compatibility mode, the TXBAT menu offers six choices:
9V ALK Transmitter uses a 9V alkaline battery.
Monitor voltage with battery icon in main
window.
9V LTH Transmitter uses a 9V lithium battery. Moni-
tor voltage with battery icon in main window.
9V TIM
Transmitter uses a 9V battery. Display its
voltage normally in the battery level window
but monitor its status with the battery timer
in the main window.
AA ALK Transmitter uses a AA alkaline battery.
Monitor voltage with battery icon in main
window.
AA LTH Transmitter uses a AA lithium battery. Moni-
tor voltage with battery icon in main window.
AA TIM Transmitter uses an AA battery. Display its
voltage normally in the battery level window
but monitor its status with the battery timer
in the main window.
The 9V TIM and AA TIM settings are most useful for
NiMH batteries as they do not exhibit reliably identifiable
voltage drops as they discharge.
In compatibility modes other than 400 Series and 200
Series, no battery telemetry information is available so
the TXBAT setup screen offers only two choices:
NOTIMER Display no transmitter battery status in the
main window.
TIMER
Monitor the transmitter battery status with
the battery timer in the main window.
Note: To reset the battery timer, hold MENU and
SEL Down together for one second.
PHASE Setup Screen
The
PHASE setup screen allows the
audio output phase to be inverted.
The SEL Up and Down buttons can
be used to toggle between normal and inverted phase.
Press MENU to leave this screen.
SmartNR Setup Screen
The
SmartNR setup screen (available
in 400 Series compatibility mode only)
places the Smart Noise Reduction
algorithm in one of three modes. In
the OFF position, no noise reduction
is applied, for complete transparency.
In the NORMAL position (factory
default setting), a moderate amount
of noise reduction is applied, dramati-
cally reducing hiss with virtually no
discernible side effects. In the FULL
position, the transparency is superior to the Lectroson-
ics noise reduction system used for many years in the
195 and 200 series systems. Try switching between the
three modes to decide what setting is correct for your
application. Refer to the Smart Noise Reduction section
in the
General Technical Description chapter for more
detailed information about this feature.