Instructions for use with mvp receivers – Controlled Products Systems Group QC-CLASSIC User Manual
Page 2
1
1
1
1
2
2
2
2
3
3
3
3
4
4
4
4
5
5
5
5
6
6
6
6
7
7
7
7
8
8
8
8
9
9
9
9
+ / On
+ / On
+ / On
+ / On
BUTTON
BUTTON
BUTTON
BUTTON
Zero
Zero
Zero
Zero
BUTTON
BUTTON
BUTTON
BUTTON
-
--
- / Off
/ Off
/ Off
/ Off
BUTTON
BUTTON
BUTTON
BUTTON
2.
While the LED is on, press the button
you wish to use.
(If your block has 8 switches press
the
+
button, if not, press any button you’d like to use).
The LED will blink off once and then remain
on.
- SELECT THE BUTTON YOU WISH TO USE -
- PUT THE TRANSMITTER IN PROGRAM MODE -
- ENTER YOUR 9 DIGIT CODE
3.
Enter the 9-digit code from the table
pressing the buttons that correspond with the
grid above.
(If your block has 8 switches use the
+
button in the 9th position)
4.
After the 9-digit code is entered,
the LED will blink twice to confirm
a valid code and remain off.
5.
Repeat the procedure for the remaining buttons.
Go to Step 3...
Go to Step 4...
NOTE: The table has a row for each one of the three buttons since it is possible to set a unique code for each
button. Write the code that you matched from your transmitter or receiver in the grids below.
1.
First, press and hold the
+
button.
The Red LED will turn on. Next, while
continuing to hold the
+
button, press
and hold the
-
-
-
-
button. Continue to hold
both buttons until the LED starts to blink
(approximately 5 seconds). Release
both buttons while the LED is blinking.
The LED will blink two times and then
remain on to confirm you are in
programming
mode.
Go to Step 2
1a.
First, press and hold the
-
-
-
-
button.
The Red LED will turn on. Next, while
continuing to hold the
-
-
-
-
button, press
and hold the
+
button. Continue to hold
both buttons until the LED starts to blink
(approximately 5 seconds). Release
both buttons while the LED is blinking.
The LED will blink two times and then
remain on to confirm you are in
programming mode.
Go to Step 2
*If the LED goes out,
start over.
*If the LED goes out,
start over.
When using the Classic with a MVP Receiver there is no need to
match a switch setting.
Simply make up your own unique code, enter it in the grid on page 2
and follow the instructions starting with Step 1.
When the transmitter is programmed, follow the instructions for teaching
the receiver the transmitter code.
Note: If you want to program all the buttons you can Express Code them by
selecting the
+
button in Step 2 and ending the 9 position code in
Step 3 with a
+
. This will code all three buttons in one
programming step.
Keep transmitters and remote controls
out of the reach of children.
Do not let children play with or use the
transmitter or remote controls.
Unexpected door operations can cause
personal injury or property damage.
Do not place transmitter where the buttons
can be accidentally or unintentionally
activated.
WARNING
Battery Replacement
The transmitter is provided with two factory installed 3-
volt batteries which should be replaced after two years
of normal use. The transmitter code is retained in
permanent memory and will not be lost during battery
replacement. To replace the batteries, remove the back
of the case with a small screwdriver. Carefully slip the
batteries out of the holders and replace with fresh
CR2032 3-volt batteries. The “+” on the batteries must
point away from the circuit board. Replace the back of
the cover and resume normal use.
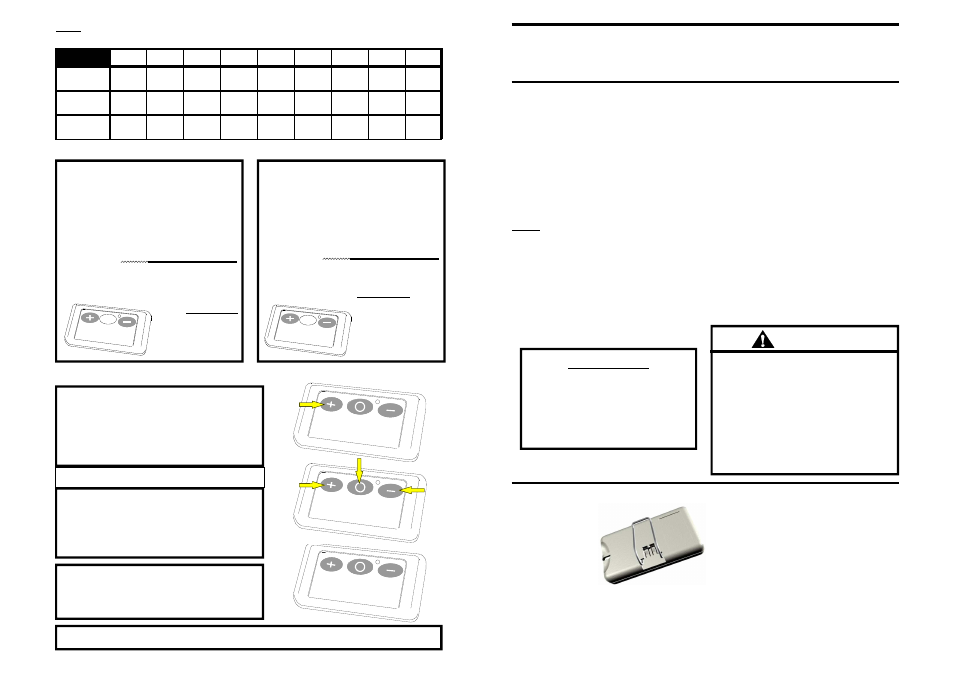
Installing the Transmitter
The transmitter is
supplied with a metal
clip which may be used
to attach the unit to a
sun visor. If the clip is
used, slide it into the
recess provided on the
back of the transmitter
case until the snaps on the case fit around the clip.
If the transmitter is installed in a pocket in your car,
follow all the manufacturer’s instructions.
Improper transmitter installation or use may cause intermittent operation which can
result in unexpected door operations.
IMPORTANT
The SAME CODE must be set
on both the transmitter and
receiver. The controls will not
function if the codes are
mismatched
.
INSTRUCTIONS FOR USE WITH
MVP RECEIVERS