Controlled Products Systems Group 111965 User Manual
Page 2
2
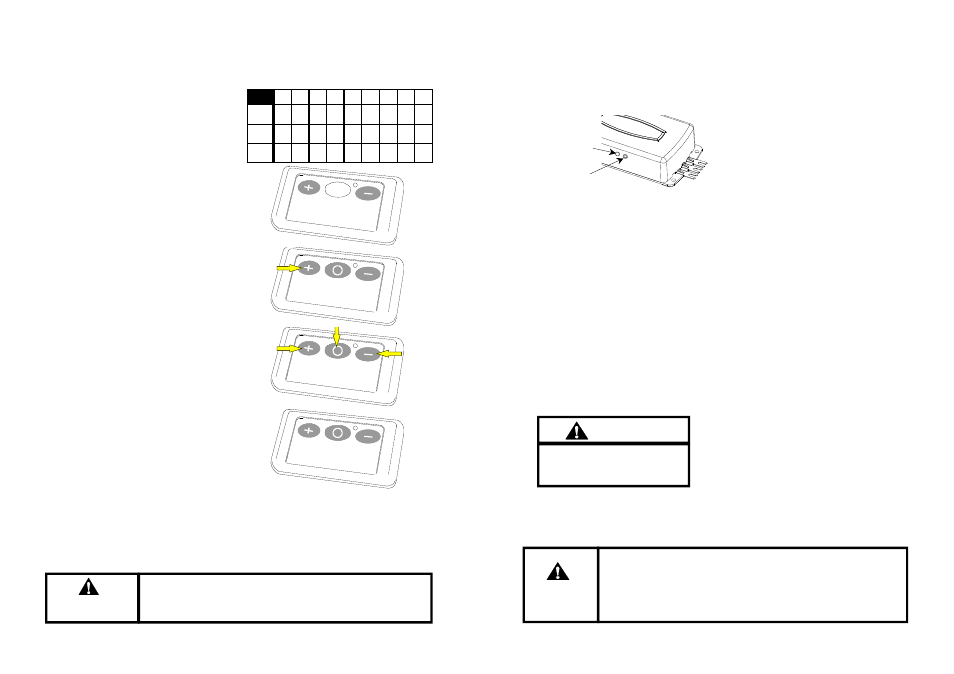
Programming Original Dip-Switch Transmitters
The coding switch in these products consist of nine or eight small switches, each of which can be
placed in a different position. Use a small screwdriver to set the switches to a new positions.
NOTE: Change switch settings from factory settings.
WARNING
Radio Controls are prohibited from providing constant contact
closure when installed on the push button inputs of residential garage
door openers that are provided with monitored safety systems.
NOTE: The table below has a row for each one of the
three buttons on the Quik-Code transmitter since it is
possible to set a unique code for each button.
Programming Quik-Code Transmitters
Programming the Allstar Classic or MVP
Quik-Code transmitter is done as follows:
1. Put the transmitter in program mode.
2. Select the button you wish to use.
3. Enter your 9 digit code.
After your code is confirmed, repeat the
procedure for the remaining buttons.
Put the Transmitter in Program Mode
Step 1: First, press and hold the + button. The Red
LED will turn on. Next, while continuing to hold the
+ button, press and hold the - button. Continue to
hold both buttons until the LED starts to blink
(approximately 5 seconds). Release both buttons
while the LED is blinking. The LED will blink two
times and then remain on to confirm you are in
programming mode.
Select the Button You Wish to Use
Step 2: While the LED is on, press the button you
wish to use. The LED will blink off once and then
remain on.
ENTER YOUR 9 DIGIT CODE
Step 3: Enter the 9-digit code from the table by
pressing the buttons that correspond with the entries in
the table.
CONFIRM ENTRY
After the 9-digit code is entered, the LED will blink
twice to confirm a valid code and remain off.
PROGRAM REMAINING BUTTONS
Repeat the procedure for the remaining buttons.
Express Coding
Express coding will program all 3 buttons at one time.
To use Express Code to program all the buttons at the
same time select the "
+
" button in Step 2 and end the
9 digit code entry in Step 3 with a "
+
". This will code
all three buttons in one programming step.
*If the LED goes out the programming mode
has timed out and you will need to start over.
1
1
1
1
2
2
2
2
3
3
3
3
4
4
4
4
5
5
5
5
6
6
6
6
7
7
7
7
8
8
8
8
9
9
9
9
+
+
+
+
0
0
0
0
----
Refer to individual manuals for
transmitter and keypad installation,
coding and user instructions.
Important
Learning Transmitter Codes
The MVP receiver is capable of learning up to
8 different transmitter codes. The transmitters
may be any combination of MVP, Classic or
Original dip-switch type transmitters.
Learn/Erase Button
Indicator LED
Programming One Door Receivers
Step 1: Momentarily press and release the
Learn button. The LED will turn on.
Step 2: Using a programmed transmitter, press
the desired transmitter button. When the
receiver learns the transmitter code, the LED
will turn off.
Step 3: Repeat to add additional transmitters
with different codes.
Note: When using two or three-button
transmitters, the button used in step 3 will
activate the receiver.
Erasing the Receiver’s Memory
Step 1: Press and HOLD the Learn button. The
indicator LED will turn on.
Step 2: When the LED turns off (after
approximately 5 seconds), release the Learn
button.
Programming the MVP Wireless
Keyless Entry
When set to learn mode, the receiver
memorizes a PIN and door number entered
from the keypad. Once learned, this PIN and
door number combination activates the
receiver.
Step 1: The red
Keypad
lighting should be
Off
. If it is on, wait until it turns off
(approximately 20 seconds).
Step 2: Momentarily press and release the
Learn
button. The LED will turn on. You
have approximately 20 seconds to enter the
keypad PIN and door code.
Step 3:
Press ON/RESET
to turn on the
keypad. The red lighting on the keypad will
turn on.
Step 4: Enter your
Four Digit PIN
. Every
time you press a key the keypad lighting
system will blink off and on to verify a key
has been pressed.
Step 5: Press the *
*
*
* key.
Step 6: Enter a
Door Number
.
Step 7: The LED on the receiver will turn off
when a valid PIN and door number has been
learned.
Keep transmitters and remote controls out of the reach of children.
Do not let children play with or use the transmitter or remote controls.
Unexpected door operations can cause personal injury or property damage.
Do not place transmitter where the buttons can be accidentally or
unintentionally activated.
WARNING