Installation instructions, Water supply requirements – Hydrotech ProSelect R1P Remote Water Chiller User Manual
Page 6
If local codes permit, the chiller feed line should be
connected to the cold water supply line with the “T”
water line connector included with the faucet (sold
separately). If you are using a filtration unit, the chiller
should be connected after the filtration unit.
IMPORTANT: If local codes do not permit the use of the
“T” water line connector, special feed valves can be
obtained from your local plumbing supply retailer.
The water pressure to the chiller should be between 30
psi (MIN) and 100 psi (MAX).
Water Supply Requirements
Installation Instructions
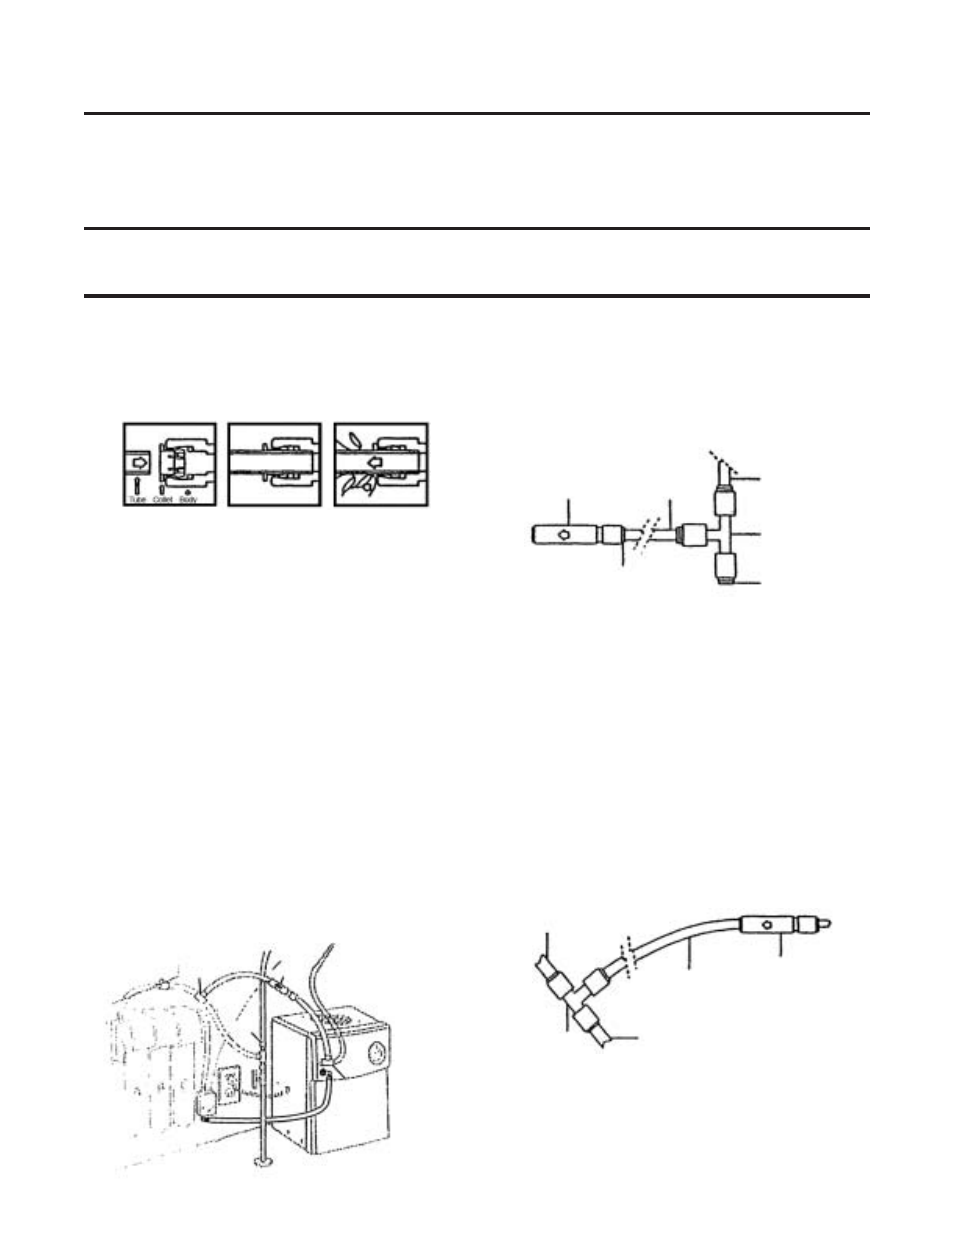
How to Insert/Remove Tubing
in Easy Connect Fitting
Insert the tubing separately. See Figure A.
Make sure to insert tubing completely. See Figure B.
Push in collet and pull out tubing. See Figure C.
Install the Chiller
NOTE: Tubing must be cut to fit. All tubes must be cut
squarely with no burrs. All tubing connections must be
fully seated. Tubing must be routed to avoid sharp bends
and have enough slack to avoid straining connections. A P-
clip and mounting screw is included to hold the tubing in
place as needed. Pull gently on each connection to make
sure they are secure.
IMPORTANT: After the chiller is unpacked, place chiller
upright for 24 hours before plugging it in.
1. Determine where you will install your chiller.
See “Location Requirements” section.
2. For best performance, allow a 2” (5cm) space around
the side and top. Do not put any objects on top of the
chiller that could obstruct the fan.
3. Shut off water supply valves.
4. Install ProSelect™ faucet sold separately. See faucet’s
installation instructions.
5. Using the white tubing included with the faucet (sold
separately), connect on end to the chiller (water in) and
the other end to the flow monitor outlet (blue collet)
(see Figure 1).
NOTE: If you are installing the chiller with a filtration
system, follow steps 6a to 13. Following these steps will
avoid the possibility of excessive pressure building as the
chiller cycles on and off. If you are NOT installing the chiller
with a filtration system, follow steps 6b and 10 to 13.
6a. Connect “T” (part 12) to “water out” chiller tube.
Connect blue tubing between “T” and faucet, sold
separately (see figure 2).
6b. If you are NOT installing a filtration system, connect
blue tubing between the “water out” chiller tube and
faucet, sold separately. Do NOT use “T” quick connect
fittings (part 12) or check valve (part 13).
7. Cut 6 inches of white tubing. Connect one end to “T”
(part 12) that is connected to “water out” chiller tube
and other end to check valve inlet (see Figure 2).
8. Cut white tubing between the “T” water line connector
(part 9) and the white “water in” collet of the filtration
system. Connect the straight-thru ports of the second
“T” (part 12) to the loose ends of the white tubing just
cut (see Figure 3).
9. Connect white tubing included with chiller between the
third port of the second “T” (part 12) and check valve
outlet (see Figure 3).
10. Slowly turn on water supply valve. Depress faucet lever
until water flows for about one minute. Check all
connections.
11. Plug in chiller.
12. Prior to drinking water from chiller, flush water
through chiller for at least 5 minutes.
Figure A
Figure B
Figure C
Figure 1
part 12
part 13
part 12
part 9
Check Valve
(part 13)
Check valve
inlet
White tubing to
check valve
Blue tubing to faucet
“T” Quick Connect
Fitting (part 12)
Connection to Chiller
“water out”
Figure 2
White tubing to
filtration system
White tubing to part 9.
“T” Quick connect
fitting (part 12)
White tubing
Check valve
(part 13)
Figure 3
6