1 • installing the light kit on the ceiling – Hunter 28568 Swirled Marble Dual Use Bowl Light Kit User Manual
Page 4
4
43550-01 • 06/10/10 • Hunter Fan Company
1 . If you are replacing an existing light fixture, disconnect and remove the old
fixture and mounting bracket . Leave the wires coming from the outlet box
exposed .
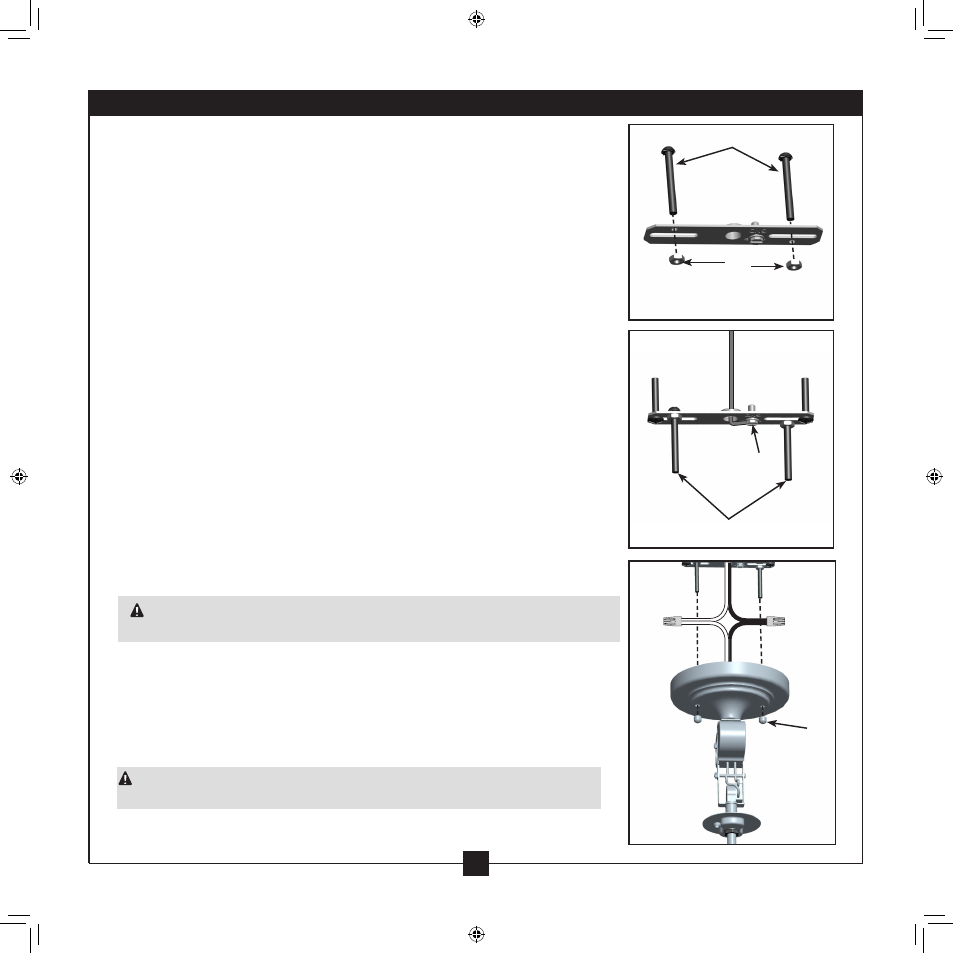
2 . Pre-install the two #8-32 screws, two corresponding washers, and two #8-32 nuts
on the hanger bracket . Tighten nuts securely . Note: The hanger bracket should
be positioned so that the two #8-32 screws are coming down and the green
grounding screw is going up towards the ceiling .
3 . Using the screw holes located on the electrical box, secure the hanger bracket to
the electrical box by threading the screws through the slotted holes in the hanger
bracket . Tighten screws . Note: The screws for installing the hanger bracket to
the electrical box should be installed in the opposite direction as the screws for
installing the ceiling plate cover to the hanger bracket .
4 . Locate the metal (uncoated) ground wire from the light fixture and the supply
ground wire coming out of the electrical box . Connect the metal ground wire
and the supply ground wire underneath the green ground screw on the hanger
bracket . Tighten the green ground screw as needed .
5 . Connect the white wire from the light fixture to the white supply wire coming
out of the ceiling . Connect the black wire from the light fixture to the black
supply wire coming out of the ceiling . Secure all wire connections using approved
wire connectors . To connect the wires, hold the bare metal leads together and
place a wire connector over them, then twist the wire connector clockwise until
tight .
6 . Spread the electrical splices so that the black wires are on one side of the outlet
box and the white wires are on the other side .
CAUTION: Be sure no bare metal wires or wire strands are visible after making
the connections .
7 . Align the holes in the cover plate with the #8-32 screws that were pre-installed
on the hanger bracket . Raise the light fixture and insert the screws through the
two holes in the cover plate .
8 . Install the decorative nuts on the end of each of the #8-32 screws . Tighten
securely .
1 • Installing the Light Kit on the Ceiling
WARNING: Improper installation could cause the light fixture to fall, or result in
electrical shock or personal injury .
Step 2
Steps 3-4
Steps 5-8
#8-32 Screws
Ground
Screw
Nuts
Decorative
Nut
#8-32 Scews