Call, C aut ion, S p ik e 2 0 0 0 – Bird B Gone 2000 Plastic Bird Spikes User Manual
Page 2
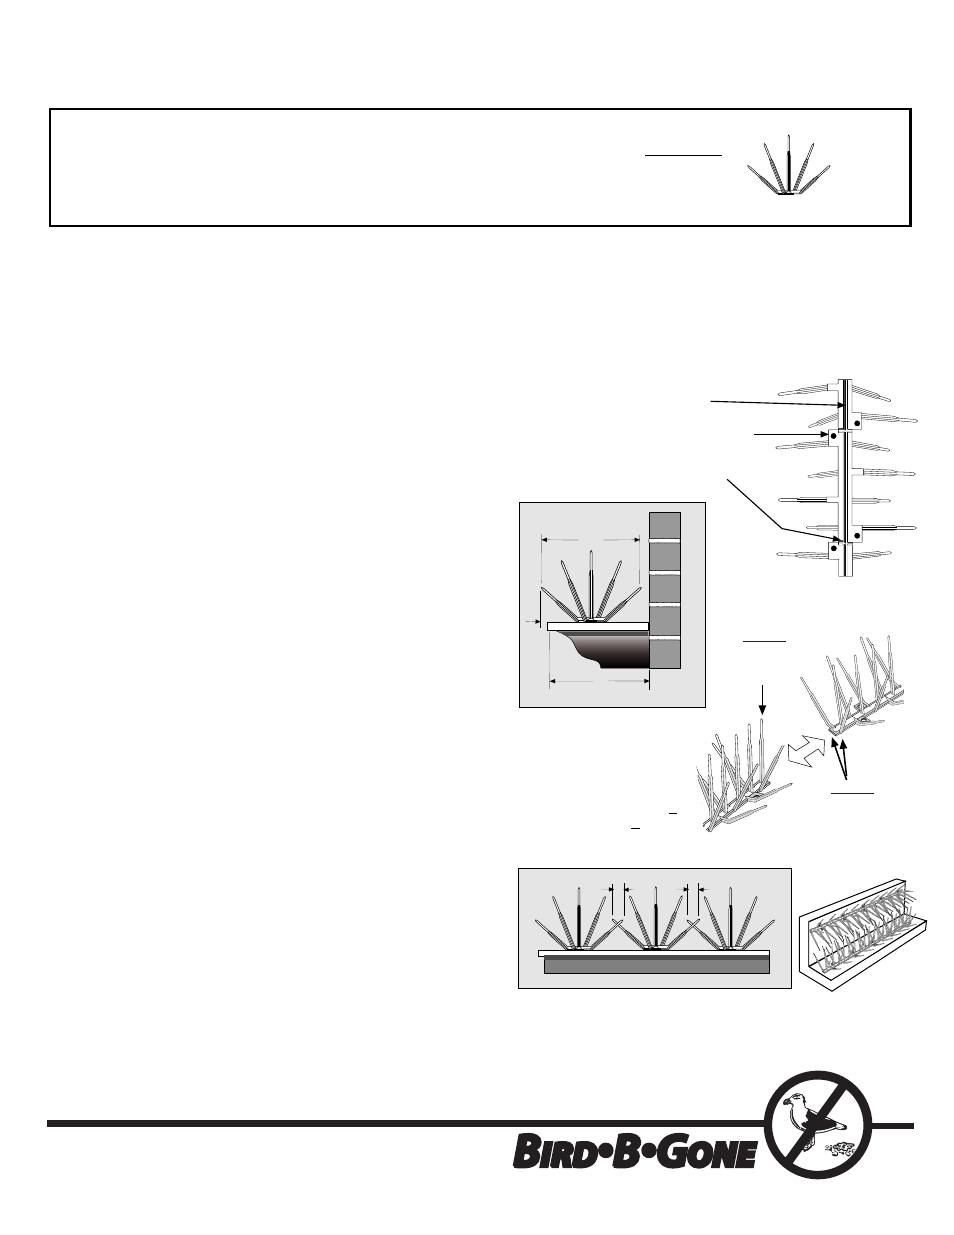
End-B
2 Angled
Middle Spikes
End-A
Vertical
Center
Spike
A
B
C AUT ION!
READ AND FOLLOW ALL INSTRUCTIONS PRIOR TO ATTEMPTING TO
INST ALL BIRD-B-GONE SPIKE 2000. SPIKES ARE SHARP ...
BE SURE TO WEAR GLOVES AND SAFETY EYE WEAR.
KEEP OUT OF REACH OF CHILDREN AND PETS.
DO NOT INSTALL WHERE HUMAN PHYSICAL CONTACT IS POSSIBLE.
INS T AL L AT ION INS T R UC T IONS F OR
B IR D• B • GONE "S P IK E 2 0 0 0 " S YS T E M
1.
e
to disinfect that ar
Thoroughly clean all surfaces where the product is to be
installed. S uggestion: Use a 10% bleach or ammonia solution
ea. It is important that all debris is removed
including overhanging branches, leaves, nests, etc. befor
disinfecting.
DUE TO THE INFECTIOUS DISEASES ASSOCIATED WITH
BIRD FECES, BE SURE TO USE EXTREME CARE WHEN
REMOVING NESTS AND BIRD DROPPINGS.
2.
Determine method of attaching S pike 2000 to surface.
• For Wood: Use #8 Wood screws. You will need 10 - #8
wood screws for every 2ft. section of spikes.
• For Concrete, Brick, Steel: Use Outdoor Construction
Adhesive that is not silicon based. Call B ird-B -Gone for
r
ecommended adhesives. One caulking tube of adhesive
should cover at least 30 ft. of S pike.
3.
When using adhesives:
.
a. R un a bead line of adhesive down the glue line
trough on the under side of the spike strip. ( Illus # 1)
Also put a dollop of adhesive on each of the screw
holes. this will allow the glue to mushroom up through
holes and adhere more effectively ( Illus # 1)
b.
C arefully place strip on to surface. R emember to
over hang strip 1/2” from edge of surface...
And be sure that no more than1/2” is left to back of wall.
( Illus. # 2 )
c.
When placing the next strip of spikes, be sure to place
“ End A “ to “ End B ”
End-A S tarts with vertical center spike.
End-B S tarts with two middle spikes offset at an angle.
( Illus # 3 )
Note: Whenever possible - Screw or bolt down the spikes in
conjunction with using an Outdoor Construction Adhesive.
4.
Adapting to size:
S pike 2000’ s unique design has break away points
between each set of screw holes. You can bend and
twist the product at these points to break off section as
needed.
Tin snips,
Hacksaw, etc. can be used to cut the
product to any desired size. ( Illus # 1)
5.
For heavy infestation/nesting areas: Getting rid of pest bir
ds
that have been in an area for generations may take some extra
effort. S pike 2000 should be installed horizontally on the surface
and vertically across the back wall. Intertwine spikes as shown.
(Illus #4)
LEDGE
7
“
7
“
1 2
/
“
1 2
/
“
3.
Apply End-A to
End-B Only
“
20” Ledge/Area
1
“
1
“
GLUE TROUGH FOR
EASY AND NEAT GLUING
OFFSET PRE DRILLED
HOLES FOR SCREW
ATTACHMENT
NOTCHES FOR EASY
CUTTING TO ROW SIZE
23918 Skyline • Mission Viejo, CA 92692
2.
Over hang spikes1/2”
No more than 1/2” to
back wall
4.
For Wide areas and Heavy infestations - Intertwine
spikes with 1” overlap on both vertical and horizontal
surfaces.
Any Questions Regarding
S P IK E 2 0 0 0
Installation
1.
call
1-800-392-6915
Fax: 949 472 3116
Web site www.birdbgone.com
Tel: 949 472-3122
E-Mail: [email protected]
INC.