American Expedition Vehicles Tummy Tucker – TJ Rubicon models User Manual
Page 2
Installation Instructions:
Tummy Tucker™ – TJ Rubicon models
Nth30116 v4.doc
page 2 of 13
www.aev-conversions.com
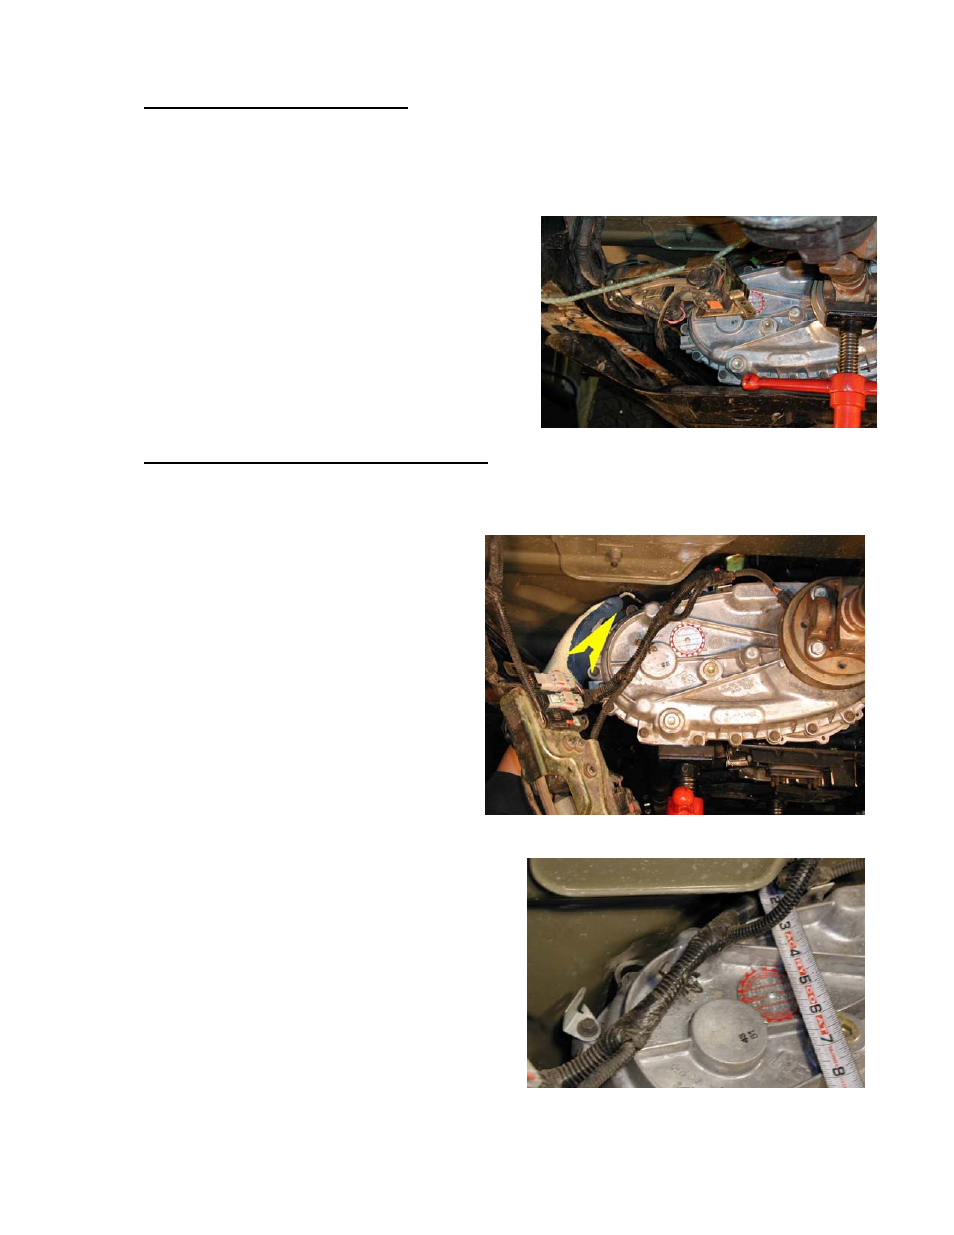
Fig. 1
Fig. 2
Fig. 3
Step 3: Remove Current Center Skid Plate. If you have an automatic, first remove the front
transmission skid plate. The two frame rail bolts will come out much easier and more reliably if you heat
the heads of the bolts with a torch first (this is to break down the factory loc-tite used on these bolts, else
they often spin the ‘riv-nuts’ in the frame, preventing disassembly). You will not be able to re-use this
skid plate with the TT or with any lift kit – Nth° makes a heavy duty replacement for this skid that is
compatible with the 4-speed auto-specific TT and any amount of lift height (Nth1470x). Remove the four
M8 (13mm head) trans mount nuts located at the slots
near the center of the main skid plate; support the
powertrain by placing a jack/stand under the transfer case
end of the rear driveshaft (right under the joint). Next,
remove the four bolts that hold the locker pumps bracket to
the left-rear area of the skid and support the assembly with
a bungie cord as shown in figure 1. Be sure nothing else
is attached to the skid plate such as auxiliary air lines or
wiring, etc. then remove the six bolts that attach the plate
to the frame rails (’03 TJ uses M12 bolts with 18mm
heads). The stock skid weighs 41.5 lbs. - be prepared!
Step 4: Floor Dimple for NV241OR ‘Roc-Trac’ t-case. Depending on your installation, you will need to
make a ‘dimple’ in the floor to create clearance for the case-half boss that is above and slightly outboard
of the front output. Note that this dimple is in an area of the floor that is ‘double walled’ – so the dimple
will not affect the interior of the vehicle. To determine whether you need to make a clearance dimple in
your case, consult the chart below and find the
combination of TT, body lift, and motor mount lift
that applies to you. You should have been
supplied with a small piece of steel tubing that has
been cut in half lengthwise – this is the ‘dimple
tool’. Move your floor jack or jackstand to a
position directly under the front output and in line
with the junction of the two case halves; lower the
t-case enough to place the tool over the boss as
shown in figure 2. The boss is slightly shorter than
the tool, so make sure the tool is centered front-to-
back over the boss. You will also need to tie the t-
case to the driver’s frame rail to keep the t-case
from sliding into the tunnel as you try to make the
dimple – a ratchet strap will work for this. (Do not
pull the t-case towards the driver’s frame, just restrain it from moving farther away.)
Create the dimple by jacking the t-case+dimple tool
up against the floor and letting the weight of the Jeep
cause the floor to ‘dimple’. For most installations,
determining when you have created a large enough
dimple is simple: as you jack the t-case up against the
floor, watch the round ‘bulge’ on the back of the case (to
the right of the dimple tool in figure 3). When this bulge
is nearly touching the floor (about 1/16” gap), you are
done and can lower the t-case again. Note that you will
nearly lift the left-side tires of the Jeep off the ground
during this process, so if doing it on an overhead lift, be
careful and safe!
Once the TT is in place you will be able to check
clearance at the dimple – you want to have at least ¼” (manuals) to 3/8” (autos) of clearance between
the t-case boss and the floor. However, due to variations in your measurements, etc., be prepared to