Alpha Technologies UPE-3, UPE-6, UPE-M3, UPE-M6, PN, CE and FPE Series - Quick Start Guide User Manual
Fiel, Security bar field installation instructions, Installing the security bar
Tools and Materials Required
•
Hand Drill
•
Center Punch
•
4-foot Level
•
7/16" Socket Driver with Extension
•
1/8" Drill Bit
•
#K (9/32" or .281") Drill Bit
•
Tape Measure
•
Masking Tape
•
Pencil
•
Utility Knife
•
Vacuum ( To remove drill swarf from cabinet interior)
•
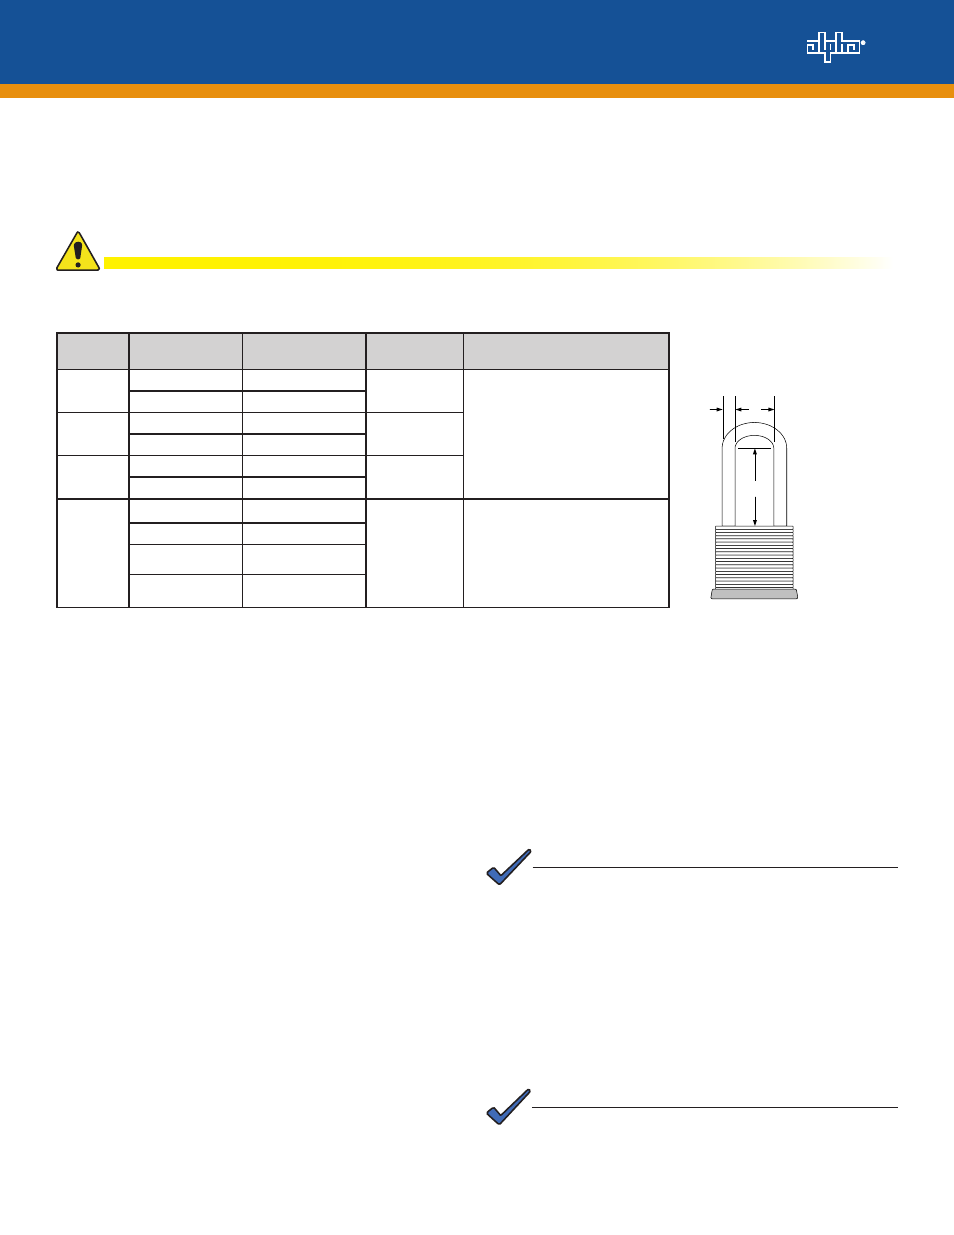
Lock (see Fig. 1 for dimensions)
Security Bar Field Installation Instructions
Fiel
For FPE, UPE-3, UPE-6, UPE-M3, UPE-M6, PN Series and CE Series Enclosures
Each security bar kit contains the parts and accessories needed to secure one enclosure door. Enclosures with both a front and back
door, require two kits (expect where noted below). Detailed placement specifications for each supported enclosure are in the Security
Bar Field Installation Manual (Search for P/N 745-847-C1-001) available at www.alpha.com.
Installing the Security Bar
The installation outlined in this document applies to each of
the supported enclosures. See Page 2 for installation detail
figures. Lock dimensions must conform to Figure 1.
If necessary, placement specifications for each supported
enclosure are in the Security Bar Field Installation Manual
(Alpha P/N 745-847-C1-001) available at www.alpha.com.
B
A
C
A= 5/16"
B= 3/4"
C= 2 1/2"
Figure 1, Lock Dimensions
1. Using a 4-ft level and a pencil, mark the enclosure where the
top of the side brackets will be placed, see Figure 2.
2. Position the side bracket and center punch the holes
3. Remove the door. Protect any electronic equipment from
drill shavings before drilling, and ensure the drill bit will not
contact any equipment as it passes into the enclosure.
Page 1 of 2
Only qualified personnel should complete this installation. Irreparable damage may occur to the
enclosure or equipment if not installed correctly.
CAUTION!
4. Pilot drill the side bracket holes using the 1/8" drill bit.
5. Drill the two top holes using a #K drill bit. See Figure 3.
6. Using the side brackets as templates, mark and drill the two
bottom holes.
7. Install the side brackets, see Figure 4, and replace the door.
8. Install the security bar in the side brackets. Position and use
the lock bracket as a template for marking its holes.
9. Drill the lock bracket holes.
NOTE:
Where necessary, use the utility knife to cut and
remove insulation from the hardware area.
10. Install the lock bracket. See Figure 5.
11. Install the other Security Bar Side and Lock Brackets by
repeating Steps 1–8.
12. Remove any metal shavings.
13. Secure the enclosure with the Security Bar, Lock and Lock
Guard. See Figure 6.
Enclosure
Color
Alpha Part Number
# of Required
Kits
Kit Components Description (Qty)
UPE
Seafoam Green
745-847-20
1
• Lock Bracket (2)
• Side Bracket (4)
• Security Bar (2)
• Lock Guard (2)
• Carriage Bolt 1/4"-20X3/4" (12)
• Lock Washer 1/4" (12)
• Flat Washer 1/4" (12)
• Hex Nut 1/4"-20 (12)
Gray
745-847-21
PN
Seafoam Green
745-847-20
2
Gray
745-847-21
CE
Seafoam Green
745-847-20
2
Gray
745-847-21
FPE
Seafoam Green
745-847-22
1
• Lock Bracket (4)
• Side Bracket (8)
• Security Bar (4)
• Lock Guard (4)
• Carriage Bolt 1/4"-20X3/4" (24)
• Lock Washer 1/4" (24)
• Flat Washer 1/4" (24)
• Hex Nut 1/4"-20 (24)
Gray
745-847-23
Pine Green
745-847-24
White
745-847-25
NOTE:
On enclosure doors with louvers, position the Lock
Bracket to either side of the louvers. See Page 2.