Bell & Gossett 6 71 075 114A Series e3 SC Solar Circulators User Manual
Page 4
CAUTION: Excessive use of solder in a vertical installation may result in damage to the pump impeller. Do not
use excessive flux. Failure to follow these instructions could result in property damage and/or moderate
personal injury.É
4.When sweating the joints, first wrap the pump body with a cool wet rag, then direct the flame with care to avoid ЙЙЙЙЙЙЙ
subjecting the pump to excessive heat.
5.Check soldered connections for leaks. If re soldering is required, take care to avoid subjecting the pump to excessive
heat.É
WARNING: - WATER LEAKAGE HAZARD - To prevent leakage, make certain that the flange bolts or ring nuts
have been adequately tightened and that the solder connections do not leak. Failure to follow these
instructions could result in serious personal injury, death and/or property damage.É
6. Drain the plumbing lines by opening the faucet/tap in the house. Drain the water heater if you plan to make the
connection at the bottom of the water heater, which requires removal of the drain valve.
7. Connect the return line at the last faucet/taps riser and run to the water heater. Tee the return line as close to the end
of the hot water supply line as possible and run the return line back to the water heater.
8. Close the shut-off valve on the inlet side of the pump and turn the water supply to the house back on.
9. Flush system of debris. Before reattaching the pump motor, open the shut-off valve on the inlet side of the pump
housing and let water flow through the housing. Use a bucket to catch the water. Let the water run long enough to
clear all sand, solder pellets, plumbers tape flakes, etc. from the lines. Close the inlet shut-off valve when finished.
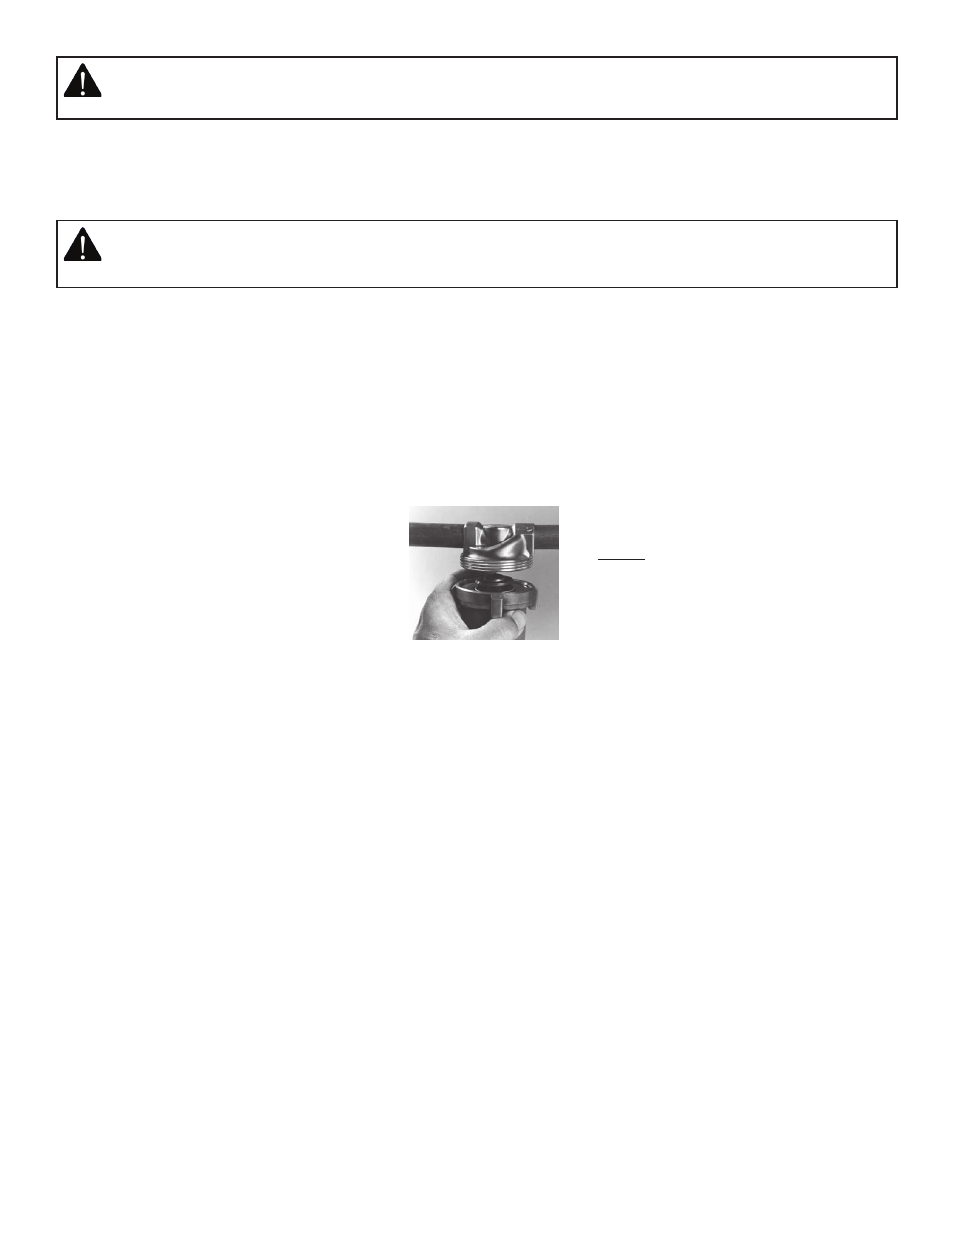
10. Connect the pump motor to the housing. Make sure the rubber o-ring is in place in the housing and the screw ring
is securely hand tightened. Reopen the shut-off valve or valves and let the water flood the pump housing.
fig. 1
Remove the motor unit and
o-ring from the pump housing into the plumbing
line. Do not sweat the housing into the plumbing
line with the motor or o-ring attached. Arrows on
the pump housing indicate the direction of water
flow.
Caution: Only hand tighten the screw ring.
Do not over tighten! Do not use plumbers
putty on the screw ring.
Do’s and Do Not’s
Do:
• Install an air vent mounted in a vertical position (if provided).
• Be sure the check valve is installed in the proper direction of the flow.
• Be sure all air is purged from the system prior to starting the pump.
• Use a water conditioner if you have hard water.
• Be sure the gate valves are open before turning on the pump.
• Install the pump pumping in upward direction only.
Do Not
• Use grease or oil to lubricate the pump (it is self-lubricating).
• Over tighten the screw ring.
• Install the pump with the motor above the pump housing.
• Install the pump pumping away from the water heater nor pumping downward.
• Start the pump before the system is full of water and purged of air.
• Use any pipe size other than 1/2”(5/8”) for all models.
Hard Water Conditions
Use a water conditioner. Hard water can cause scale build-up and eventually reduce the life of the pump and other
system components.
Protected by one or more of the following Patents: 4580335, 4615662, 4822256, 4834628, 5094593, 5143049,
5749715, 6149407, 6227235