8 troubleshooting 9 warranty – Analytical Industries AII-4001 Helium Oxygen Trimix Analyzer User Manual
Page 8
13
8 Troubleshooting
9 Warranty
Coverage
Under normal operating conditions, the analyzer and sensors are warranted to
be free of defects in materials and workmanship for the period specified in the
current published specifications. To make a warranty claim, you must return
the item properly packaged and postage prepaid to:
Analytical Industries Inc.
2855 Metropolitan Place
Pomona, Ca 91767 USA
Analytical Industries in their sole discretion shall determine the nature of the
defect. If the item is determined to be eligible for warranty we will repair it or,
at our option, replace it at no charge to you. If we choose to repair your item,
we may use new or reconditioned replacement parts. If we choose to replace
your item, we may replace it with new or reconditioned components of the
same or upgraded design. This is the only warranty we will give and it sets
forth all our responsibilities, there are no other express or implied warranties.
The warranty period begins with the date of shipment from Analytical Indus-
tries and is limited to the first customer who submits a claim for a given serial
number which must be in place and readable to be eligible for warranty. Under
no circumstances will the warranty extend to more than one customer or be-
yond the warranty period.
Exclusions
This warranty does not cover normal wear and tear; corrosion; damage while
in transit; damage resulting from misuse or abuse; lack of proper maintenance;
unauthorized repair or modification of the analyzer; fire; flood; explosion or
other failure to follow the Owner’s Manual.
Limitations
Analytical Industries shall not liable for losses or damages of any kind; loss of
use of the analyzer; incidental or consequential losses or damages; damages
resulting from alterations, misuse, abuse, lack of proper maintenance; unau-
thorized repair or modification of the analyzer.
Service
Telephone 909-392-6900, fax 909-392-3665 or e-mail [email protected] be-
tween 8:00am and 5:00pm PST Monday thru Thursday or before 12:00pm on
Friday. Trained technicians will assist you in diagnosing the problem and deter-
mining the appropriate course of action.
14
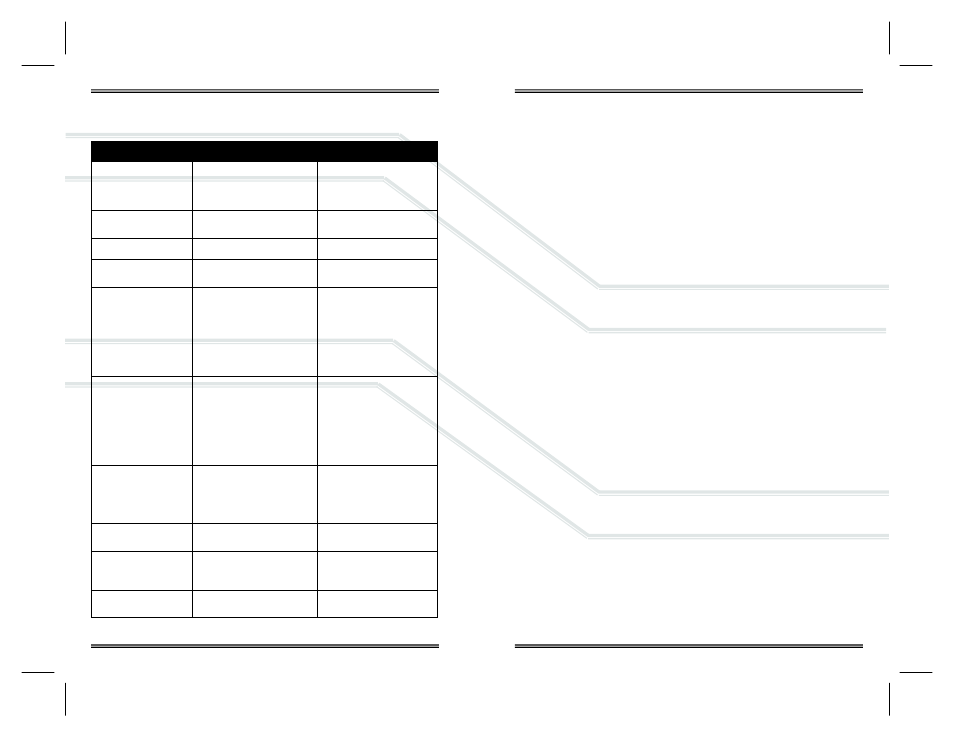
Symptom
Possible Cause
Recommendation
Display blank
15 min auto turn off feature
Battery protection auto turn off
Bad connection
Other component failure
Press red POWER key
Charge analyzer for 2 hrs
Check battery connection
Return to factory
Display dark
Auto turn off feature
Exposure to high temperature
Press yellow BACK LIGHT key
Move the unit to cooler place
Display segment missing LCD component failure
Return to factory
Display reflects empty
battery symbol
LOW BATTERY warning
Charge battery
Readings unstable
Bad electrical connection
Ignore LOW BATTERY warning
Backpressure on sensor
RF/Electro-mag interference
O
2
sensor nearly expired
He sensor faulty
Check connections
Charge or replace battery
Check pressure, flow and vent
(remove any restriction)
Move unit away from source
Replace O
2
sensor
Check with known He % mix
Replace He sensor
Reading drifts
Leak in gas path connections
Liquid covering sensing areas
Ignore LOW BATTERY warning
Temperature change >10⁰C
O
2
sensor nearly expired
He sensor faulty
Check connections
Remove liquid
Replace O
2
sensor
Charge or replace battery
Stabilize 30 min at new temp
Replace O
2
sensor
Check with known He % mix
Replace He sensor
Reading zero O
2
Bad
electrical
connection
Liquid covering sensing area
No oxygen present
Shock from being dropped
O
2
sensor expired
Check O
2
sensor connection
Remove liquid
Expose to air
Replace PCB or O
2
sensor
Replace O
2
sensor
Reading +/- He in air
He zero required
He sensor fault
Perform CAL O
2
ZERO He
Replace He sensor
O
2
Calibration failed
No oxygen present
O
2
sensor nearly expired
Shock from being dropped
Expose to air, repeat
Replace O
2
sensor
Replace PCB, sensors
He Zero failed
He sensor disconnected
He sensor faulty
Check He sensor connection
Check with known He % mix