Billet Specialties 248865 - Battery Lug Bracket Panel Mount User Manual
1 or 2 gauge wire - strip approx 3/4 in, 1/2” battery terminal (not supplied)
Billet Specialties, Inc. 500 Shawmut Avenue La Grange, Illinois 60526 PH 800.245.5382 Fax 708.588.7181 www.billetspecialties.com
Warning!
• Disconnect battery before installation
• Do not allow charging lug to come in contact with the chassis or body at
any time - Electrical Damage Will Occur.
Panel Mounting
• Cut out template provided and tape to panel in desired position.
• Trace outline onto panel.
• Center punch hole centers. Use a 1-3/8” Bi-metal hole saw to cut outer
radius of each side, finish by trimming balance of cut out.
• De-burr all edges and paint exposed bare metal for corrosion protection.
• Apply Loc-Tite to threads on one end of the 1/4-20 socket set screw then
thread into back of outer bezel.
• Apply Loc-Tite to the exposed threads of the 1/4-20 socket set screw and
install inner and outer bezels onto panel, install 1/4” washer and nut.
Tighten firmly until bezels are securely clamped to panel.
Male Lug Assembly (From Charger)
• Slide plastic handle over cable then strip approximately 3/4” of cable
insulation (Note: works with 1 or 2 gauge cable).
• Insert the exposed wire completely into the charging
lug and secure with the 3/8-16 socket set screw.
• Next slide the plastic handle over male charging lug
and secure with #8-32 socket head cap screw.
Female Charging Receptacle
• See Illustration at right.
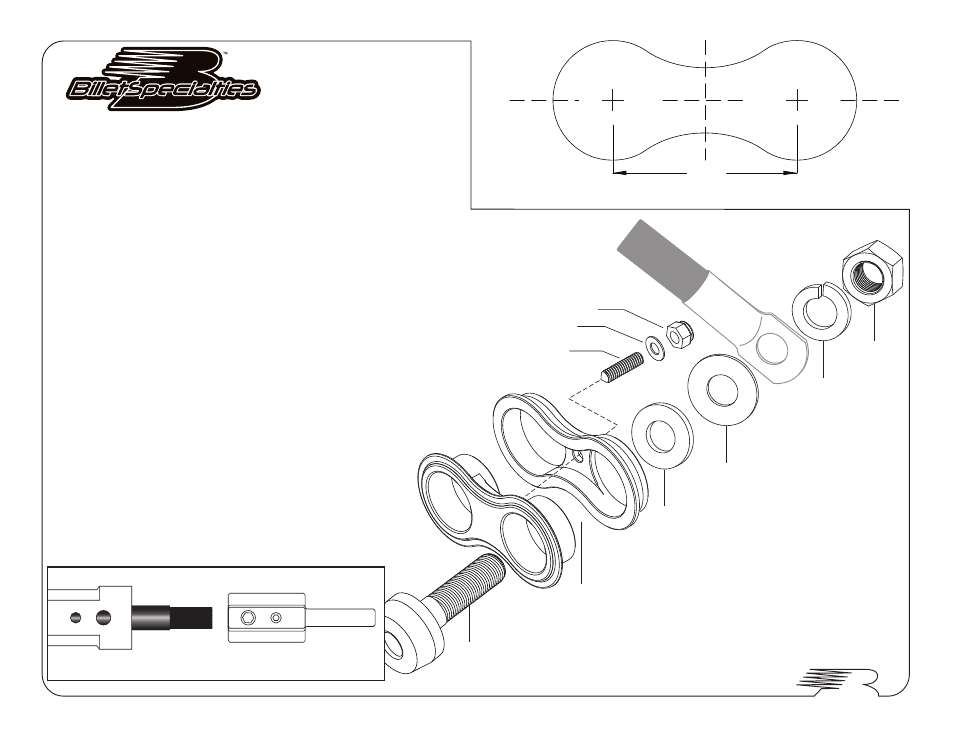
#248860 / #248865 - Battery Lug Bracket Panel Mount
CUT TEMPLATE - USE 1-3/8” Bi-Metal Hole Saw
Nylon Bung with Female Charging Lug
Panel Mount Battery Lug Bracket
Nylon Lug Washer
1/4-20 Lock Nut
Flat Washer
1/4-20 Socket Set Screw
Flat Washer
Lock Washer
1/2-20 Hex Nut
2.125
1 or 2 Gauge Wire - Strip Approx 3/4 in.
MALE LUG ASSEMBLY
1/2” Battery Terminal (Not Supplied)
Install between flat washer & lock washer