0gu048z-2 final p4p9.pdf, Nstructions d, Nstallation – Factory Direct Hardware Toto CST423EF Eco Lloyd User Manual
Page 4: Contenu de l`emballage, Toilet tank fill valve instructions e-max, Dimensions recommandées, Toto u.s.a., inc, Type a type b
ENGLISH
S I
A
Ç
N
A
R F
Alimentation
1/2” (1,27mm)
Lisez attentivement ces instructions avant toute installation.
Vous venez de faire l`acquisition de l`une des meilleures
toilettes à chasse d`eau disponibles sur le marché actuel
et garanties par l`excellente renommée mondiale
de TOTO
®
.
Mettez ces instructions à la disposition des clients. Ces
instructions comprennent des informations relatives à
l`entretien et
à la garantie de votre toilette.
OUTILS NECESSAIRES:
•
Clй а molette de 10” (25,40 cm)
•
Niveau à bulle d`air
• Scie à main pour métaux
•
Mètre à ruban
•
Pince à main
•
Tournevis plat
•
Couteau à mastiquer
M A T ERIEL SUPPLEMENTAIRES
:
(PAS FOURNIS PAR TOTO
®
)
• Anneau de cire de la cuvette
• Boulons de montage de la bride de sol des toilettes
(En général, 2 Boulons en T, 2 Rondelles métalliques et 2 Ecrous)
• Conduites d`eau
(En général, une compression de 1/2” et un robinet à flotteur de 7/8”)
• Siège des toilettes (Sof
tclose
®
recommandé)
REV 04/08
0GU048Z-2
*
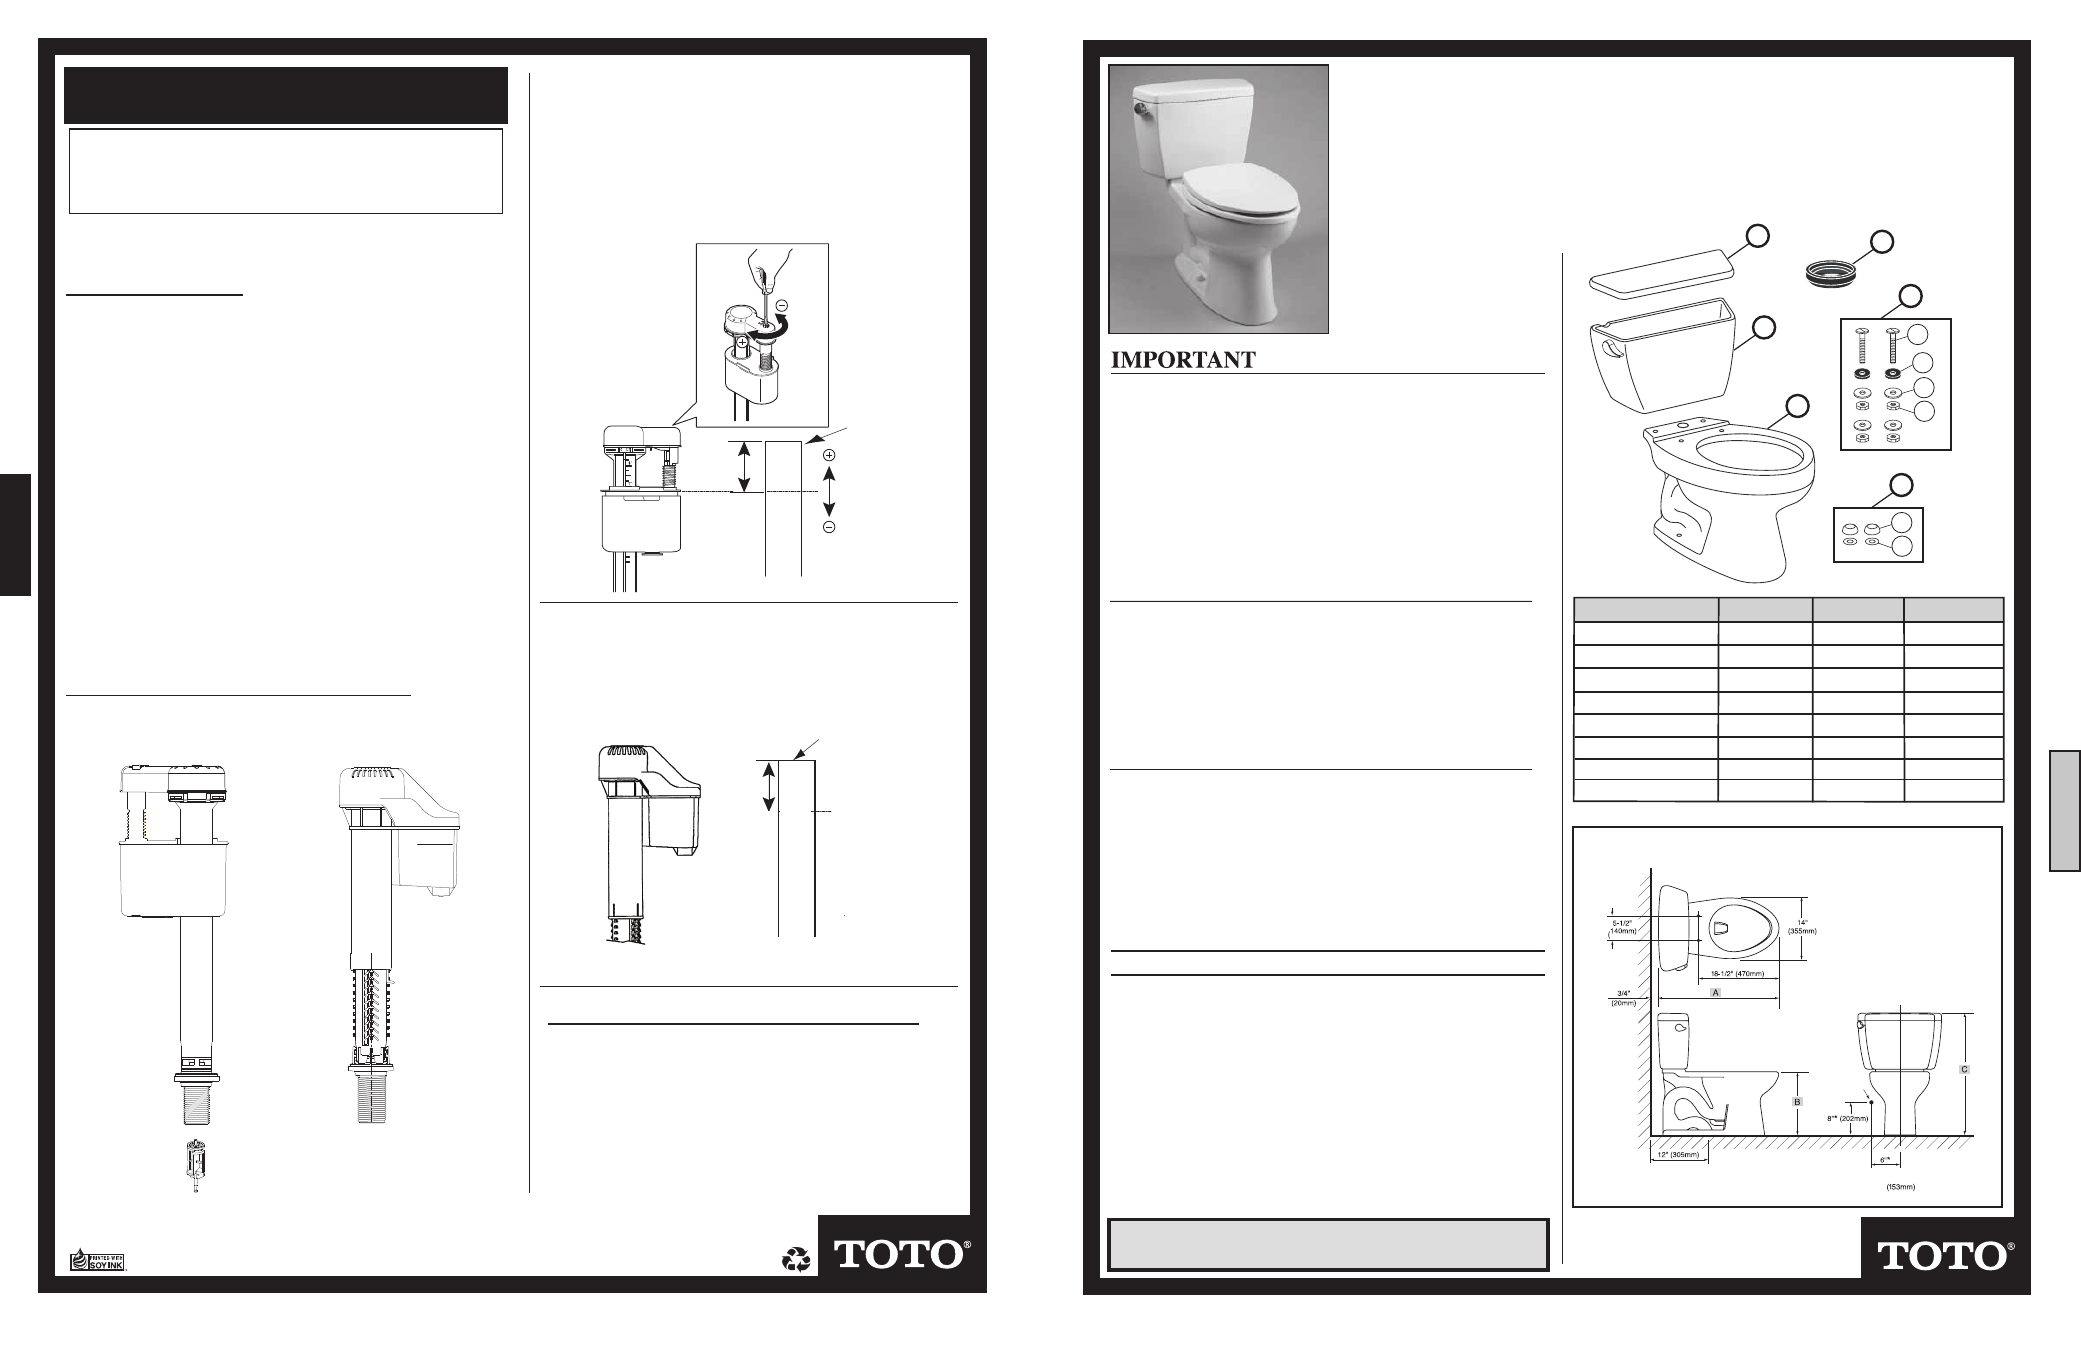
Dimensions Recommandées
Contenu de l`emballage:
Article Description
Quantité
1
Couvercle du Réservoir (vitrifiée en porcelaine) 1
2
Réservoir ( vitrifiée en porcelaine )
1
3
Cuvette ( vitrifiée en porcelaine )
1
4
Joint Réservoir-Cuvette
1
5
Quincaillerie Réservoir-Cuvette
a. Boulons (métallique)
2
b. Rondelles (caoutchouc)
2
c. Rondelles (métallique)
4
d. Ecrous (métallique)
4
6
Capot de brides (pour la cuvette)
e. Bouchons (plastique)
2
f. Support (plastique)
2
Remarque : Due à la puissante performance de nos systèmes de chasse d`eau E-max
TM
qui ne sont pas spécifiés pour une installation Dos-à-dos. La seule façon d`installer ces WC
Dos-à-dos, est lorsque l`égout de connexion du cabinet inclus un élément WYE. Prendre soin de
contacter votre constructeur ou l`entrepreneur avant toute installation.
I
NSTRUCTIONS D`
I
NSTALLATION
INSTALLATION
WATER LEVEL ADJUSTMENT
OPERATION (NOTE TO OWNER)
WARNING! DO NOT USE IN-TANK BOWL CLEANERS
The use of high concentration of chlorine or chlorine-related products can
seriously damage fittings in the tank. This damage can cause leakage and
property damage. • TOTO
®
shall not be responsible or liable for any tank fit-
ting failure or damage caused by the use of in-tank bowl cleaners.
TOILET TANK FILL VALVE INSTRUCTIONS
E-Max
TM
1. Shut OFF water supply to toilet.
2. Flush toilet and remove remaining water from tank with a sponge.
3. Remove the water supply connection at the fill valve.
4. Remove old fill valve and use damp sponge to clean hole in tank.
5. Place new fill valve inside tank hole.
6. Thread mounting nut onto fill valve shank and tighten nut.
Note: DO NOT OVERTIGHTEN. Be sure to install fill valve in a
position that does not interfer with the trip lever operation.
7. Connect water supply to fill valve shank and hand tighten only.
Note: DO NOT OVERTIGHTEN. These are plastic parts.
Never use pipe dope on any water supply connection.
8. Attach refill tube to fill valve nipple and clip other end of refill
tube to the overflow pipe.
9. Turn water supply ON and check for leaks outside the tank.
Note: As water fills the tank, water is also directed into the
overflow tube via the refill tube. This additional flow
of water is critical to refilling your toilet’s bowl. Once the
water stops filling the tank, some residual drops of water
may drip from the fill valve. This is NORMAL as these
drops will subside.
Depending on the manufacturing plant, you may have one
or the two of following fill valves.
You have chosen a TOTO
®
product that is superior in quality
and craftsmanship. Our toilet flushing systems are the
best in the industry. To insure that your toilet is performing
correctly, always flush the toilet with a full stroke of the
trip lever to activate the flushing cycle. A full stroke will
guarantee that you are flushing with the power of a TOTO
®
.
If you need advice on your installation or Fill Valve Service
Instructions, feel free to contact one of our Technical
Support members at the number below.
TOTO U.S.A., Inc.
• 1155 Southern Rd, Morrow, GA 30260 Tel. (888) 295-8134 • Fax (800) 699-4889
www.totousa.com Printed in U.S.A. TOTO LTD.
©
Type A
Type B
Top of
Overflow Tube
WATER
LEVEL
4
9
Pour Toilettes: CST423EF/ CST424EF(G)/
CST454CEF(G)/ CST743E/CST744E/
CST744EL/ CST754EF(N)/ CST784EF
WL
Top of overflow tube
WL
TOTO U.S.A., Inc.
www.totousa.com Printed in U.S.A. TOTO LTD.
©
1
2
3
4
5
6
a
b
c
d
e
f
For Type A fill valve,
refer to water level (WL) setting marked
on the inner wall of the tank. Allow the water to fill the tank
Turn the adjustment screw clockwise in the (+) direction to
increase the water level height. Turn the adjustment screw
counter-clockwise in the (-) direction to decrease the water
level height. Flush the toilet to verify the correct water level.
Adjust as necessary.
For Type B fill valve, there are no water level adjustments.
THE FILL VALVE HAS BEEN PRESET AT THE FACTORY.
Model
A
B
C
CST424EF(G)
28-1/4”
16-1/8” 33-1/2
”
CST454CEF(G)
28-1/2“
16-1/8”
29-1/2
“
CST743E
26-3/8”
14-5/8”
28-1/2”
CST744EL
28”
16-1/2”
30-1/2”
CST744E(G)
27-3/4”
14-5/8”
28-1/2”
CST754EF(N)
28-1/8”
16-1/8”
32-1/2”
CST784EF
28-1/2”
16-1/8”
32-1/2”
CST423=EF(G)
26-3/8”
16-1/8” 33-1/2
”