Factory Direct Hardware Pfister G134-344 Pfirst Series User Manual
Page 7
7
17
18
19
20
18 FLUSHING
After installation is complete, remove Aerator Housing (18A). Turn Valve (18B) on
and allow both hot and cold water to run for at least one minute each. While water
is running, check for leaks. To clean the aerator, disassemble Aerator Housing (18A)
by separating the Aerator Head (18C), Basket (18D) and Washer (18E). Once parts
have been cleaned, reassemble by reversing steps.
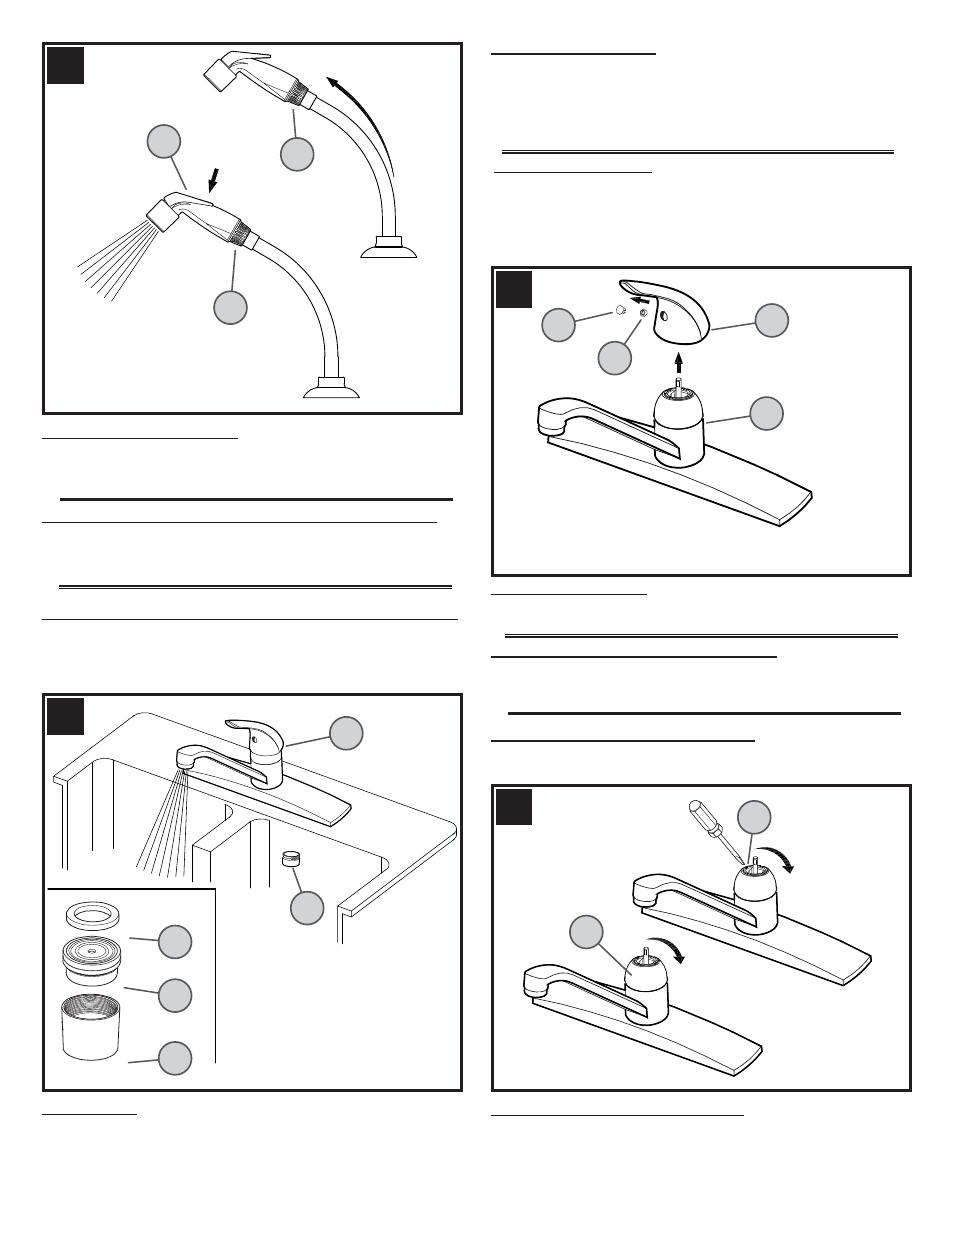
19 HANDLE REMOVAL
With valves in closed position, detach Decorative Button (19A), unscrew Fastener
(19B) and remove Handle Hub (19C) from Valve Stem (19D).
17 SIDE SPRAY OPERATION
The Side Spray (17A) can be pulled forward to spray water in any direction. To
activate the Side Spray, press the Toggle Button (17B) located on the back of the
Side Spray (17A).
20 TROUBLE SHOOTING THE VALVE
Leaks Underneath Handle: Tighten the Adjusting Ring (20A) by turning it clockwise
with a small screwdriver. Move the ball stem to the ON position and continually
tighten the Adjusting Ring (20A) until the leak stops. If leak does not stop, loosen
the Adjusting Ring (20A) and tighten the entire Cap Assembly (20B) by turning it
clockwise. Re-tighten the adjusting ring and replace handle.
18 Español: ENJUAGUE
Luego de efectuar la instalación, retire la caja del aereador (18A). Abra las válvulas
(18B) y deje correr el agua fría y caliente por lo menos un minuto cada una. Mientras
el agua corre, verifique que no existan fugas. Para limpiar el aereador, desarme la
caja del aereador (187A) separando el cabesa del aereador (18C), la cesta (18D) y
arandela (18E) del aereador. Una vez que haya limpiado las partes, reensámblelas
siguiendo estos pasos en orden inverso.
19 Español: CÓMO QUITAR LAS MANIJAS
Manteniendo las válvulas en la posición cerrada, quite el botón decorativo (19A),
desenrosque el sujetador (19B) y saque el núcleo de la manija (19C) del vástago
de la válvula (19D).
17 Español: FUNCIONAMIENTO DEL ROCIADOR LATERAL
El rociador lateral (17A) puede tirarse hacia adelante para rociar agua en cualquier
dirección. Para activar el rociador lateral, oprima el botón basculante (17B) situado
en la parte posterior del rociador lateral (17A).
.18 Français : RINÇAGE
Une fois l’installation terminée, retirer le boîtier d’aérateur (18A). Ouvrir les robinets
(18B) laisser couler l’eau chaude et l’eau froide pendant au moins une minute
pour chaque robinet. Contrôler l’étanchéité pendant que l’eau coule. Pour nettoyer
l’aérateur, démonter son boîtier (18A) en séparant le têé (18C), la crépine (18D) et
la rondelle (18E). Une fois que les pièces sont nettoyées, procéder au remontage
dans l’ordre inverse du démontage.
19 Français : DÉPOSE DES MANETTES
Les robinets étant en position fermée, détacher le bouton décoratif (19A), dévisser la
fixation (19B) et retirer le moyeu de manette (19C) de la tige de robinet (19D).
17 Français : FONCTIONNEMENT DE LA DOUCHETTE LATÉRALE
Il est possible de tirer la douchette latérale (17A) vers l’avant pour pulvériser de l’eau
dans n’importe quelle direction. Pour l’activer, appuyer sur la commande articulée
(17B) qui se trouve sur l’arrière de la douchette (17A).
17A
17B
17A
18A
18B
18E
18D
18C
19B
19A
19D
19C
20A
20B