Go to step 11, Go to step 7, Go to step 5 – Factory Direct Hardware Pfister G134-344 Pfirst Series User Manual
Page 3
3
2
3
4
Thank you for purchasing this Price Pfister product. All Price Pfister products are carefully engineered,
and factory tested to provide long trouble-free use under normal conditions. This faucet is easy to
install using basic tools and our easy to follow illustrated instructions. If you have any questions
regarding this product, contact your local distributor.
2 SHUT OFF WATER SUPPLY
Locate water supply inlets and shut off the water supply valves. These are usually
found under the sink or near the water meter. If you are replacing an existing faucet,
remove the faucet from the sink and clean the sink surface thoroughly.
3 TOOLS RECOMMENDED
• Plumber's putty
• Slotted screwdriver
• Philips head screwdriver
• Pliers
• Adjustable wrench
• Flashlight
• Cloth
1 BEFORE PROCEEDING
WARNING:
Read all the instructions completely before proceeding. Price Pfi ster recommends
calling a professional if you are uncertain about installing this product!
This product should be installed in accordance with all local and state plumbing and building codes.
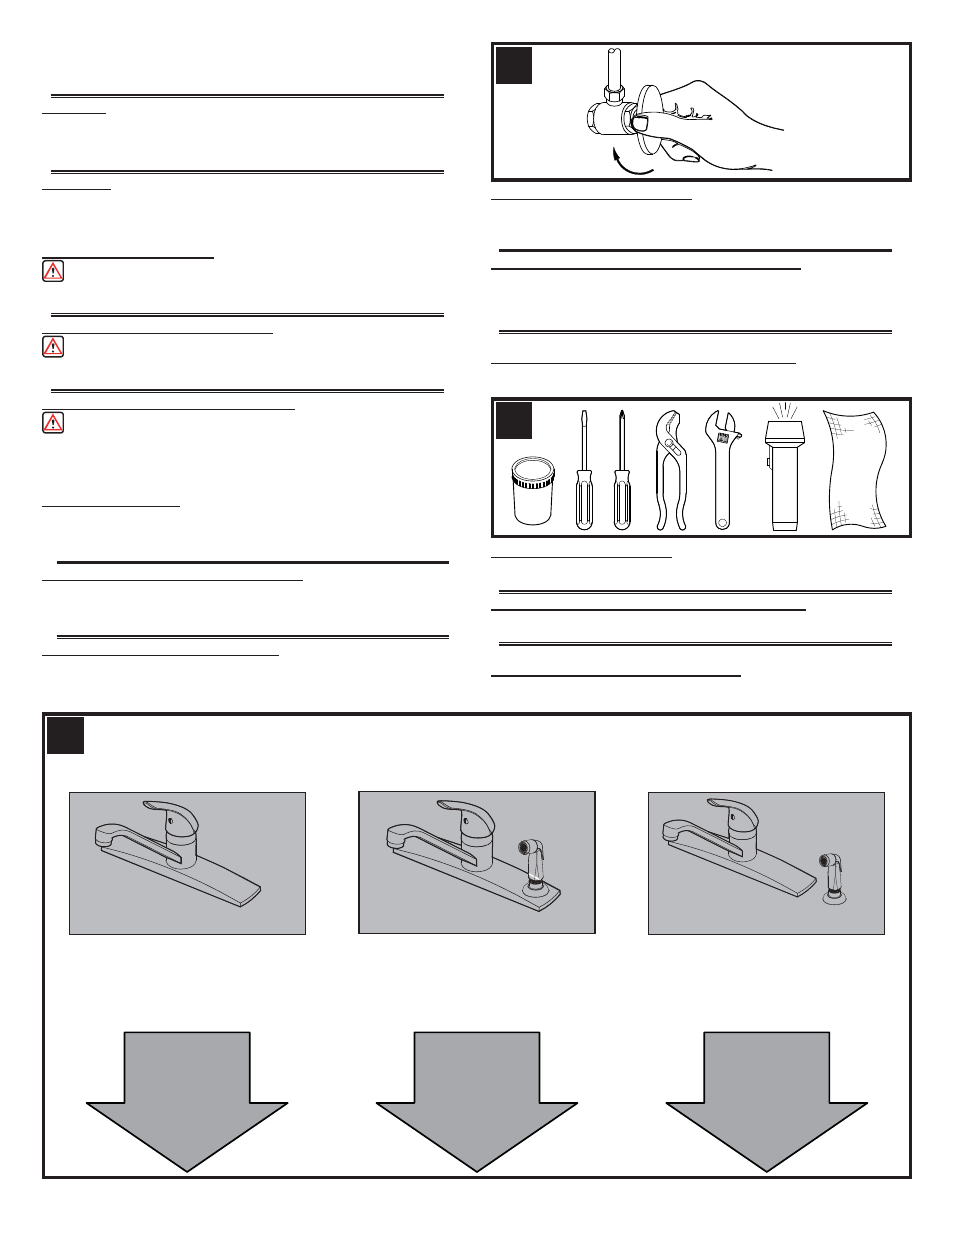
These instructions cover three different installations:
Estas instrucciones cubren tres instalaciones distintas:
Ces instructions s’appliquent à trois installations différentes :
3 HOLE INSTALLATION NO
SIDE SPRAY
INSTALACIÓN EN 3 AGUJEROS
SIN ROCIADOR LATERAL
INSTALLATION 3 TROUS
SANS DOUCHETTE LATÉRALE
3 HOLE INSTALLATION WITH
SIDE SPRAY
INSTALACIÓN EN 3 AGUJEROS
CON ROCIADOR LATERAL
INSTALLATION 3 TROUS
AVEC DOUCHETTE LATÉRALE
134-4
4 HOLE INSTALLATION WITH
SIDE SPRAY
INSTALACIÓN EN 4 AGUJEROS
CON ROCIADOR LATERAL
INSTALLATION 4 TROUS
AVEC DOUCHETTE LATÉRALE
Go To Step 11
Go To Step 11
Continúe con el
Continúe con el
Paso 11
Paso 11
Passer à l’étape
Passer à l’étape
11
11
134-3
Go To Step 7
Go To Step 7
Continúe con el
Continúe con el
Paso 7
Paso 7
Passer à l’étape
Passer à l’étape
77
134-1
Go To Step 5
Go To Step 5
Continúe con el
Continúe con el
Paso 5
Paso 5
Passer à l’étape
Passer à l’étape
55
Español:
Gracias por haber comprado este producto Price Pfister. Todos los productos Price
Pfister están diseñados cuidadosamente y son sometidos a pruebas en la fábrica para ser utilizados
sin problemas bajo condiciones normales. Este grifo es fácil de instalar con herramientas básicas y
nuestras instrucciones ilustradas fáciles de seguir. Comuníquese con su distribuidor local si tiene alguna
pregunta sobre este producto.
2 Español: CIERRE EL SUMINISTRO DE AGUA
Ubique las entradas del suministro de agua y cierre las válvulas de suministro de
agua. Generalmente se encuentran debajo del fregadero o cerca del medidor de
agua. Si se trata de un reemplazo de grifo, quite el grifo viejo y limpie completamente
la superficie del fregadero.
3 Español: HERRAMIENTAS RECOMENDADAS
• Masilla para plomeria • Destornillador en cruz
• Destornillador ranurado
• Pinzas
• Llave ajustable
• Linterna de baterías • Toalla
1 Español: ANTES DE PROCEDER
ADVERTENCIA:
Antes de proceder, lea completamente todas las instrucciones. Price Pfi ster
recomienda llamar a un profesional si no se está seguro acerca de cómo instalar este producto.
Este producto debe instalarse de acuerdo a los códigos de plomería y de construcción locales y estatales.
à la plomberie et à la construction.
2 Français : COUPURE DE L’ARRIVÉE D’EAU
Repérer les arrivées d’eau et fermer leurs robinets. Ces robinets se trouvent générale-
ment sous le lavabo ou à côté du compteur d’eau. En cas de remplacement d’un robinet
Français :
Merci d’avoir acheté ce produit Price Pfister. Tous les produits Price Pfister sont fabriqués
avec soin et contrôlés à l’usine pour offrir une longue durée de service sans problème dans des conditions
d’utilisation normales. Il est facile de poser ce mitigeur à l’aide d’un outillage de base et de nos illustrations
très claires. Pour toute question concernant ce produit, contacter le distributeur local.
existant, le déposer du lavabo et nettoyer soigneusement la surface de ce dernier.
3 Français: OUTILS RECOMMANDÉS
• Mastic de plombier
• Tournevis Phillips
• Clés à ouverture variable
1 Français : AVANT DE COMMENCER
AVERTISSEMENT :
lire attentivement toutes les instructions avant de procéder à la pose.
Price Pfi ster recommande de faire appel à un professionnel en cas d’incertitude quant à l’installation
de ce produit !
Ce produit doit être installé conformément à l’ensemble de la réglementation locale et provinciale
applicable
INSTALLATION TIME
The average estimated time for installing this kitchen faucet is 60 minutes. This estimated time only
involves this product and does not include the removal of old faucet. This estimated time will vary
depending on many variables such as the install application, the skill level of the installer, the type of
plumbing (iron pipe, copper, fl exible, PEX), the type of tools used, etc.
Français : TEMPS D’INSTALLATION
Le temps moyen estimé pour installer ce robinet de cuisine est 60 minutes. Ce temps estimé implique seulement
ce produit et n’inclut pas le déplacement du vieux robinet. Ce temps estimé changere selon beaucoup de
variables comme l’application d’installation, le niveau de compétence de l’installateur, le type de tuyauterie
(pipe de fer, cuivre, fl exible, PEX), le type d’outils utilisés, excetera.
Español: TIEMPO DE LA INSTALACIÓN
El tiempo promedio para instalar este grifo de la cocina es 60 minutos. Este estimado de tiempo implica
solamente este producto y no incluye quitar el grifo viejo. Este estimado de tiempo variará dependiendo de
muchas variables por ejemplo la aplicacion de la instalación, el nivel de habilidad del instalador, el tipo de
plomería (pipa de acero, cobre, fl exible, PEX), el tipo de herramientas usadas, etcetera.