Factory Direct Hardware Toto LT183 User Manual
Page 3
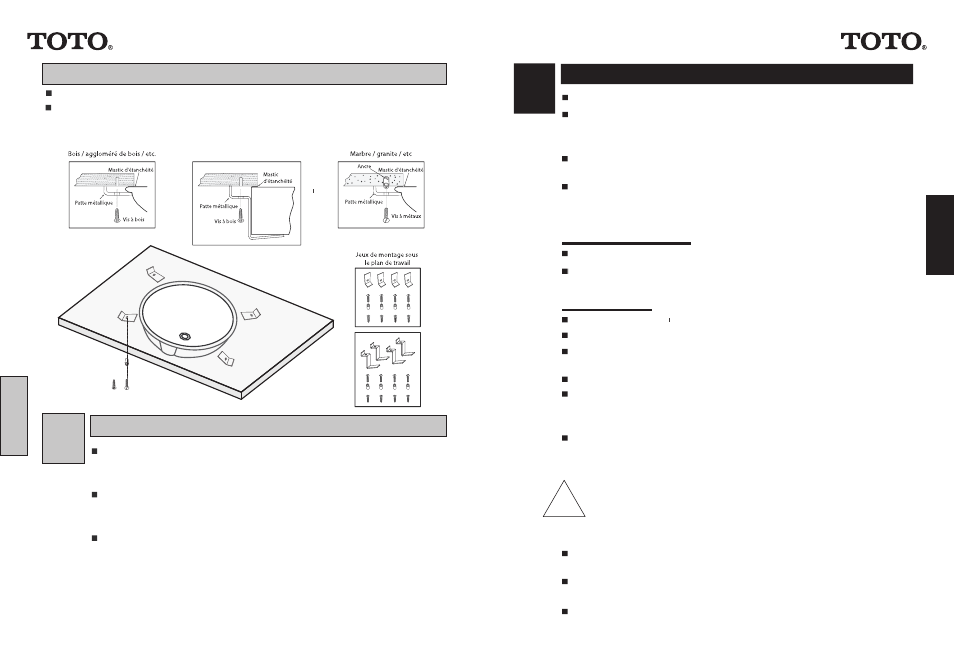
SCHÉMA D'INSTALLATION
Le robinet et l'égout du lavabo ne sont pas inclus.
PRÉPARATION À L'INSTALLATION
1
Si nécessaire, couper l'alimentation d'eau et déposer l'ancien lavabo.
Inspecter les tuyaux d'égout et d'alimentation et les remplacer selon
le besoin.
Utiliser le gabarit fourni avec le lavabo. En cas d'installation de
remplacement, vérifier que la découpe existante est de la même taille
ou plus petite que celle nécessaire pour le nouveau lavabo.
Le lavabo sous le plan de travail doit être installé par un
professionnel avec de l'expérience. Le non respect de ces
instructions peut causer des dommages du produit ou des biens,
ainsi que des blessures.
NOTA - Installer le lavabo de manière à rendre possible la dépose
future de l'appareil de sous le plan de travail.
10
Or
LT546 / LT548/ LT553 (bois montré)
NOTA - LT546 / LT548 / LT553 ou similaire
Run water into lavatory and check entire installation for leaks.
INSTALLATION OF THE LAVATORY
2
Cutout the template along the inside of the cutting line.
Place the template on the counter-top, and ensure there is enough
clearance for faucet and trim. Also, check the clearance for the cabinet
beneath the counter top.
Trace around the template. Also, mark the center line of faucet and
mounting screw location.
Cut out the opening by cutting along the traced line from template
Drill the hole for the anchors at the marked location and set them into
counter-top using setting tool and hammer.
Carefully turn the counter upside down and mark the anchor locations.
Marble / Stone Counter-Top
!
Warning
DO NOT OVERTIGHTEN the screws. May damage the products and
cause personal injury and/or property damage
NOTE: Minimum counter thickness of 1” (25.4mm) is required for the
provided installation hardware.
Pre-drill the wood screw holes and water-seal the exposed area.
Mark the screw location on the counter-top using the template.
Install the counter-top, if not installed. Drill the faucet hole per
manufacturer’s specification.
Install the faucet and drain fitting per manufacturer's instructions.
Wipe away excess sealant and fill any voids as necessary. Allow sealant to
set for 30 minutes.
Connect the trap to the drain and complete faucet installation per
manufacturer’s specifications.
Apply a continuous bead of sealant to the top surface of the lavatory rim
where it will contact the counter-top.
(SEALANT NOT PROVIDED WITH THE LAVATORY)
Position lavatory squarely under the cutout and mount the lavatory via
provided brackets and screws. Use appropriate screws for wood and
marble/stone counter top.
Wood Counter-Top
3
ENGLISH
FRENCH
Les dimensions d’installation et performance hydraulique conforment ou exédent
tous les normes du CAN/CSA B45 et d’ANSI/ASME A112.19.2 pour porcelaine vitrifiée
et A112.19.1 pour materiel en fonte.