Airbagit Air Management User Manual
Page 13
A I R B A G I T. C O M S U S P E N S I O N S
2 6 0 S . H I B B E R T, M E S A , A Z P H . 8 0 0 - 8 4 2 - 8 7 8 9
11
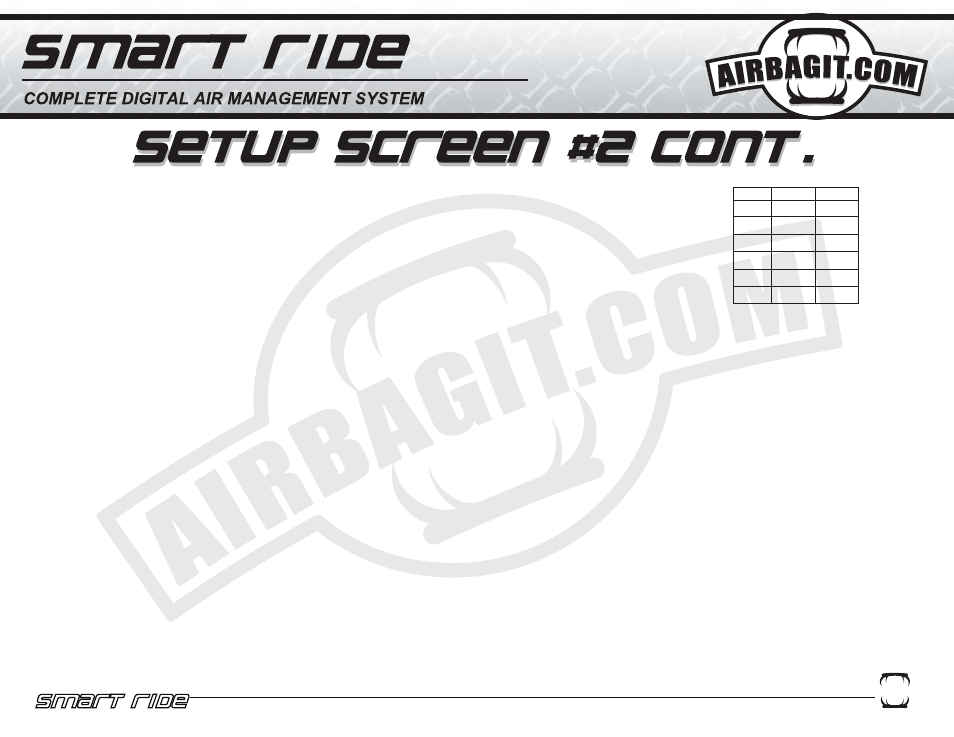
1-4. Speed Settings: These Speed Settings control the pulse frequency for when the vehicle is lifting or dropping
the airbags. The valves will pulse whenever the system is moving towards a preset. Press the corresponding
button to change the speed settings for either the Front Lift, Front Drop, Rear Lift, and Rear Drop. To test these
speed settings, Make sure Pulse on Manual Control is set to 1 or on (SEE #8 BELOW), exit out of the Setup
Screen by pressing the center of the Smart-Ride button, now press one of the manual valve control buttons
i.e. FR UP. The settings range from 00-50.
5. PSI Tolerance: This adjustment controls the pressure tolerance when the system is in Pressure Sensor only mode. This controls how close the
system will try to get to the target preset pressure. This adjustment only applies when the height sensors are unplugged and when the system is in
“Pressure Sensor” Mode. This is controlled with the RR Drop button. Default = 10
6. Height Tolerance: This adjustment controls the height tolerance when the system is in Height Sensor mode. This controls how close the system
will try to get to the target preset height. This adjustment overrides the PSI tolerance when the height sensors are plugged in. This value is changed
by pressing the RR Up button to cycle through the tolerance options Default = 1.2
Note on Tolerance: The Height and Pressure Tolerance settings should not be set tighter than the movement of the vehicle in 1 pulse. To verify this,
enable the “Pulse on Manual Control” option that is described in the Setup Screen #2 page. Once this is enabled, press the “D” button to start the
compressor. Let the compressor run until it shuts off at its set Tank High Pressure. Next, press each “Manual Control Button” and read the move-
ment displayed on the LCD in the height section or pressure section. The amount of movement found must be less than the tolerance setting.
For Example: If one pulse moves the Rear Right from 4.2 to 5.1 than the Height Tolerance shouldn’t be any smaller than 0.9.
7. Ignition Rise to Preset #1: This option turns off “00” or on “01” to control if the vehicle will go to “Preset #1” when the ignition is turned on. This
option can be used in both the “Pressure Sensor mode” or “Height Sensor Mode” and is controlled with the “5” button. Default = 0
8.Pulse on Manual Control: This option turns off “00” or on “01” to control if the valve outputs are constant or pulsed. This only applies to the
manual controls i.e. FR up. Default =0
9-10. Tank High and Low Pressure: This adjustment controls the pressure at which the compressor starts and stops running and is controlled with
the All Up, All Dump buttons and the FR UP and FR DOWN buttons. Note: The Tank pressure will always be higher than the Low Tank Pressure.
300psi max. Default = 90 on 120 off.
11. Ignition Compressor Control: This option allows you to set the compressor to run whenever the tank is low regardless of whether or not the
ignition is turned on. If this option is turned on then the compressor will only run when the tank is low and when the LCD is turned on. Note: When
the ignition is turned off the LCD will remain lit for 30 secs and then turn off. Pressing any button will turn on the LCD controller. 2 beeps will turn this
option off and 4 beeps will turn this option on.
Speed
Setting
Valve “On”
Time
Valve “Off”
Time
00
Full
0
10
0.1 sec 0.1 sec
20
0.5 sec 0.3 sec
30
0.1 sec 0.5 sec
40
0.5 sec 0.8 sec
50
0.1 sec 1.0 sec
Speed Settings
BELOW IS A DESCRIPTION OF THE BUTTON AND OPTION SHOWN ON THE
PREVIOUS PAGE