GlowShift Tinted Series Transmission Temperature Gauge User Manual
Tinted series - transmission temperature gauge
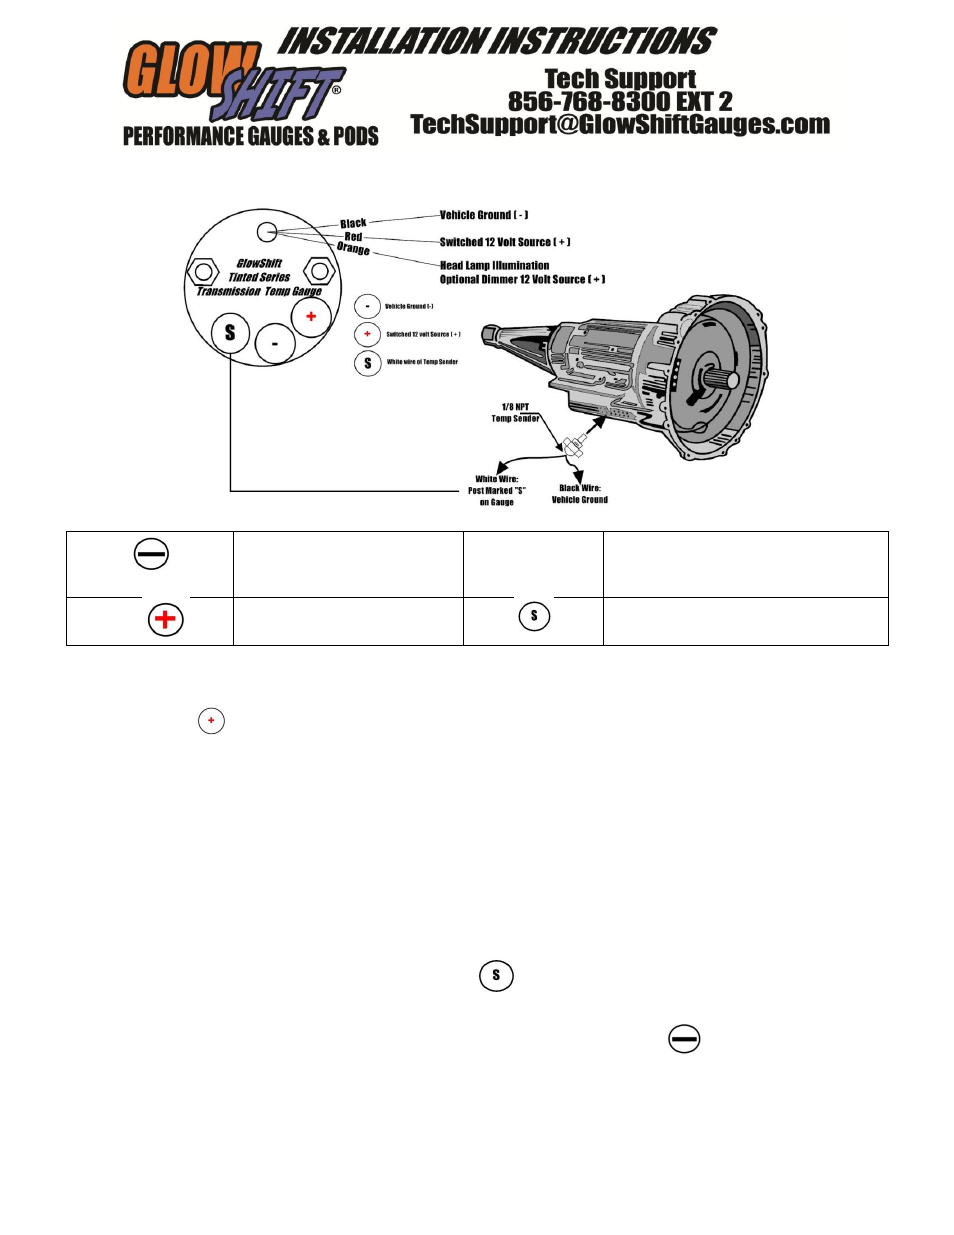
Tinted Series - Transmission Temperature Gauge
For Product Numbers: GS-T12
Wire Color Code
Black,
POST,
Black Sender Wire
Vehicle Ground ( - )
Orange
12v Dimmer (switched) Source (+)
Red,
12v Ignition Source (+)
Connected to the white wire on the
temperature sensor unit
1. Disconnect the negative battery cable.
2. Using automotive grade wiring (18 gauge), connect
the red wire and
POST to a positive 12 volt
ignition (switched) source. It may be connected to the
fuse panel, an accessory wire, or any positive 12 volt
source that turns on and off with the ignition switch of
the vehicle.
If wiring to an un-fused source, install a 3 amp fuse
inline within 20 inches of the sources connection.
You may obtain an optional “add a circuit”
accessory. This component easily fits into your fuse
panel and provides an additional fused power wire
for accessories such as gauges. This is available at
www.GlowShift.com or a local auto parts store.
3. (Optional) The dimming feature of the Tinted Series
decreases the brightness of the lighted gauge face 30%.
Connect the orange wire to a positive 12 volt switched
source. The most common installation is to splice and
connect to the 12 volt positive headlight source. This
step is completely optional.
This gauge should never be connected to a
dimmer. Connecting the gauge to any type of
dimmer switch unit will cause the gauge to
improperly function.
4. There are two common types of transmission
temperature sender unit installations:
Transmission Test Port:
Most vehicle transmissions
come equipped with a test port location. This may be
located on either the driver or passenger sides of the
transmission near the transmission oil pan. The bolt in
this port should be removed and the sensor fitted in its
place. Confirm port and thread size with your vehicle
dealer or owner’s manual.
Replace Stock Sensor:
The second is to remove the
stock sender unit for the warning light on your dash. In most
vehicles this sensor is not connected to your PCM and
removing it will not affect anything. YOU MUST confirm this
with your dealer or owner’s manual before removing and
replacing the sensor with the GlowShift unit.
5. Connect the white temperature sender wire to the
POST on the back of the gauge.
6. Connect the black wire,
POST and black sender
wire to any good (unpainted) ground connection. You may
also route a wire directly to the negative side of the
vehicle’s battery.
7. Reconnect the negative battery cable.
Be sure all of your wiring is correct for proper gauge operation.