Assembly, Warning, Type 1 – BabyTrend 9185 - EXPEDITION LX - JET User Manual
Page 5: Type 2
Copyright © 2007 - 2008, Baby Trend Inc., All Rights Reserved.
Copyright © 2007 - 2008, Baby Trend Inc., All Rights Reserved.
7
8
Fig. 8
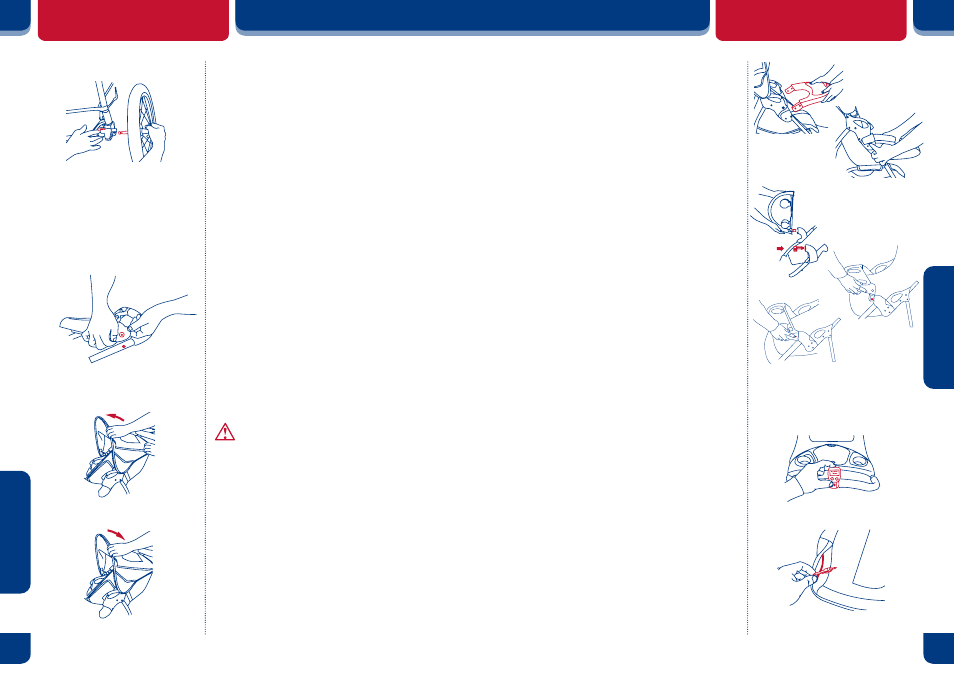
REAR WHEEL
Lean the stroller forward to rest on the front
wheel. To attach the rear wheels, push each
wheel's axle into the plastic corner fitting as
shown in Fig. 8. Depress the metal lever on the
inside of the corner fitting as you push the axle
into corner fitting. When the wheel will not go
on any farther, release the lever. Check that the
wheel has locked into the corner fitting by pulling
on the wheel. If not locked, lift upward on the
lever, push the wheel on farther and release lever.
Ensure that the wheels are firmly locked
into place.
NEVER
use the stroller if the
wheels are not locked into place, contact our
customer service department immediately at
1-800- 328-7363, between the hours of 8:00am
and 4:30pm PST, for assistance.
PARENT TRAY
To attach the parent tray, align the fittings on the
ends of the parent tray with the fittings on the
outsides of the handle. Hook the hole in the parent
tray. Pull outward on the opposite end while
pushing down on the tray until locked onto the
stoller handle. Please be careful not to pinch your
fingers when installing the parent tray. (Fig. 9) To
remove the parent tray, pull outward on one end of
the tray while lifting upward.
WARNING:
Do not place
hot liquids or more than 3 pounds
in the parent tray. Serious burns or
unstable conditions could result.
CANOPY
To open the canopy: push forward on the front
edge of the canopy while holding the rear of
canopy in place. (Fig. 10a)
To fold the canopy: pull backwards on the front
edge. (Fig. 10b)
ASSEMBLY
T
ype 1
&
2
CHILD TRAY
(if equipped)
TYPE A:
To attach the front child tray: line up make
fittings of the child tray with the female fitting on the
outside of the center joint and push inward (toward the
rear of the stroller) until locked in place. (Fig. 11a)
To remove the front child tray: depress the
button on the underside of the male fitting and pull
the tray outward to remove. (Fig. 11b)
TYPE B:
To attach the front child tray: Insert the tray clip
into the fitting on the stroller’s fold joint. Check
the tray clip locks into place. (Fig. 11c) Push the
angled tray onto the post at the end of the right
armrest, while pressing downward on the snap
button, until locked into place. Rotate the tray
downward until latched onto the left armrest.
Please check that the snap button comes through
and securely latches the tray in place. (Fig. 11d)
To open the front child tray: press inward on left
side tray release button and rotate upward on the
tray. Please see figure 11e. Please note that you
may remove the tray completely by depressing the
buttons on each side while pulling forward on the
tray.
INFANT CAR SEAT
(if equipped)
Please refer to the infant car seat instruction
manual for more details.
PEDOMETER
(if equipped)
The pedometer is located in a seperate box inside
the main box. Silde the pedometer onto the
provided mounting bracket as shown in
Fig. 12. Instructions on how to use the pedometer
are included in the seperate box. Caution: When
folding the stroller, please make sure to rotate
the pedometer inside towards the parent tray to
prevent damage when folded.
MP3 SPEAKER
(if equipped)
The canopy comes with a speaker sewn into a
mp3 storage pocket on the side of the canopy. The
speaker has a wire with a male jack for use with
mp3 player so you and your child can listen to
music while you jog. Connect male end of speaker
wire into your mp3 player. (Fig. 13)
Your stroller is now ready to use.
T
ype 2
ASSEMBLY
Fig. 9
Fig. 10a
Fig. 10b
Open
Close
Fig. 13
Fig. 11a
Fig. 11b
Fig. 12
Fig. 11c
Fig. 11d
Fig. 11e